5.2 Creating and Maintaining Communities
Communities are very much like Organizations except that they are not hierarchical. They are designed instead to be islands to themselves which anyone from any organization (or from no organization at all) can join. Use Communities in any situation where you need to cut across the organizational structure of your portal, or where you have a site that would apply to almost anybody. For example, the home page for the Intranet is probably best placed in a community that any member of the portal can access.
Communities are groupings of pages and users based on shared interests or skills. And, a user can belong to any number of communities. Examples of communities might include:
-
A human resources community where staff members discuss issues related to health insurance.
-
A tech support community of users who have the skills to provide technical support to an organization.
-
A marketing community where marketing personnel shares marketing and corporate information.
The Dashboard default home page is in a community called Guest, and this is where you would put your public web site. As you can see, there are several scenarios in which you would want to use something like a community instead of an organization, and this is why they have a distinct role within Liferay Portal.
Communities can be created and managed in two ways. The first is through the , like every other user/page collection. The second is through the portlet, which can be added to any page. Why two ways? Because the portlet also doubles as a way to navigate from community to community, and allows users to browse the list of communities.
Permissions can be assigned to users to delegate community management tasks. For more information, see Section 11.0, Portal and Community Permissions.
Every community must have at least one page (represented by a tab) to be active, but there is no limit on the number of pages that a community can have.
After a community is named, define its characteristics and add content pages. Consider the following:
-
Every community must have at least one page (represented by a tab) to be active, but there is no limit on the number of pages that a community can have.
-
Pages can be private or public. A public page can be accessed by a guest who has the appropriate URL. A private page can only be accessed by users who are logged in and assigned to the community.
-
URLs must be defined for public and private pages.
-
A default look and feel can be set for all private and public pages.
NOTE:You are already a member of the organizations you create. By creating an organization, you become both a member and have the Organization Owner role, which gives you full rights to the organization.
To create and configure communities:
5.2.1 Creating a New Community
To create a community:
-
Do one of the following:
-
Go to a page that has a portlet.
Click .
-
Click and select .
Under , select .
Click .
-
-
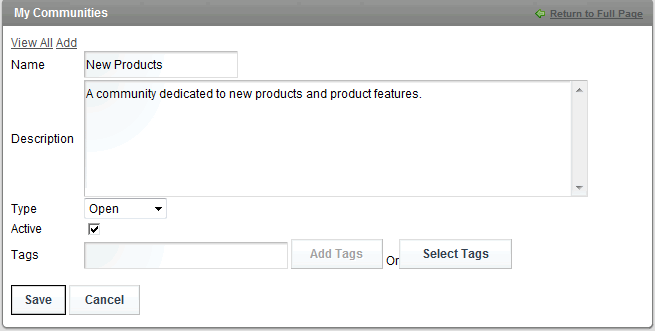
Name the new community and optionally add a description.
-
Select one of the following to indicate the type of community:
-
Open: Appears in the portlet and users can join and leave the community whenever they want.
-
Restricted: Appears in the portlet but users must request membership and be approved before joining.
-
Private: Does not appear in the portlet. Users are added manually by a community administrator.
-
-
Deselect the check box to inactivate the community and no data can be added to it.
-
Specify keywords in the field to identify the community and leverage the portals tagging feature.
-
Click .