3.3 Custom Classes and Class Customizations for CMS
Custom classes can be created to use with CMS. Any class can be customized to show custom CI menu options. The following sections describe how to implement both:
3.3.1 Creating Classes to Utilize CIM Qualifiers
MetaModel libraries have default classes used to register configuration items; you can also create new classes to define your environment. When creating a new class, you can specify CIM qualifiers that pull in specialized CIM model attributes for items of that class. Or, if you have preexisting classes that you know will be used to define CMS objects, edit the properties for that class to update the settings.
For additional information about working with classes and metamodels, see the Operations Center 5.6 Service Modeling Guide.
To create a class:
-
In the Explorer pane, expand > .
NOTE:You can create a new folder to organize classes created for CIM Qualifiers. Right click and select to create a new folder.
-
Right-click the desired folder, then select to open the dialog:

-
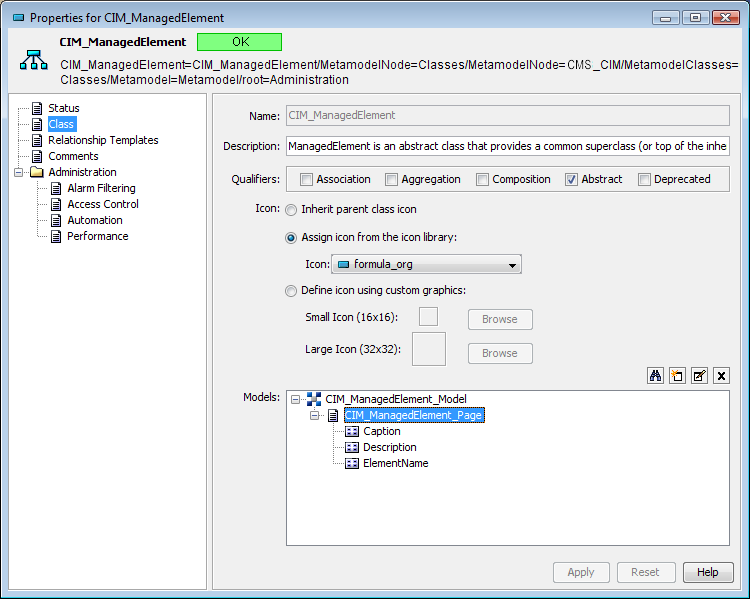
Specify a name and description of the class in the and fields.
-
Select any options in the section to apply CIM model qualifier attributes as appropriate:
Association: The class defines a relationship between two objects.
Aggregation: The class defines a relationship between parent and child objects.
Composition: The class defines a relationship where the child object is a part of the parent. In this case, the child can only have one parent.
Abstract: The class serves as a base to define new classes.
Deprecated: The class is obsolete and is only used for backwards support only.
For more information about creating and modifying classes, see the Operations Center 5.6 Service Modeling Guide.
-
To assign an icon to the class, select one of the following options:
Inherit parent class icon: Reuses the class’ parent icon. This assumes the class is created as a child of another class. If the parent is not a class, but a folder, then the default formula_org icon is used.
Assign icon from the icon library: Select this radio button, click the drop-down list, then select the existing icon to display for the class.
Define icon using custom graphics: Select this radio button, and , click , navigate to the icon, then click . The selected icon displays on the Create Class dialog box.
If the icon graphics are later edited or replaced, it is necessary to restart the server in order to display the updated icons.
-
To make the class available as search criteria when finding elements, select the check box.
For more information, see the Operations Center 5.6 Service Modeling Guide.
-
Select one or more behavior model definitions to apply to elements of this class using one of the following steps:
-
Click
 Browse to select one or more behavior model definitions.
Behavior model definitions contain a list of property pages that show for elements of this class.
-
Click
 Create a Class Model to create a behavior model to open the Create Model dialog box.
For more information, see the Operations Center 5.6 Service Modeling Guide.
-
Click
 Edit to display the behavior model and to edit it.
-
-
Click .
The new class displays in the hierarchy.
3.3.2 Customizing Classes for Custom Links to External Web Sites from CI Menus
Classes can be customized to offer various hyperlinks as options in the CI’s right-click menu. If a link is defined high enough in the class hierarchy then all CIs of any child class inherit the functionality.
When this custom menu type is selected in CMS, a new browser window opens and attempts to access the external Web site.
When defining these links as a class property, the following rules apply:
-
Menu operation definitions uses a minimum of two name value pairs separated by double colons (::) and a pipe symbol (|) internally. Optionally, window feature arguments can be specified separated by commas.
name|Option_Label::popupurl|URL_and_Parameters::windowfeatures|window_argument_name=window_argument_value,window_argument2_name=window_argument2_value
For example,
name|Google::popupurl|http://www.google.com::windowfeatures|width=800,height=600,windowname=_GOOGLE
URL values must be fully qualified Web addresses. Window feature are standard window attributes for the JavaScript window.open method such as width, height, location, menubar, resizable, scrollbar, titlebar, toolbar, left and top. Not all window features are supported by all browsers. If the browser doesn't recognize a specific feature, it simply ignores it.
-
The property’s script expression should return a multi-line string wth each URL specified on a single line.
-
The NOC Script must contain valid syntax. For more information on FormulaScript, see the Operations Center 5.6 Scripting Guide.
-
Operations defined for a class are automatically inherited by any sub-classes.
In the procedure below, we illustrate how three different types of URLs might be called including a simple URL, a URL passing the element name as a parameter, and a JavaScript alert box showing the element name.
For more information about creating Property Pages and Properties, see the Operations Center 5.6 Service Modeling Guide.
To add custom hyperlinks to external sites to CI of a specific class:
-
In the Operations Center console pane, expand > > to the desired class definition.
-
Right-click the class and select . The dialog opens:
-
Click to select the property page definition (in our example, this is the object) under and click
. The opens:

-
Click
. The dialog opens.

-
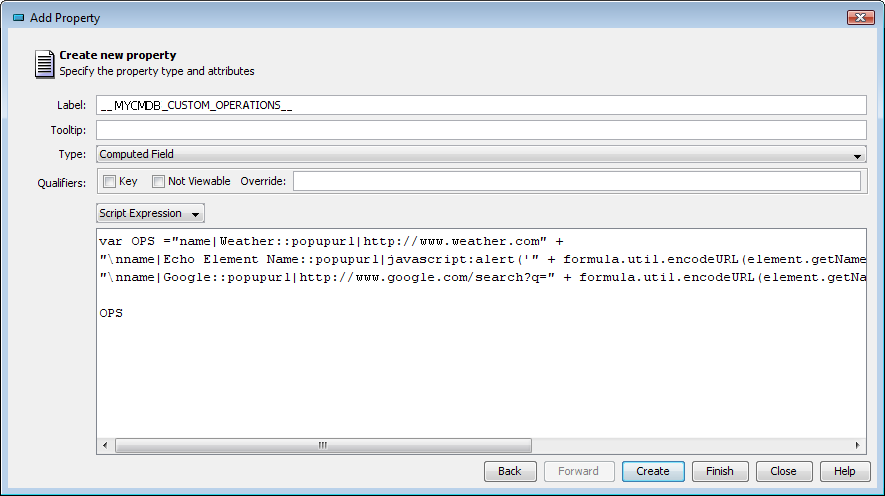
Type __MYCMDB_CUSTOM_OPERATIONS__ in the field.
IMPORTANT:__MYCMDB_CUSTOM_OPERATIONS__ must be specified as the property name for this feature to work. In addition, note that this value starts and stops with double underscores.
-
(Optional) Specify a description in the field.
-
Click . The dialog updates.
-
Select in the drop-down list.
For more detailed information about features and functionality in this dialog, see the Operations Center 5.6 Service Modeling Guide.
-
Select from the drop-down list below the section.
-
Using FormulaScript, specify the script necessary to define the menu options.
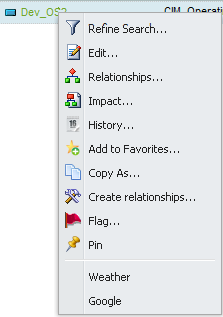
For example, we defined 3 menu options. The first opens www.weather.com, the second opens a JavaScript alert with the element name, and the third opens a google search for the element name:
var OPS ="name|Weather::popupurl|http://www.weather.com" +"\nname|Echo Element Name::popupurl|javascript:alert('" + formula.util.encodeURL(element.getName()) + "')::windowfeatures|width=800,height=600,windowname=_SCRIPTTEST" +"\nname|Google::popupurl|http://www.google.com/search?q=" + formula.util.encodeURL(element.getName()) + "::windowfeatures|width=800,height=600,windowname=_GOOGLE"OPS
-
Click .
The menu options show under standard menu options when right-clicking on any CI belonging to the class (or sub-class) in CMS.