5.3 Using Reporting
CMS has a variety of report types that are available by default. Community owners and producers can create community reports that can be accessed by community members. You can also create any number of personal reports to meet your needs.
To view reports exported from CMS to into the Mircosoft Excel, Word, or PowerPoint formats, you need Mircosoft Office 2003 or later.
The following sections cover how to run CMS reports:
5.3.1 Understanding the Reports Page
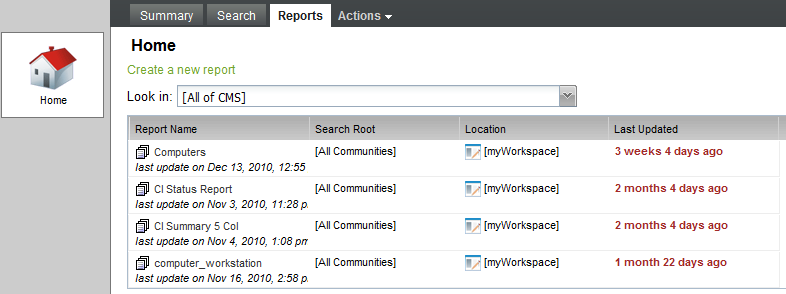
All reports can be accessed from the Reports page:
Figure 5-3 A list of Saved Reports is found under the Reports Tab
From the Reports page you can run reports or create a new one:
Figure 5-4 CI Details and CI Attribute Chart Reports
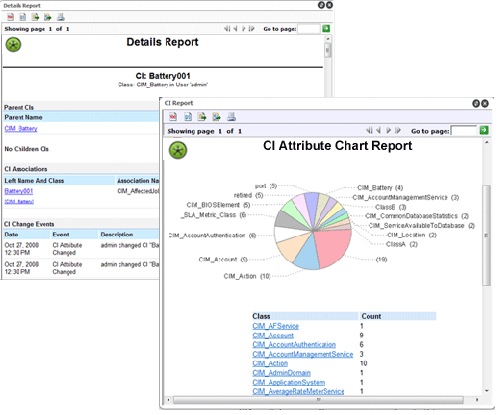
Table 5-1 lists the default reports included with CMS.
Table 5-1 CMS Reports
|
Name |
Description |
|---|---|
|
CI Attribute Chart |
Summarizes an attribute for a container (such as objectClass), showing a pie chart of the breakdown by the hits on that attribute. For example, if run on the Contact attribute, it charts the people whose contact name shows up. |
|
CI Details |
Details specified values for the CIs. |
|
CI Impacts |
Lists impacted CIs. |
|
CI Summary (Flags) |
Lists flags on a CIs. |
|
CI Summary (5 column) |
Shows the values for specified attributes for each CI. |
|
CI Summary (Multiple Attributes) |
Shows the values of multiple attributes for each CI. |
All reports have the following features, including exporting data and reports:
Table 5-2 Report Options
|
Icon |
Description |
|---|---|

|
Opens a Table of Contents |

|
Run report |

|
Export data |

|
Export report |

|
Print report |

|
Reloads the report |
5.3.3 Running a Quick Report on a Single CI
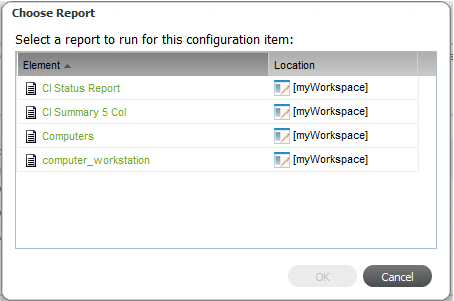
CMS lets you run a report on a selected CI. This feature runs an existing report on a selected CI. If no reports have been created yet, you should do that first. For more information, see Section 5.3.5, Creating Reports.
To run a report on a single CI:
-
From search results or the pinboard, right-click the desired CI, then select from the drop-down list to open the Choose Report dialog box:
Another way to run a report on a single CI is to click while editing the CI.
-
Click the line of the report type to run on the CI to select it, then click to run the report.
-
Click any of the links to drill in to item details.
-
(Optional) Click
() to return to the original report.
5.3.4 Running Reports
The Reports page for each community contains access to all reports created for that community by the community owner or community producers. Any personal reports you create can be accessed from the Reports page for myWorkspace or the Public area.
To run a report:
-
From the Reports page or the pinboard, right-click the report name, then select to run the report.
-
Click any of the links to drill in to item details.
-
(Optional) Click
() to return to the original report.
5.3.5 Creating Reports
There are a couple of ways to create a report. One is by going through the Reports page. However, one of the easiest ways is to first refine search until it contains a list of desired CIs, then save it as a report.
To create a new report from a Search:
-
Use a search to build a query that matches your specifications for the report.
For instructions on searching, see Section 5.2, Searching in CMS.
-
When you are satisfied with the search results, click
 () to open the Save Report dialog box:
-
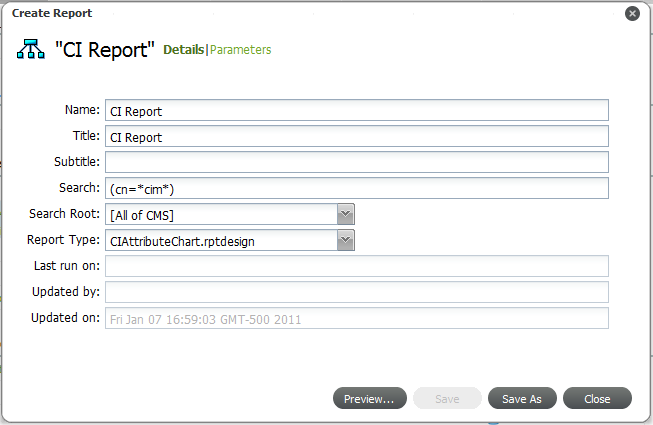
Specify the report details:
-
Specify the desired report name in the field.
This is the name of the report when it shows in a list of available reports.
-
Specify the report title in the field.
This is the main heading shown at the top of the actual report.
-
Specify a subtitle in the field.
This is the secondary heading shown at the top of the actual report.
-
From the drop-down, select the scope of the report.
-
From the drop-down list select the report type.
-
Select from the following options:
CIAttributeChart: To run a report charting the number of hits on a specific attribute.
CIDetails: To run a report showing CI information.
CIImpacts: To run a report showing the CIs impacted by the selected CI.
CISummary5Column: To report on up to 5 specified attributes for each CI.
CISummaryFlags: To show flags for each CI.
CISummaryMultipleAttribute: To report on attributes for each CI.
-
-
Click to specify any report parameters.
For a description of each report parameter, see Section 5.3.2, Understanding Report Parameters.
-
At anytime, do one of the following:
-
Click to view what the report will look like.
-
Click to save the report.
-
-
If you decided to preview the report, check to make sure everything is as expected.
-
Return to the Create Report dialog box to save the report after everything is set up properly:
-
Click to open the Save As dialog box.
-
In the field, specify the name of the report.
-
From the drop-down list, select or the desired community.
-
Click .
-