2.5 Configuring the Dashboard Integration
Before using the AppManager Operations Portal, there are configurations that must be performed to the Operations Center Dashboard to further customize the portal integration, layout, and “look & feel”.
To configure the Operations Center Dashboard:
-
Add the following line to the /OperationsCenter_Dashboard_install_path/server/webapps/ROOT/WEB-INF/classes/portal-ext.custom.properties file:
default.regular.theme.id=netiq_WAR_netiqtheme
-
Start the Operations Center Dashboard.
For detailed steps and descriptions, see
Starting and Stopping the Dashboard
in the Operations Center 5.6 Dashboard Guide. -
On the installation server, using your Web browser, access the URL of the Dashboard server:
http://server:dashboard_port
For example, the Dashboard is installed on your current machine and the HTTP port (Operations Center Dashboard Configuration Manager) set to 8080, then point your browser to:
http://localhost:8080
When successful, the guest home page for the Dashboard displays.
-
Use the Sign In portlet to log in using the Operations Center admin account.
-
Click Welcome and select Control Panel.
-
Do the following to set the default portal theme:
-
Under Portal, select Communities.
-
Click Actions next to the Guest community, and select Manage Pages.
The page updates to Edit Pages for Community: Guest.
-
Under Public Pages, click the Look & Feel tab.
-
In the Available Themes section, click AppManager.
The page updates to show the AppManager theme under Current Themes.
-
Click the Back tab.
The page updates to the Communities listing.
-
-
Do the following to create the AppManager Operations community:
-
Click Add.
The page updates to show the create community form.
-
Type AppManager Operations in the Name field.
-
(Optional). Type a description in the Description field.
-
Select Restricted from the Type drop-down list.
-
Click Save.
The page updates to the Communities listing.
-
-
Do the following to import AppManager Operations Portal configurations:
-
Click Actions next to the AppManager Operations community, and select Manage Pages.
The page updates to Edit Pages for Community: AppManager Operations.
-
Switch to the Export/Import tab.
-
Click Import.

-
Click Browse, and navigate to and select the /OperationsCenter_Dashboard_install_path/NetIQControlCenter/AppManager.lar file.
-
Click Open.
The file name displays in the field.
-
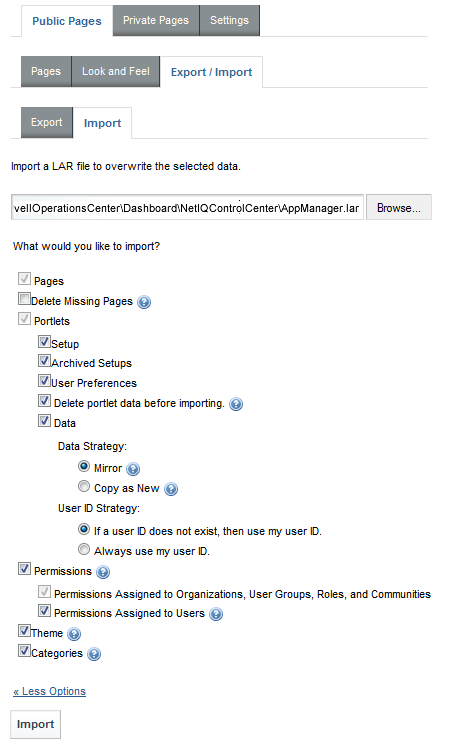
Click More Options and select from the options provided to configure what is imported from the file.
The following options are recommended (shown in the above illustration):
-
Pages
-
Portlets
-
Select all check box sub-options.
-
Select Mirror under Data Strategy.
-
Select If a user ID does not exist, then use my user ID. under User ID Strategy.
-
-
Permissions
-
Select all sub-options.
-
-
Theme
-
Categories
-
-
Click Import.
-
-
Click Back to Guest to exit the Control Panel.
-
Log out of the Operations Center Dashboard.
-
Stop the Operations Center Dashboard.
For detailed steps and descriptions, see
Starting and Stopping the Dashboard
in the Operations Center 5.6 Dashboard Guide. -
Add the following lines to the /OperationsCenter_Dashboard_install_path/server/webapps/ROOT/WEB-INF/classes/portal-ext.custom.properties file:
auth.forward.by.last.path=true
default.landing.page.path=/web/appmanager-operations/starting-point
-
Restart the Operations Center Dashboard.
For detailed steps and descriptions, see
Starting and Stopping the Dashboard
in the Operations Center 5.6 Dashboard Guide. -
Do one of the following:
-
Continue to Section 3.0, Using the AppManager Operations Portal to configure and use the portal.
-
Continue to Section A.0, Advanced Administrative Topics to import AppManager Control Center user accounts.
-