3.7 Using Sequential-Access Storage for Long Term Data Storage
Sentinel Log Manager requires the data to be on a storage system that supports random access, such as data on your typical hard drive.It does not support interfacing with the data stored on tape directly.
You can also search the raw data directly by using tools such as egrep or a text editor, but this search may not be sufficient for your requirements. The search mechanism provided by Sentinel Log Manager on event data is much more powerful than these tools.
The high-level approach to configure Sentinel Log Manager is to retain data for a longer duration so you can perform searches and run reports on the data you regularly need to access, and to copy the data to tape before Sentinel Log Manager deletes it. To search or run reports on data that was copied to tape, but deleted from Sentinel Log Manager, copy the data from the tape back to Sentinel Log Manager.
This section describes how to use tape or any other storage mechanism that Sentinel Log Manager does not support.
3.7.1 Determining What Data You Need to Copy to Tape
There are two types of data in Sentinel Log Manager:
-
Raw Data: For more information on raw data, see Section 3.1.1, Raw Data.
-
Event Data: For more information on event data, see Section 3.1.2, Event Data.
If you want to perform searches or reports on the data, copy both the raw data and the event data to tape so that you can copy both sets of data back into Sentinel Log Manager, when the data is needed. If you want to store data only to comply with legal requirements, copy only the raw data to the tape.
3.7.2 Backing Up Data
Events should be moved to networked storage regularly. The following types of data can be backed up in Sentinel Log Manager:
Configuration data: This option includes non-event or raw data backup. It is faster because it contains small amount of data, including all the installation directories except the data directory.
Data: This option backs up all the data in the local storage and networked storage directories. This option takes a longer time to complete.
NOTE:Networked storage directories can be located on a remote machine.
Some of the best practices that you can follow are:
-
Periodically export all the Event Source Management configurations and save them. When the environment is relatively stable, you can generate a full Event Source Management export including the entire tree of the Event Source Management components. This action captures the plug-ins as well as the configuration of each node. The resulting .zip file should be backed up and moved to networked storage as a normal file.
If changes such as updating plug-ins or adding nodes are made to Event Source Management later, you must export the configuration and save it again.
-
Back up the entire installation directory, instead of particular sections, so there is no risk of manual mistakes and the process is quicker.
For information on backing up and restoring data, see Section C.0, Backing Up and Restoring Data.
3.7.3 Configuring Storage Utilization
You should configure local and networked storage space to store data before the data is deleted from the Sentinel Log Manager server. While configuring the storage space, ensure that your storage system is not 100% utilized to avoid undesirable behaviors such as data corruption. Additionally, you should also have additional space in your networked storage to copy data from tape back into Sentinel Log Manager. You do this by decreasing the archive utilization setting.
3.7.4 Configuring Data Retention
You can configure the duration for the data to remain on the disk before it is deleted. If your hard drive storage space is not sufficient to store data long enough to meet your legal requirements, you can use tape storage to store data beyond the specified duration.
You must configure data retention policies so that the data that you want to search and report is retained within the Sentinel Log Manager server until you no longer need it. Additionally, a data retention policy should ensure that Sentinel Log Manager is not prematurely deleting the data because of storage utilization limits. If the storage utilization limit is exceeded and you notice that the data is being prematurely deleted, change the data retention policy to expand the data storage space.
3.7.5 Copying Data to Tape
You can set up a process to copy raw data and event data to tape, depending on the data that you need.The following sections describe how each type of data is stored in Sentinel Log Manager so that you can set up copy operations to copy the data out of Sentinel Log Manager onto tape.
Copying Raw Data to Tape
Raw data partitions are individual files. They are created every hour, and are closed within 10 minutes after the elapsed time. When a raw data file is closed, it is renamed to identify it as a closed file. Files in the open state have a .open extension. When they are closed, they are renamed to have a .log extension. At a configured interval, after they are closed, they are compressed and stored in a .zip file. After the files are compressed, they are moved to networked storage from the local storage.
The directory hierarchy in which the raw data files are placed is organized by the event source and the date of the raw data. You can use this hierarchy to periodically copy a batch of raw data files to tape. For more information on raw data directory hierarchy, see Table 3-1, Raw Data Directory Structure.
You cannot copy files that are in the process of being compressed. You must wait until the raw data files are compressed and moved to networked storage before copying them to tape.The presence of a .log file with the same name as the zip file indicates that the file is still in the process of being compressed.You must also ensure that the raw data files are copied to the tape before the interval configured in the Raw Data Retention policy expires so that the data is not lost.
Copying Event Data to Tape
Event data partitions are created every 24 hours, but they are not closed for roughly 48 hours (in case some data arrives late). Event data is stored in the data/eventdata directory with subdirectory names prefixed with the year, month, and day when the partition was created (yyyymmdd). For example, the path to a complete event data partition, relative to the installation directory, is data/eventdata/20090101_408E7E50-C02E-4325-B7C5-2B9FE4853476. You can use this hierarchy to know when a partition is closed. Subdirectories whose date is at least 48 hours old should be in the closed state.
For more information on the event data directory hierarchy, see Table 3-3, Event Data Directory Structure.
You should wait until event data partitions have been copied to networked storage before copying them to tape. Before you copy, make sure that the directory is not currently being copied from local storage. To do this, see if there is a local storage directory partition of the same name. If the corresponding local storage directory partition is not present, the networked storage directory partition is not being copied. If the corresponding local storage directory partition is still present, make sure that all of the files in the local storage directory partition are also in the networked storage directory partition and that they are all of the same size. If they are all present and of the same size, it is highly likely that they are not currently being copied.
3.7.6 Restoring Data
The event data restoration feature of Novell Sentinel Log Manager enables you to restore old, lost, or deleted event data. You can also restore the data from other systems. You can select and restore the event partitions by using the Sentinel Log Manager user interface. You can also control when these restored event partitions expire.
NOTE:The Data Restoration feature is a licensed feature. This feature is not available with the free or trial licenses. For more information, see Section 13.1, Understanding the Licenses.
Enabling Event Data for Restoration
To enable event data for restoration, you must copy the event directories that you want to restore to one of the following locations:
-
The local storage data directory on the Sentinel Log Manager server. For example, /var/opt/novell/sentinel_log_mgr/data/eventdata
-
The eventdata_archive directory of the configured networked storage directory of the Sentinel Log Manager server.
Viewing Event Data Available for Restoration
-
Log in to Sentinel Log Manager as an administrator.
-
Click the link in the upper left corner of the page, then select the tab.
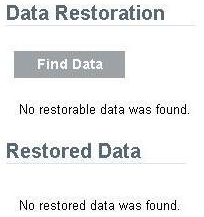
The Data Restoration section does not initially display any data.It looks similar to the following graphic:
-
Click to search and display all event data partitions available for restoration.
The Data Restoration table chronologically lists all the event data that can be restored. The table displays the date of the event data, the name of event directory, and the location. The column indicates whether the event directory was found in the local data directory of Sentinel Log Manager or in the configured networked storage directory.
-
Continue with Restoring Event Data to restore the event data.
Restoring Event Data
-
Select the check box in the column next to the partition that you want to restore.
Click to select all partitions listed.
Click to deselect all the selected partitions.
The button is enabled when the Data Restoration section is populated with the restorable data.
-
Click to restore the selected partitions.
The selected events are moved to the section. It might take approximately 30 seconds for the section to reflect the restored event partitions.
-
(Optional) Click to search for more restorable data.
-
To configure the restored event data to expire according to data retention policy, continue with Configuring Restored Event Data to Expire.
Configuring Restored Event Data to Expire
The restored partitions do not expire by default, according to any data retention policy checks.To enable the restored partitions to return to the normal state and also to allow them to expire according to the data retention policy, select for data that you want to expire according to the data retention policy, then click .
The restored partitions that are set to expire are removed from the Restored Data table and returned to normal processing.
It might take about 30 seconds for the Restored Data table to reflect the changes.