2.2 Creating Roles
To implement RBAC, you must first define all of the roles within your organization and the permissions attached to each role. A collection of users requiring the same access can be assigned to a single role. Each user can also be assigned to one or more roles and receive the collective rights associated with the assigned roles. A role policy consists of one or more rules, and each rule consists of one or more conditions and an action.
-
In the Administration Console, click > .
-
Select the policy container, then click .
-
Specify a name for the policy, then select for the type of policy.
-
Fill in the following fields:
Description: (Optional) Describe the purpose of this rule. If your role policy contains multiple rules, use the description to identify the purpose of each rule.
Priority: Specify the order in which a rule is applied in the policy, when the policy has multiple rules. The highest priority is 1 and 10 is the lowest.
-
To create a condition for a policy rule, click in the section, then select one of the following:
-
Authenticating IDP: Specifies the identity provider that authenticated the current user. To use this condition, you must have set up a trusted relationship with more than one identity provider. For configuration information, see Authenticating IDP Condition.
-
Authentication Contract: Specifies the contract used to authenticate the current user. The selections in this list are defined in the Identity Server configuration. For configuration information, see Authentication Contract Condition.
-
Authentication Method: Specifies the method used to authenticate the current user. For configuration information, see Authentication Method Condition.
-
Authentication Type: Compares a selected authentication type to the authentication types used to authenticate the current user. For configuration information, see Authentication Type Condition.
-
Credential Profile: Requires the user to use the specified credential for authentication. Only values used at authentication time are available for this comparison. For configuration information, see Credential Profile Condition.
-
LDAP Group: Specifies a group in which the authenticating user is evaluated for membership. For configuration information, see LDAP Group Condition.
-
LDAP OU: Specifies an OU against which the authenticating user's container is evaluated for containment. For configuration information, see LDAP OU Condition.
-
LDAP Attribute: Specifies an attribute from the user object of an authenticated user. By default, the selection values include those defined for the InetOrgPerson class. For configuration information, see LDAP Attribute Condition.
-
Liberty User Profile: Specifies any one of a number of data values that have been mapped to a Liberty Profile attribute. For configuration information, see Liberty User Profile Condition.
-
Roles from Identity Provider: Specifies a role that has been assigned to the user by an identity provider. For configuration information, see Roles from Identity Provider Condition.
-
User Store: Compares a selected user store to the user store where the current user is authenticated. For configuration information, see User Store Condition.
-
Condition Extension: (Conditional) If you have loaded and configured a role condition extension, this option specifies a condition that is evaluated by an outside source. See the documentation that came with the extension for information about what is evaluated.
-
Data Extension: (Conditional) If you have loaded and configured a role data extension, this option specifies the value that the extension retrieves. You can then select to compare this value with an LDAP attribute, a Liberty User Profile attribute, a Data Entry Field, or another Data Extension. For more information, see the documentation that came with the extension.
-
-
(Conditional) To add multiple conditions, repeat Step 5.
For more information on using multiple conditions in a rule, see Section 2.2.2, Using Multiple Conditions.
-
In the section, select one of the following:
-
Activate Role: Select this option to specify a name for the role. If you are creating a role that needs to be injected into an HTTP header, use the capitalization format that the Web server expects.
-
Activate Selected Role: Select this option to obtain the role value from an external source.
For more information about specifying a role or roles to activate, see Section 2.2.3, Selecting an Action.
-
-
Click twice.
-
Click .
-
To enable the role for an Identity Server configuration, see Section 2.6, Enabling and Disabling Role Policies.
2.2.1 Selecting Conditions
You create a role by selecting the appropriate conditions that qualify a user to be assigned to a role, as shown in the following page.
Figure 2-7 Role Policy Conditions

The following sections describe the conditions available for a Role policy:
Authenticating IDP Condition
The Authenticating IDP condition allows you to assign a role based on the identity provider that authenticated the current user. To use this condition, you must have set up a trusted relationship with more than one identity provider. See Configuring SAML and Liberty Trusted Providers
in the Novell Access Manager 3.1 SP3 Identity Server Guide.
The most common way to use this condition is when you have a service provider that has been configured to trust two identity providers and you want to assign a role based on which identity provider authenticated the user. To configure such a policy:
-
Set the Authenticating IDP field to
-
Set the field to Authenticating IDP
-
Select the name of an identity provider
For the condition to evaluate to True, the identity provider specified in the policy must be the one that the user selected for authentication.
Comparison: Specify how the contract is compared to the data in the field. Select either a string comparison or a regular expression:
-
Comparison: String: Specifies that you want the values compared as strings and how you want the string values compared. Select one of the following:
-
Equals: Indicates that the values must match, letter for letter.
-
Starts with: Indicates that the Authenticating IDP value must begin with the letters specified in the field.
-
Ends with: Indicates that the Authenticating IDP value must end with the letters specified in the field.
-
Contains Substring: Indicates that the Authenticating IDP value must contain the letters, in the same sequence, as specified in the field.
-
-
Comparison: Regular Expression: Matches: Specifies that you want the values compared as regular expressions.
Mode: Select the mode appropriate for the comparison type:
-
Comparison: String: Specify whether case is important by selecting or .
-
Comparison: Regular Expression: Matches: Select one or more of the following:
- Canonical Equivalence
- Case Insensitive
- Comments
- Dot All
- Multi-Line
- Unicode
- Unix Lines
For regular expression syntax information, see the Javadoc for java.util.regex.Pattern.
Value: Specify the value you want to compare with the Authenticating IDP value. If you select a static value for the Authenticating IDP value, select and . If you select for the Authenticating IDP value, select , then select the name of an identity provider.
Other value types are possible if you selected for the Authenticating IDP value. Your policy requirements determine whether they are useful.
Result on Condition Error: Specify what the condition returns when the comparison of the two values returns an error rather than the results of the comparison. Select either or . If you do not want the action applied when an error occurs, select . If you want the action applied when an error occurs, select .
Authentication Contract Condition
The Authentication Contract allows you to assign a role based on the contract the user used for authentication. The Identity Server has the following default contracts:
To configure other contracts for your system, click > > > > .
The most common way to use this condition is to select for the field and to select and the name of a contract for the field.
To specify an Authentication Contract condition, fill in the following fields:
Authentication Contract: To compare the contract that the user used with a static value, select . To compare a static value with what the user used, select a contract from the list.
If you have created more than one Identity Server configuration, select the configuration, then select the contract. The name of the contract is displayed. When you select this name, the configurations that contain a definition for this contract are highlighted.
For example, the following policy has selected as the contract.
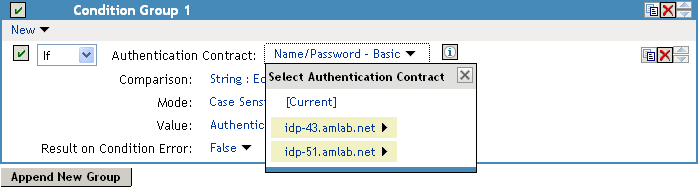
Two Identity Server configurations have been defined (idp-43.amlab.net and idp-51.amlab.net). Both configurations are highlighted because is a contract that is automatically defined for all Identity Server configurations.
If the contract you are selecting for a condition is a contract with ORed credentials, you need to use multiple conditions to set up a rule. See Creating a Rule for a Contract with ORed Credentials.
Comparison: Specify how the contract is compared to the data in the field. Select either a string comparison or a regular expression:
-
Comparison: String: Specifies that you want the values compared as strings and how you want the string values compared. Select one of the following:
-
Equals: Indicates that the values must match, letter for letter.
-
Starts with: Indicates that the Authentication Contract value must begin with the letters specified in the field.
-
Ends with: Indicates that the Authentication Contract value must end with the letters specified in the field.
-
Contains Substring: Indicates that the Authentication Contract value must contain the letters, in the same sequence, as specified in the field.
-
-
Comparison: Regular Expression: Matches: Specifies that you want the values compared as regular expressions.
Mode: Select the mode appropriate for the comparison type:
-
Comparison: String: Specify whether case is important by selecting or .
-
Comparison: Regular Expression: Matches: Select one or more of the following:
- Canonical Equivalence
- Case Insensitive
- Comments
- Dot All
- Multi-Line
- Unicode
- Unix Lines
For regular expression syntax information, see the Javadoc for java.util.regex.Pattern.
Value: Specify the value you want to compare with the Authentication Contract value. If you select a static value for the Authentication Contract value, select and . If you select for the Authentication Contract value, select , then select the name of a contract.
Other value types are possible if you selected for the Authentication Contract value. For example:
-
You can select . The value specified in the text box must be the URI of the contract for the conditions to match. For a list of these values, click > > > > .
-
If you have defined a Liberty User Profile attribute for URI of the authentication contract, you can select then select the attribute.
-
If you have defined an LDAP attribute for URI of the authentication contract, you can select then select the attribute.
Result on Condition Error: Specify what the condition returns when the comparison of the two values returns an error rather than the results of the comparison. Select either or . If you do not want the action applied when an error occurs, select . If you want the action applied when an error occurs, select .
Authentication Method Condition
The Authentication Method allows you to assign a role based on the method the user used for authentication.
Authentication Method: To compare the method that the user used with a static value, select . To compare a static value with what the user used, select a method from the list.
If you have created more than one Identity Server configuration, select the configuration, then select the method. The name of the method is displayed. When you select this name, the configurations that contain a definition for this method are highlighted.
Comparison: Specify how the method is compared to the data in the field. Select either a string comparison or a regular expression:
-
Comparison: String: Specifies that you want the values compared as strings and how you want the string values compared. Select one of the following:
-
Equals: Indicates that the values must match, letter for letter.
-
Starts with: Indicates that the Authentication Method value must begin with the letters specified in the field.
-
Ends with: Indicates that the Authentication Method value must end with the letters specified in the field.
-
Contains Substring: Indicates that the Authentication Method value must contain the letters, in the same sequence, as specified in the field.
-
-
Comparison: Regular Expression: Matches: Specifies that you want the values compared as regular expressions.
Mode: Select the mode appropriate for the comparison type:
-
Comparison: String: Specify whether case is important by selecting or .
-
Comparison: Regular Expression: Matches: Select one or more of the following:
- Canonical Equivalence
- Case Insensitive
- Comments
- Dot All
- Multi-Line
- Unicode
- Unix Lines
For regular expression syntax information, see the Javadoc for java.util.regex.Pattern.
Value: Specify the value you want to compare with the Authentication Method value. If you select a static value for the Authentication Method value, select and . If you select for the Authentication Method value, select , then select the name of a method.
Other value types are possible if you selected for the Authentication Method value. Your policy requirements determine whether they are useful.
Result on Condition Error: Specify what the condition returns when the comparison of the two values returns an error rather than the results of the comparison. Select either or . If you do not want the action applied when an error occurs, select . If you want the action applied when an error occurs, select .
Authentication Type Condition
The Authentication Type condition allows you to assign a role based on the authentication types used to authenticate the current user. The [Current] selection represents the current set of authentication types used to authenticate the user. The other selections represent specific authentication types that can be used to compare with [Current]. The Authentication Type condition returns true if the selected Authentication Type is contained in the set of Authentication Types for [Current]. For example, if the current user was required to satisfy the Authentication Types of Basic and SmartCard, then a selected Authentication Type of either Basic or SmartCard would match.
Authentication Type: To compare the type that the user used with a static value, select . To compare a static value with what the user used, select a type from the list.
Comparison: Specify how the type is compared to the data in the field. Select either a string comparison or a regular expression:
-
Comparison: String: Specifies that you want the values compared as strings and how you want the string values compared. Select one of the following:
-
Equals: Indicates that the values must match, letter for letter.
-
Starts with: Indicates that the Authentication Type value must begin with the letters specified in the field.
-
Ends with: Indicates that the Authentication Type value must end with the letters specified in the field.
-
Contains Substring: Indicates that the Authentication Type value must contain the letters, in the same sequence, as specified in the field.
-
-
Comparison: Regular Expression: Matches: Specifies that you want the values compared as regular expressions.
Mode: Select the mode appropriate for the comparison type:
-
Comparison: String: Specify whether case is important by selecting or .
-
Comparison: Regular Expression: Matches: Select one or more of the following:
- Canonical Equivalence
- Case Insensitive
- Comments
- Dot All
- Multi-Line
- Unicode
- Unix Lines
For regular expression syntax information, see the Javadoc for java.util.regex.Pattern.
Value: Specify the value you want to compare with the Authentication Type value. If you select a static value for the Authentication Type value, select and . If you select for the Authentication Type value, select , then select a type.
Other value types are possible if you selected for the Authentication Type value. Your policy requirements determine whether they are useful.
Result on Condition Error: Specify what the condition returns when the comparison of the two values returns an error rather than the results of the comparison. Select either or . If you do not want the action applied when an error occurs, select . If you want the action applied when an error occurs, select .
Credential Profile Condition
The Credential Profile condition allows you to assign a role based on the credentials the user entered when authenticating to the system. Only values used at authentication time are available for this comparison.
To set up the matching for this condition, fill in the following fields:
Credential Profile: Specify the type of credential your users are using for authentication. If you have created a custom contract that uses a credential other than the ones listed below, do not use the Credential Profile as a Role condition.
-
LDAP Credentials: If you prompt the user for a username, select this option, then select (the cn of the user) or (the fully distinguished name of the user), or .
The default contracts assign the cn attribute to the Credential Profile. If your user store is an Active Directory server, the SAMAccountName attribute is used for the username and stored in the cn field of the LDAP Credential Profile.
-
X509 Credentials: If you prompt the user for a certificate, select this option, then select one of the following:
-
X509 Public Certificate Subject: Retrieves the subject field from the certificate, which can match the DN of the user, depending upon who issued the certificate.
-
X509 Public Certificate Issuer: Retrieves the issuer field from the certificate, which is the name of the certificate authority (CA) that issued the certificate.
-
X509 Public Certificate: Retrieves the entire certificate, Base64 encoded.
-
X509 Serial Number: Retrieves the serial number of the certificate.
-
-
SAML Credential: If your users authenticate with a SAML assertion, select this option.
Comparison: Select one of the following types:
-
Comparison: String: Specifies that you want the values compared as strings and indicates how you want the string values compared. Select one of the following:
-
Equals: Indicates that the values must match, letter for letter.
-
Starts with: Indicates that the Credential Profile value must begin with the letters specified in the field.
-
Ends with: Indicates that the Credential Profile value must end with the letters specified in the field.
-
Contains Substring: Indicates that the Credential Profile value must contain the letters, in the same sequence, as specified in the field.
-
-
Comparison: Regular Expression: Matches: Specifies that you want the values compared as regular expressions.
Mode: Select the mode appropriate for the comparison type:
-
Comparison: String: Specify whether case is important by selecting or .
-
Comparison: Regular Expression: Matches: Select one or more of the following:
- Canonical Equivalence
- Case Insensitive
- Comments
- Dot All
- Multi-Line
- Unicode
- Unix Lines
For regular expression syntax information, see the Javadoc for java.util.regex.Pattern.
Value: Specify the second value for the comparison. Select one of the following data types:
-
LDAP Attribute: If you have an LDAP attribute that corresponds to the Credential Profile you have specified, select this option and the attribute.
-
Liberty User Profile: If you have a Liberty User Profile attribute that corresponds to the Credential Profile you have specified, select this option and the attribute.
-
Data Entry Field: Specify the string you want matched. Be aware of the following requirements:
-
If you selected as the credential, you need to specify the DN of the user in the text box. If the comparison type is set to , you can match a group of users by specifying a common object that is part of their DNs, for example ou=sales.
-
If you selected as the credential, you need to specify all elements of the Subject Name of the certificate in the text box. Separate the elements with a comma and a space, for example, o=novell, ou=sales. If the comparison type is set to , you can match a group of certificates by specifying a name that is part of the Subject Name, for example ou=sales.
-
Other values are possible. Your policy requirements determine whether they are useful.
Result on Condition Error: Specify what the condition returns when the comparison of the two values returns an error rather than the results of the comparison. Select either or . If you do not want the action applied when an error occurs, select . If you want the action applied when an error occurs, select .
LDAP Group Condition
The LDAP Group condition allows you to assign a role based on whether the authenticating user is a member of a group. The value, an LDAP DN, must be a fully distinguished name of a group.
LDAP Group: Select .
Comparison: Specify how you want the values compared. Select one of the following:
-
LDAP Group: Is Member of: Specifies that you want the condition to determine whether the user is member of a specified group.
-
Comparison: Regular Expression: Matches: Specifies that you want the values compared as regular expressions.
Mode: If you selected as the comparison type, select one or more of the following:
- Canonical Equivalence
- Case Insensitive
- Comments
- Dot All
- Multi-Line
- Unicode
- Unix Lines
For regular expression syntax information, see the Javadoc for java.util.regex.Pattern.
Value: Specify the second value for the comparison. If you select > > , you can browse to the name of the LDAP group.
If you have more than 250 groups in your tree, you are prompted to enter an LDAP query string. In the text box, you need to add only the <strFilter> value for the query. For example:
For more information about the <strFilter> parameter, see RFC 2254 “LDAP Search Filter.”
If you select as the value, you can specify the DN of the group in the text field. For example:
cn=managers,cn=users,dc=bcf2,dc=provo,dc=novell,dc=com
cn=manager,o=novell
Other values are possible. Your policy requirements determine whether they are useful.
Result on Condition Error: Specify what the condition returns when the comparison of the two values returns an error rather than the results of the comparison. Select either or . If you do not want the action applied when an error occurs, select . If you want the action applied when an error occurs, select .
LDAP OU Condition
The LDAP OU condition allows you to assign a role based on a comparison of the DN of an OU against the DN of the authenticated user. If the user’s DN contains the OU, the condition matches.
LDAP OU: Select .
Comparison: Specify how you want the values compared. Select one of the following:
-
Contains: Specifies that you want the condition to determine whether the user is contained by a specified organizational unit.
-
Comparison: Regular Expression: Matches: Specifies that you want the values compared as regular expressions.
Mode: Select the mode appropriate for the comparison type.
-
Contains: Select whether the user must be contained in the specified OU (or whether the user can be contained in the specified OU or a child container (.
-
Comparison: Regular Expression: Matches: Select one or more of the following:
- Canonical Equivalence
- Case Insensitive
- Comments
- Dot All
- Multi-Line
- Unicode
- Unix Lines
For regular expression syntax information, see the Javadoc for java.util.regex.Pattern.
Value: Specify the second value for the comparison. If you select > > , you can browse to the name of the OU.
If you have more than 250 OUs defined in your tree, you are prompted to enter an LDAP query string. In the text box, you need to add only the <strFilter> value for the query. For example:
For more information about the <strFilter> parameter, see RFC 2254 “LDAP Search Filter.”
If you select you can specify the DN of the OU in the text field. For example:
cn=users,dc=bcf2,dc=provo,dc=novell,dc=com
ou=users,o=novell
If you have defined a Liberty User Profile or an LDAP attribute for the OU you want to match, select this option, then select your attribute.
Result on Condition Error: Specify what the condition returns when the comparison of the two values returns an error rather than the results of the comparison. Select either or . If you do not want the action applied when an error occurs, select . If you want the action applied when an error occurs, select .
LDAP Attribute Condition
The LDAP Attribute condition allows you to assign a role based on a value in an LDAP attribute defined for the inetOrgPerson class or any other LDAP attribute you have added. You can have the user’s attribute value retrieved from your LDAP directory and compared to a value of the following type:
-
Roles from an identity provider
-
Authenticating IDP or user store
-
Authentication contract, method, or type
-
Credential profile
-
LDAP attribute, OU, or group
-
Liberty User Profile attribute
-
Static value in a data entry field
To set up the matching for this condition, fill in the following fields:
LDAP Attribute: Specify the LDAP attribute you want to use in the comparison. Select from the listed LDAP attributes. To add an attribute that isn’t in the list, click , then specify the name of the attribute.
Comparison: Specify how you want the values compared. All data types are available. Select one that matches the value type of your attribute.
Mode: Select the mode, if available, that matches the comparison type. For example, if you select to compare the values as strings, you can select either a mode or a mode.
Value: Specify the second value for the comparison. All data types are available. For example, you can select to compare the value of one LDAP attribute to the value of another LDAP attribute. Only you can determine if such a comparison is meaningful.
Result on Condition Error: Specify what the condition returns when the comparison of the two values returns an error rather than the results of the comparison. Select either or . If you do not want the action applied when an error occurs, select . If you want the action applied when an error occurs, select .
Liberty User Profile Condition
The Liberty User Profile condition allows you to assign a role based on a value in a Liberty User Profile attribute. The Liberty attributes must be enabled before you can use them in policies (click > > > , then enable one or more of the following: or ).
These attributes can be mapped to LDAP attributes (click > > > ). When mapped, the actual value comes from your user store. If you are using multiple user stores with different LDAP schemas, mapping similar attributes to the same Liberty User Profile attribute allows you to create one policy with the Liberty User Profile attribute rather than multiple policies for each LDAP attribute.
The selected attribute is compared to a value of the following type:
-
Roles from an identity provider
-
Authenticating IDP or user store
-
Authentication contract, method, or type
-
Credential profile
-
LDAP attribute, OU, or group
-
Liberty User Profile attribute
-
Static value in a data entry field
To set up the matching for this condition, fill in the following fields:
Liberty User Profile: Select the Liberty User Profile attribute. These attributes are organized into three main groups: Custom Profile, Corporate Employment Identity, and Entire Personal Identity. By default, the Common Last Name attribute for Liberty User Profile is mapped to the sn attribute for LDAP. To select this attribute for comparison, click > > > .
Comparison: Select the comparison type that matches the data type of the selected attribute and the value.
Mode: Select the mode, if available, that matches the data type. For example, if you select to compare the values as strings, you can select either a mode or a mode.
Value: Select one of the values that is available from the current request or select to enter a static value. The static value that you can enter depends on the comparison type you selected.
Result on Condition Error: Specify what the condition returns when the comparison of the two values returns an error rather than the results of the comparison. Select either or . If you do not want the action applied when an error occurs, select . If you want the action applied when an error occurs, select .
Roles from Identity Provider Condition
The Roles from Identity Provider condition allows you to assign a role based on a role assigned by another identity provider (Liberty, SAML 2.0, WS Federation). You configure the condition to match the role sent by the identity provider, then set the action to assign a new role.
This condition uses the mapped attribute All Roles. All roles that are assigned to the user can be mapped to attributes and assigned to a trusted identity provider. For information about enabling All Roles, see Selecting Attributes for a Trusted Provider
in the Novell Access Manager 3.1 SP3 Identity Server Guide.
For an example of how to use Roles from Identity Provider to create a Role policy, see Section 2.5, Mapping Roles between Trusted Providers. For an example that explains all the configuration procedures required for sharing roles, see Sharing Roles
in the Novell Access Manager 3.1 SP3 Setup Guide.
To configure a Roles from Identity Provider condition, fill in the following fields:
Roles from Identity Provider: If you have configured your system for multiple identity providers, select the identity provider. If you have only one, it is selected.
Comparison: Select one of the following types:
-
Comparison: String: Specifies that you want the values compared as strings, and how you want the string values compared. Select one of the following:
-
Equals: Indicates that the values must match, letter for letter.
-
Starts with: Indicates that the Roles from Identity Provider value must begin with the letters specified in the field.
-
Ends with: Indicates that the Roles from Identity Provider value must end with the letters specified in the field.
-
Contains Substring: Indicates that the Roles from Identity Provider value must contain the letters, in the same sequence, as specified in the field.
-
-
Comparison: Regular Expression: Matches: Specifies that you want the values compared as regular expressions.
Mode: Select the mode appropriate for the comparison type:
-
Comparison: String: Specify whether case is important by selecting or .
-
Comparison: Regular Expression: Matches: Select one or more of the following:
- Canonical Equivalence
- Case Insensitive
- Comments
- Dot All
- Multi-Line
- Unicode
- Unix Lines
For regular expression syntax information, see the Javadoc for java.util.regex.Pattern.
Value: Select , then specify the name of an identity provider role. Other value types are possible. Your policy requirements determine whether they are useful
Result on Condition Error: Specify what the condition returns when the comparison of the two values returns an error rather than the results of the comparison. Select either or . If you do not want the action applied when an error occurs, select . If you want the action applied when an error occurs, select .
User Store Condition
The User Store condition allows you to assign a role based on the user store that was used to authenticate the current user. The [Current] selection represents the user store from which the user was authenticated. The other selections represent all of the configured user stores that can be used to compare with [Current].
For example, if the configured user stores are eDir1 and AD1 and the current user is authenticated from eDir1, then a selected user store of eDir1 would match and a selected user store of AD1 would not match.
User Store: To compare the user store that the user used for authentication with a static value, select . To compare a static value with what the user used, select a user store from the list.
If you have created more than one Identity Server configuration, select the configuration, then select the user store. The name of the user store is displayed.
Comparison: Specify how the user store is compared to the data in the field. Select either a string comparison or a regular expression:
-
Comparison: String: Specifies that you want the values compared as strings and how you want the string values compared. Select one of the following:
-
Equals: Indicates that the values must match, letter for letter.
-
Starts with: Indicates that the User Store value must begin with the letters specified in the field.
-
Ends with: Indicates that the User Store value must end with the letters specified in the field.
-
Contains Substring: Indicates that the User Store value must contain the letters, in the same sequence, as specified in the field.
-
-
Comparison: Regular Expression: Matches: Specifies that you want the values compared as regular expressions.
Value: Specify the value you want to compare with the User Store value. If you select a static value for the User Store value, select and . If you select for the User Store value, select , then select the name of a user store.
If you have created more than one Identity Server configuration, select the configuration, then select the user store. The name of the user store is displayed.
Other value types are possible if you selected for the User Store value. Your policy requirements determine whether they are useful.
Result on Condition Error: Specify what the condition returns when the comparison of the two values returns an error rather than the results of the comparison. Select either or . If you do not want the action applied when an error occurs, select . If you want the action applied when an error occurs, select .
Condition Extension
If you have loaded and configured a role condition extension, this option specifies a condition that is evaluated by an outside source. See the documentation that came with the extension for information about what is evaluated.
Data Extension
If you have loaded and configured a role data extension, this option specifies the value that the extension retrieves. You can then select to compare this value with an LDAP attribute, a Liberty User Profile attribute, a Data Entry Field, or another Data Extension. For more information, see the documentation that came with the extension.
2.2.2 Using Multiple Conditions
The field controls how conditions within a condition group interact with each other and how condition groups interact with each other. Select one of the following:
The following sections explain how to configure the condition groups and conditions to interact with each other:
AND Conditions, OR groups
If the conditions are ANDed, the user must meet all the conditions in a condition group to match the profile. If the condition groups are ORed, the user must meet all of the conditions of one group to match the profile. This option allows you to set up two or more profiles into which a user could fit and be considered a match. For example, suppose you create the following Permit rule.
The first condition group contains the following conditions:
-
The user’s department must be Engineering.
-
The request must come on a weekday.
The second condition group contains the following conditions:
-
The user’s department must be Information Services and Technology (IS&T).
-
The request must come on a weekend.
With this rule, the engineers who match the first condition group have access to the resource during the week, and the IS&T users who match the second condition group have access to the resource on the weekend.
OR Conditions, AND groups
If the conditions are ORed, the user must meet at least one condition in the condition group to match the profile. If the conditions groups are ANDed, the user must meet at least one condition in each condition group to match the profile. For example, suppose you created the following Permit rule:
The first condition group contains the following conditions:
-
The user’s department is Engineering.
-
The user’s department is Sales.
The second condition group contains the following conditions:
-
The user has been assigned the Party Planning role.
-
The user has been assigned the Vice President role.
With this rule, the Vice Presidents of both the Engineering and Sales departments can access the resource, and the users from the Engineering and Sales department who have been assigned to the Party Planning role can access the resource.
Using the Not Options
At the top of each condition group, there is an option that allows you to control whether the user must match the conditions to match the profile or whether the user matches the profile if the user doesn’t match any of the conditions. Depending upon your selection for the Condition structure, you can select from the following:
-
If/If Not
-
Or/Or Not
-
And/And Not
Conditions also have similar Not options, so that a user can match a condition by not matching the specified value.
Adding Multiple Conditions
To add another condition to a condition group, click , then select a condition. To copy an existing condition, click the icon  . New conditions are always added to the end of the condition group. Use the
  buttons to order the conditions in the condition group.
Adding New Condition Groups
To add another condition group to the rule, click . To copy the existing condition group, click the icon . New condition groups are always added to the end to the Conditions section. Use the buttons to order the condition groups.
Disabling Conditions and Condition Groups
Condition groups and conditions within them can be disabled by clicking the Enabled check mark  , which changes the icon to the icon
  .
.
You usually disable a condition or condition group when testing a new rule, and if you decide the condition or condition group is not needed, you can then use the  button to delete the condition or condition group from the rule. Use the buttons by the button to move a condition up or down within its group. Condition groups also have buttons.
2.2.3 Selecting an Action
The policy action specifies the role to which the user is assigned. Roles are activated at the time the role policy is evaluated. Select one of the following actions:
Activate Role
Select when you want to specify a name for the role. If you are creating a role that needs to injected into an HTTP header, use the same capitalization format as the Web server expects. For example, if the Web server expects an Employee role with an initial capital, name your role Employee.
Figure 2-8 show how to assign the role of Employee to a policy.
Figure 2-8 Assigning a Role

To use the same conditions to activate multiple roles, select for each role you want to specify.
Activate Selected Role
Select when you want to obtain the role value from an external source. Select one of the following:
-
LDAP Attribute: If you have an LDAP attribute that is a role, select the attribute from the list. If the attribute is not in the list, select to add it to the list.
-
LDAP Group: Activates a role based on an LDAP Group attribute. Select either [Current] or browse to the DN of the group by selecting the Identity Server and User Store. The value for this option is the DN of the group. If you select [Current], the value can be a list of the groups the user belongs to. The [Current] value makes the DN of each group in the attribute into a role.
If you select to browse to the DN of the group and you have more than 250 groups in your tree, you are prompted to enter an LDAP query string. In the text box, you need to add only the <strFilter> value for the query. For example:
For more information about the <strFilter> parameter, see RFC 2254 “LDAP Search Filter.”
This action does not query all the static and dynamic groups on the LDAP server to see if the user belongs to them, but uses the user’s group membership attribute to create the list. If you want to use this longer query, you need to create a policy extension. For a sample extension that does this, see Novell Access Manager Developer Tools and Examples.
-
LDAP OU: Activates a role based on the Organizational Unit in the user’s DN. Select either [Current] or browse to the DN of the OU by selecting the Identity Server and User Store. The value for this option is the DN of the OU.
If you select to browse to the DN of the OU and you have more than 250 OUs defined in your tree, you are prompted to enter an LDAP query string. In the text box, you need to add only the <strFilter> value for the query. For example:
For more information about the <strFilter> parameter, see RFC 2254 “LDAP Search Filter.”
-
Liberty User Profile: If you have a Liberty attribute that is a role, select the attribute from the list.
-
Data Extension: If you have created a data extension that calculates a set of roles, select the extension. For information on creating such an extension, see Novell Access Manager Developer Tools and Examples.
If the source contains multiple values, select the format that is used to separate the values.
If the value is a distinguished name, select the format of the DN.
Figure 2-9 shows how to assign an LDAP Group, cn=DocGroup,o=novell, as a role.
Figure 2-9 Activating a Role from an External Source

To use the same conditions to activate multiple roles from different sources, select for each role you want to activate.