4.2 Configuring Client Policies
You can configure SSL VPN so that a client can be forced to connect in either Kiosk mode only or Enterprise mode only, depending on the role of a client. You can also configure SSL VPN to let the client select the SSL VPN mode based on the client privileges, or you can configure SSL VPN to download the applet client when the Internet Explorer browser is used to establish the SSL VPN connection.
4.2.1 Configuring Users to Connect Only in Enterprise Mode or Kiosk Mode
You can configure client policies to user roles so that they can connect only in Enterprise mode or only in Kiosk mode.
-
In the Administration Console, click > .
-
Select from the policies section.
-
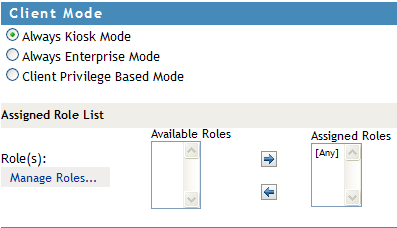
Select one of the following options:
Always Kiosk Mode: Select this option to force SSL VPN users to connect in Kiosk mode only, depending on the role of the user.
Always Enterprise Mode: Select this option to force SSL VPN users to connect in Enterprise mode only, depending on the role of the user.
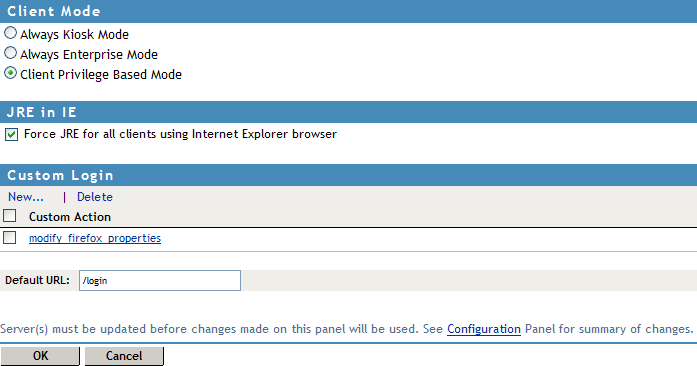
Client Privilege Based Mode: Select this option to allow users to connect in either Enterprise mode or Kiosk mode, depending on their privileges. If you do not select any client modes for roles, the roles are by default configured for the option.
NOTE:You cannot configure some roles to connect in and other roles to connect in The two modes are mutually exclusive. However, if you configure some roles for one of these modes, and do not configure the other roles for any mode, the roles without a specific configuration are by default assigned to the .
For example, you cannot configure the Sales role for the and the Finance role for the However, if you configure the Sales role for the and do not configure the Finance role for any mode, the Finance role is by default configured for the .
-
To configure the role for the client policy, specify the following information:
Role (s): The role to which the client policy applies. If the role is created in the Identity Server, it is displayed in by default.
The role is case-sensitive. If the role configured is Employee and the Identity Server sends a request for employee, the rule is not pushed to the client.
Manage Roles: To assign a client policy to user-defined roles, click the button. Click the icon to add roles or click the icon to delete roles. Click to confirm your changes, or click to discard them.
Available Roles: Select the role for which you want to assign the client policy and click the forward arrow to send it to . If you want to assign a client policy to multiple roles, press the Ctrl key when selecting the roles.
Assign Roles: Lists the roles for which a client policy is assigned.
If some roles are not explicitly configured for a mode, they are assigned to the Client Privileged mode by default.
-
To save your modifications, click , then click on the Configuration page.
4.2.2 Allowing Users to Select the SSL VPN Mode
To configure users to connect in either Enterprise mode or Kiosk mode, depending on their privileges, you assign them to the option.
-
In the Administration Console, click > .
-
Select from the policies section.
-
The Client Policies page is displayed. Select the option to allow users to select the SSL VPN connection mode. If the client has admin privileges, it can connect in Enterprise mode; otherwise, it can connect in Kiosk mode.
-
To save your modifications, click , then click on the Configuration page.
If you do not configure any client modes for roles, then the roles are by default configured for the option.
4.2.3 Configuring Client Cleanup Options
You can configure the cleanup options that are displayed to the user while disconnecting the SSL VPN connection.
-
In the Administration Console, click .
-
Select from the policies section.

-
Select any of the following options:
Clear Browser Private Data: Select this option to clear the browser history and cache, saved password, authenticated sessions and auto form-fill data when the client logs out. When this option is selected, all the data and information that were saved after the SSL VPN connection was made are cleared from the client machine. In the Firefox browser, any previous browsing history or data that was present before the SSL VPN connection was made is not cleared.
Clear Java Cache: Select this option to clear the Java cache when the client logs out. This clears not just the files and applets used by SSL VPN, but all files and applets in the cache. The Java cache is cleared when the browser window is closed.
Uninstall Enterprise Mode: Select this option to uninstall the Enterprise mode client when the client logs out.
Leave Behind the Client Components: Select this option to reduce the connection time when the client logs in again. When this option is selected, some of the SSL VPN components are left on the client and the connecting time is reduced because these components are not downloaded again.
If this option is not enabled:
-
All client components downloaded for the connection are removed in Kiosk mode.
-
All client components other than the service RPM or service MSI are removed in Enterprise mode. This is because the service RPM or service MSI is mandatory for operation in this mode.
Uninstall ActiveX control (for IE users only): When a user connects to SSL VPN through Internet Explorer, ActiveX is downloaded to the client machine to enable SSL VPN connection. You can select this option to remove the ActiveX control when the client logs out.
To select any of these options, set to .
If you set to , users can change any of the cleanup options set by you. To require users to retain the cleanup options you configured, set to .
-
-
To save your modifications, click , then click on the Configuration page
4.2.4 Configuring SSL VPN to Download the Java Applet on Internet Explorer
The SSL VPN client components are downloaded on the client machine through a Java applet or through ActiveX, depending on the browsers they use. The Internet Explorer browser uses the ActiveX control by default to download the SSL VPN client components. However, some Windows clients do not allow ActiveX controls to run in Internet Explorer.
In such scenarios, the you can force the Windows client to load the Java applet instead of the ActiveX control.
-
In the Administration Console, click > .
-
Select from the policies section.
-
Select .
-
To save your modifications, click , then click on the Configuration page.
4.2.5 Configuring a Custom Login Policy for SSL VPN
When you configure a custom login policy for SSL VPN, the SSL VPN server redirects the login requests to different URLs based on the policy configuration.
-
In the Administration Console, click > .
-
Select from the policies section.
-
Click in the section.
-
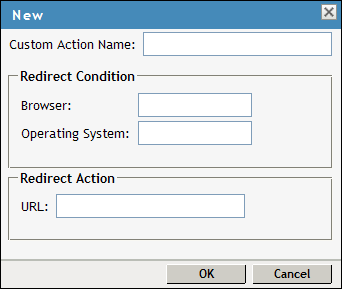
Specify the following information:
Custom Action Name: Specify a name for the custom login policy.
Redirect Condition: Specify the redirect condition in terms of the browser and the operating system. The conditions configured for the workstation platform and the browser platform are verified against the user agent HTTP header of the browser.
For an example of a custom-login policy configured for Citrix clients, see Section 4.4.3, Configuring a Custom Login Policy for Citrix Clients.
-
The browser can be Firefox, Safari*, Internet Explorer, or any other. You can specify more than one browser, separated by ommas.
-
The operating software can be Windows, Linux, Macintosh, or Any. When you configure this attribute to Any, the custom-login policy becomes platform independent.
Redirect URL: Specify the URL to which a user is redirected if the redirection conditions match.
-
-
Click .
-
Specify a URL as the default URL. The user is redirected to this URL if none of the conditions are met.
-
To save your modifications, click , then click on the Configuration page.