2.5 Mapping Roles between Trusted Providers
The Identity Server can send roles in an authentication assertion. You can map these roles that are received from trusted providers to your own roles. Figure 2-14 illustrates this process.
Figure 2-14 Role Mapping
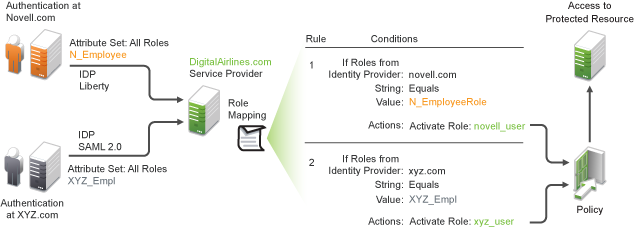
In this example, employees authenticate to identity providers novell.com (Liberty) or xyz.com (SAML 2.0). Each user is assigned to a role, such as N_EmployeeRole or XYZ_Empl. Attribute sets at each of the identity providers are configured to exchange the attribute with the trusted service provider, DigitalAirlines.com. DigitalAirlines.com consumes the authentication assertions, then maps the incoming roles to local roles. The mapped roles at DigitalAirlines.com can be used as evaluated conditions in authorization or J2EE policies, which can provide access to resources intended for the authenticated employees.
2.5.1 Prerequisites
-
Configure trust between trusted providers, using the Liberty or SAML 2.0 protocol.
You should be familiar with
Configuring SAML and Liberty Trusted Providers
in the NetIQ Access Manager 3.1 SP5 Identity Server Guide. -
Configure local authentication.
You must create an external contract at the service provider that matches the contract of the identity provider. See
Configuring Local Authentication
in the NetIQ Access Manager 3.1 SP5 Identity Server Guide. -
Create an attribute set and select the local attribute in the set. This must be done at the identity provider and service provider.
This attribute set is used to pass roles from an identity provider to an external service provider in authentication assertions. See
Configuring Attribute Sets
in the NetIQ Access Manager 3.1 SP5 Identity Server Guide.
2.5.2 Procedure
The following procedure describes how the service provider configures this type of role policy for novell.com, mapping the N_Employee role to an Access Manager role:
-
In the Administration Console, click > .
-
Click , then specify a name for the Role policy.
-
Select for the type, then click .
-
Configure the role policy as shown on the following page.

-
In the section, click > .
-
Select the trusted identity provider in the drop-down menu.
-
For , select > .
-
Select > .
-
Type the name of the role used by the trusted identity provider.
-
Under the section, click .
-
Type the name of the role you want to activate at the trusted service provider.
-
Click .
-
On the Policies page, click .
-
To enable the role so that it can be used in Authorization and Identity Injection policies, click > > > .
-
Select the check box next to the name of the role, then click .
-
Click .
-
Update the Identity Server.