2.4 Creating Access Manager Roles in an Existing Role-Based Policy System
If you have already implemented a role-based administration policy for granting access to print, file, and LDAP resources, you can leverage your role definitions and use Access Manager policies to control access to Web resources. If your role definitions use the following types of LDAP features, you can create Access Manager Role policies that use them:
-
Values found in LDAP attributes
-
Location of the user objects in the directory tree
-
Membership in groups or roles
The Access Manager Role policies that you create for these features can then be used to control access to protected Web resources. You can manually assign the roles by creating role policies with conditions or you can activate roles based on the values in the external source.
2.4.1 Activating Roles from External Sources
If you have an LDAP attribute, an LDAP group, an LDAP OU, or a Liberty attribute that you are currently using for role assignments, you can have Access Manager read its value and activate roles based on the values. This allows you to use the same roles for Access Manager access as you are using in other parts of your deployment.
When you create this type of Role policy, you do not need to specify any conditions. The policy engine reads the attribute you specify, then assigns roles to users based on the value or values in the attribute. If the user has no value for the attribute, the user is assigned no roles. If the user has a value for the attribute, the user is assigned a role for each value in the attribute.
-
In the Administration Console, click > .
-
Select the policy container, then click to create a new policy.
-
Specify a name for the Role policy, select for the type, then click .
-
On the Rule page in the section, click > .
-
For this example, select .
-
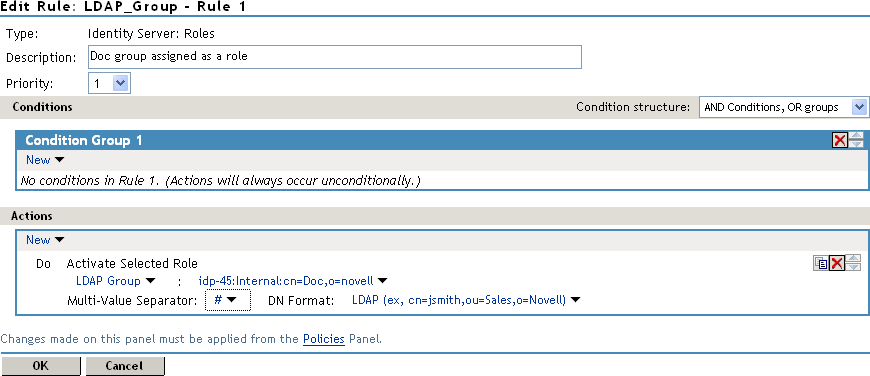
To select the group you want to use for role assignments, click > > > .
The distinguished name of this group is the Role name that is assigned to the user.
-
Select a that is compatible with a distinguished name.
A comma, which is the default separator, cannot be used because a comma is used to separate the components in a distinguished name. Select any other value, such as #.
Your policy should look similar to the following:
-
Click twice, then click .
-
To enable the role so that it can be used in Authorization and Identity Injection policies, click > > > .
-
Select the check box next to the name of the role, then click .
-
Click .
-
Update the Identity Server.
-
(Optional) Verify the name used for the role and the user assigned to it:
-
Enable logging by clicking > > > , then set the following values:
File Logging: Select .
Echo To Console: Select this option to enable it.
Application: In the section, set to .
-
Click , then update the Identity Server.
-
Log in to the Identity Server by using the credentials of a user who belongs the LDAP group.
-
View the log file for the Identity Server by clicking >
-
Select the file (for Windows, select the stdout.log file; for Linux, select the catalina.out file), then click .
-
Look for two log entries (<amLogEntry>) similar to the following:
<amLogEntry> 2009-10-09T21:58:55Z INFO NIDS Application: AM#500199050:
AMDEVICEID#CA50FD51DB1EEE3E: AMAUTHID#213E610199A14CEAF27395A6B35F3162:
IDP RolesPep.evaluate(), policy trace:
   ~~RL~1~~~~Rule Count: 1~~Success(67)
   ~~RU~RuleID_1223587171711~LDAP_Group~DNF~~0:1~~Success(67)
   ~~PA~ActionID_1223588319336~~AddSelectedRoles~cn=Doc~~~Success(0)
   ~~PA~ActionID_1223588319336~~AddSelectedRoles~o=novell~~~Success(0)
   ~~PC~ActionID_1223588319336~~Document=(ou=xpemlPEP,ou=mastercdn,
ou=ContentPublisherContainer,ou=Partition,ou=PartitionsContainer,
ou=VCDN_Root,ou=accessManagerContainer,o=novell:romaContentCollection
XMLDoc),Policy=(LDAP_Group),Rule=(1::RuleID_1223587171711),Action=
(AddSelectedRole::ActionID_1223588319336)~~~~Success(0)
 </amLogEntry>

<amLogEntry> 2009-10-09T21:58:55Z INFO NIDS Application: AM#500105013:
AMDEVICEID#CA50FD51DB1EEE3E: AMAUTHID#213E610199A14CEAF27395A6B35F3162:
Authenticated user cn=jwilson,o=novell in User Store Internal with roles
"cn=Doc,o=novell","authenticated".
</amLogEntry>
The first <amLogEntry> entry indicates that the action in the LDAP_Group policy was successfully assigned.
The second entry gives the DN of the user and lists the roles assigned to the user: cn=Doc,o=novell and authenticated.
-
You can now use the cn=Doc,o=novell role when creating Authorization and Identity Injection policies, which control access to protected Web resources. Roles activated this way do not appear in the list of available roles. You need to use the to manually type in the role name. For more information, see the following:
2.4.2 Using Conditions to Assign Roles
Creating a Role by Using an LDAP Attribute
You can assign a user to a role by using a value found in any LDAP attribute in your directory. The following example uses the objectClass attribute because every object in an LDAP directory has an objectClass attribute that contains the object classes to which the object belongs. This attribute contains the name of the object class that was used to create the object as well as the names of the superior object classes of this class. All you need to know is the name of the object class you used to create your users in the LDAP directory. For example, the following instructions create a Role policy for users who were created with the User object class.
-
In the Administration Console, click > .
-
Select the policy container, then click .
-
Specify a name for the Role policy, select for the type, then click .
-
In , click , then select .
-
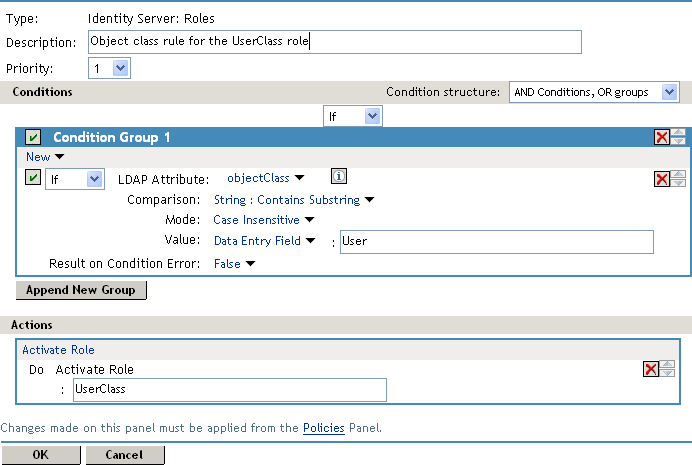
In , select the conditions the user must meet:
LDAP Attribute: Select the objectClass attribute. If you have not added this attribute, it won’t appear in the list. Scroll to the bottom of the list, click , specify objectClass for the name, then click .
If you are using eDirectory™ for your LDAP directory, you need to specify standard LDAP names for the attributes. Access Manager does not support spaces or colons in attribute names.
Comparison: Select how you want the attribute values to be compared. For the objectClass attribute, select > .
The objectClass attribute is a multi-valued attribute and, for most objects, contains multiple values. For example in eDirectory, users created with the User object class have User, organizationalPerson, person, ndsLoginProperties, and top as values in the objectClass attribute.
Mode: Select .
Value: Select and specify User as the value.
Result on Condition Error: This sets up the results that are returned if an error occurs while evaluating the condition (for example, the LDAP server goes down). This rule is set up to grant the user the role of UserClass if the condition evaluates to . If an error occurs, you do not want random users assigned the role of UserClass. Therefore, for this rule, you need to select .
-
In the section, click .
-
In the box, type UserClass, then click
The name you specify in the box is the role you want assigned to the users who match the condition.
Your rule should look similar to the following:
-
Click twice, then click .
-
To enable the role so that it can be used in Authorization and Identity Injection policies, click > > .
-
Select the check box next to the name of the role, then click .
-
Click .
-
Update the Identity Server.
You can now use this role when creating Authorization and Identity Injection policies, which control access to protected Web resources. For more information, see the following:
Creating a Role by Using the Location of the User Objects
If you have created your users in specific containers in your LDAP tree, you can use these container objects to assign users to roles. For example, suppose your LDAP tree looks similar to the following tree.
Figure 2-13 Using an eDirectory Tree for Access Control
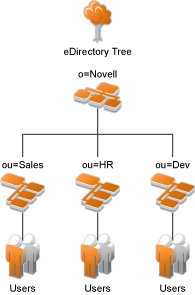
Such a tree organization can be used to control access to resources. The following instructions explain how to create a Role policy for the users created under the Sales container.
-
In the Administration Console, click > .
-
Select the policy container, then click .
-
Specify a name for the Role policy, select for the type, then click .
-
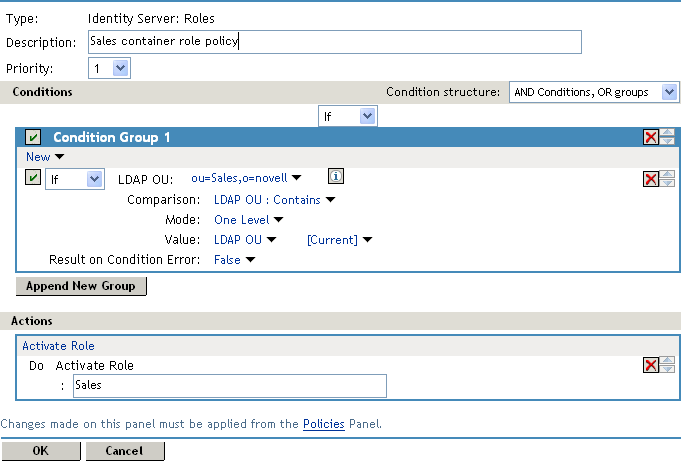
In , click , and select > > > .
The following example illustrates how to make these selections:
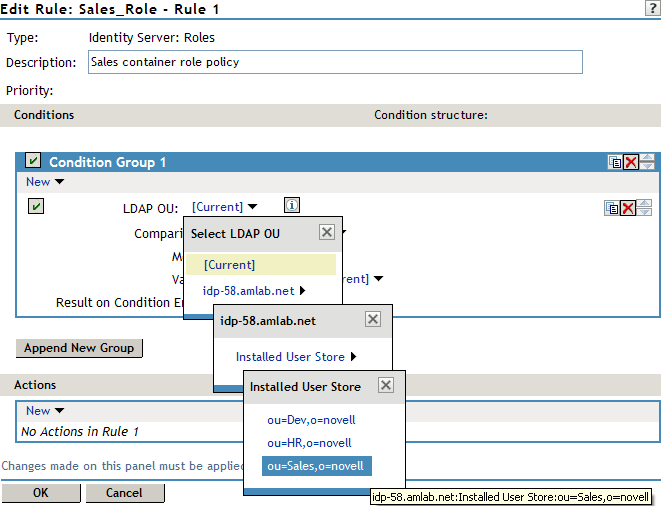
Comparison: Select how you want the attribute values to be compared. For LDAP OU, select .
Mode: Select if all your users are created in ou=Sales. Select if your users are created in various containers under the ou=Sales container.
Value: Select , then select .
The DN of the authenticated user is compared with the value specified in LDAP OU. If the DN of the user contains the LDAP OU value, the user matches the condition. For example, if the DN of the user is cn=bsmith,ou=sales,o=novell and the LDAP OU value is ou=sales,o=novell, the user matches the condition. If you selected for the Mode, a user with the following DN also matches the condition: cn=djones,ou=provo,ou=sales,o=novell.
Result on Condition Error: This sets up the results that are returned if an error occurs while evaluating the condition (for example, the LDAP server goes down). This rule is set up to grant the user the role of Sales if the condition evaluates to . If an error occurs, you do not want random users assigned the role of Sales. Therefore, for this rule, you need to select .
-
In the section, click .
-
In the box, type Sales, then click
The name you specify in the box is the role you want assigned to the users who match the condition.
Your rule should look similar to the following:
-
Click twice, then click .
-
To enable the role so that it can be used in Authorization and Identity Injection policies, click > > > .
-
Select the check box next to the name of the role, then click .
-
Click .
-
Update the Identity Server.
You can now use this role when creating Authorization and Identity Injection policies, which control access to protected Web resources. For more information, see the following:
Creating a Role by Using a Group Membership Attribute
If you have created an LDAP group and assigned users to the group, you can use group membership to assign a role to the user. For example, you might have created a first-level managers group and made all your first-level managers members of this group. You can then have other groups for your upper-level managers. You can create a Role policy that assigns the user a role if the user is a member of a specific group. The Role policy can then be used in an Authorization or Identity Injection policy to protect a Web resource.
-
In the Administration Console, click > .
-
Select the policy container, then click .
-
Specify a name for the Role policy, select for the type, then click .
-
In , click , then select .
-
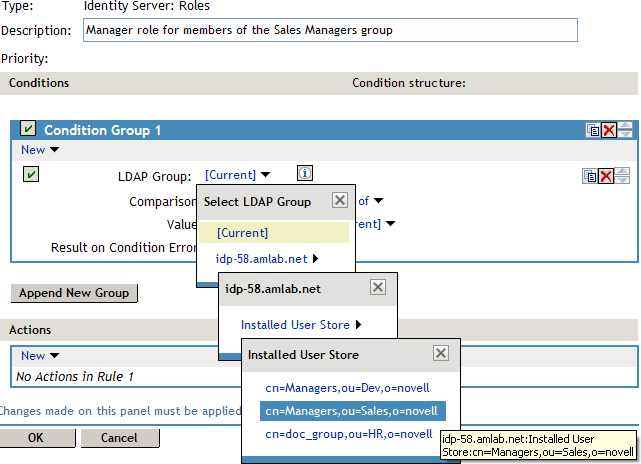
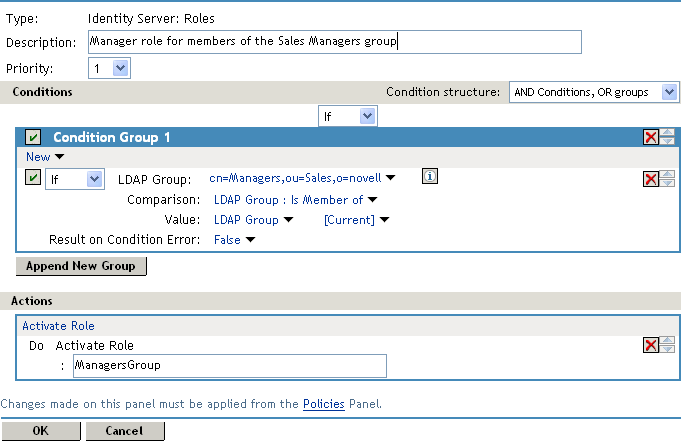
In , select the conditions the user must meet:
LDAP Group: Select the Identity Server Configuration, the user store, then the Group. The following figure illustrates this selection process.
Comparison: Select how you want the attribute values to be compared. For LDAP Group, select .
Value: Select , then select .
The DN of the authenticated user is compared with the members of the LDAP Group. If the DN of the user matches one of the members, the user matches the condition.
Result on Condition Error: This sets up the results that are returned if an error occurs while evaluating the condition (for example, the LDAP server goes down). This rule is set up to grant the user the role of ManagersGroup if the condition evaluates to . If an error occurs, you do not want random users assigned the role of ManagersGroup. Therefore, for this rule, you need to select .
-
In the section, click .
-
In the box, type ManagersGroup, then click .
The name you enter in the box is the role you want assigned to the users who match the condition.
Your rule should look similar to the following:
-
Click twice, then click .
-
To enable the role so that it can be used in Authorization and Identity Injection policies, click > > > > .
-
Select the check box next to the name of the role, then click .
-
Click .
-
Update the Identity Server.
You can now use this role when creating Authorization and Identity Injection policies, which control access to protected Web resources. For more information, see: