7.2 Installing the Traditional SSL VPN Server
The traditional SSL VPN server does not have an Embedded Service Provider and must be configure as a protected resource of an Access Gateway. You can install the traditional SSL VPN server with the Linux Access Gateway Appliance, with the Identity Server, with the Administration Console, or on a separate machine.
7.2.1 Deployment Scenarios
The traditional SSL VPN server supports the following installation scenarios:
-
Deployment Scenario 1: Linux Access Gateway and SSL VPN on the Same Server
-
Deployment Scenario 2: SSL VPN Server Installed on a Separate Machine
-
Deployment Scenario 3: Identity Server and SSL VPN on the Same Server
-
Deployment Scenario 4: Administration Console and SSL VPN on the Same Server
-
Deployment Scenario 5: Administration Console, Identity Server, and SSL VPN on the Same Server
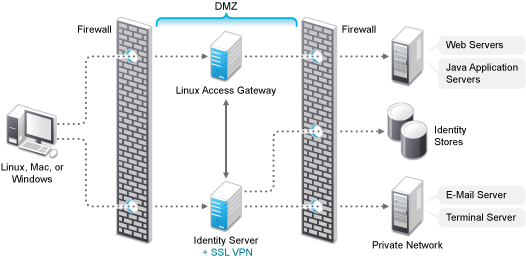
Deployment Scenario 1: Linux Access Gateway and SSL VPN on the Same Server
This deployment scenario consists of a demilitarized zone where the Linux Access Gateway and SSL VPN are on the same server and the Identity Server is deployed separately. For installation instructions for this scenario, see Installing SSL VPN with the Linux Access Gateway Appliance.
Figure 7-5 Deployment Scenario 1
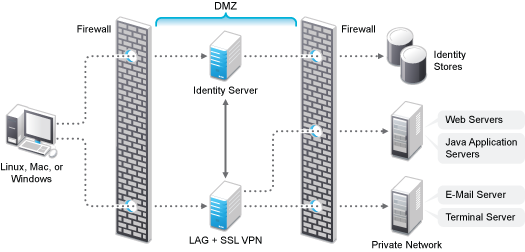
Deployment Scenario 2: SSL VPN Server Installed on a Separate Machine
This deployment scenario consists of a demilitarized zone where the Access Gateway, Identity Server, and SSL VPN are deployed separately. For installation instructions for this scenario, see Installing the Traditional Novell SSL VPN.
Figure 7-6 Deployment Scenario 2
Deployment Scenario 3: Identity Server and SSL VPN on the Same Server
This deployment scenario consists of a demilitarized zone where the Identity Server and SSL VPN are on one machine and the Access Gateway is deployed separately. For installation instructions for this scenario, see Installing SSL VPN on a Separate Machine, with the Identity Server, or with the Administration Console.
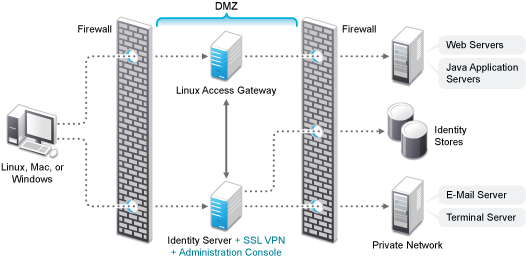
Deployment Scenario 4: Administration Console and SSL VPN on the Same Server
This deployment scenario consists of a demilitarized zone where the Administration Console and SSL VPN are on one machine and the Access Gateway and Identity Server are deployed separately on different machines. For installation instructions for this scenario, see Installing SSL VPN on a Separate Machine, with the Identity Server, or with the Administration Console.
Figure 7-7 Deployment Scenario 4

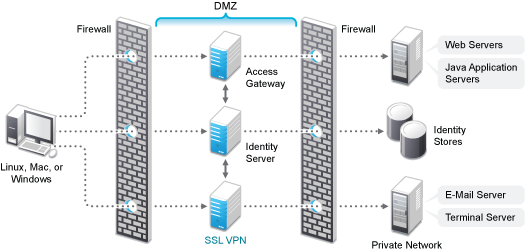
Deployment Scenario 5: Administration Console, Identity Server, and SSL VPN on the Same Server
This deployment scenario consists of a demilitarized zone where the Identity Server, Administration Console, and SSL VPN are on one machine and the Access Gateway is deployed separately. For installation instructions for this scenario, see Installing SSL VPN on a Separate Machine, with the Identity Server, or with the Administration Console.
Figure 7-8 Deployment Scenario 5
7.2.2 Installing the Traditional Novell SSL VPN
This section describes the installation procedures for different SSL VPN deployments:
Installing SSL VPN with the Linux Access Gateway Appliance
When SSL VPN is installed along with Linux Access Gateway Appliance, the Access Gateway installation process installs SSL VPN along with the Linux Access Gateway.
For more information on installing the Linux Access Gateway, refer to Section 5.3, Installing the Access Gateway Appliance
in the NetIQ Access Manager 3.1 SP5 Installation Guide.
-
Start the installation of the Linux Access Gateway. For details, refer to
Section 5.3, Installing the Access Gateway Appliance
in the NetIQ Access Manager 3.1 SP5 Installation Guide. -
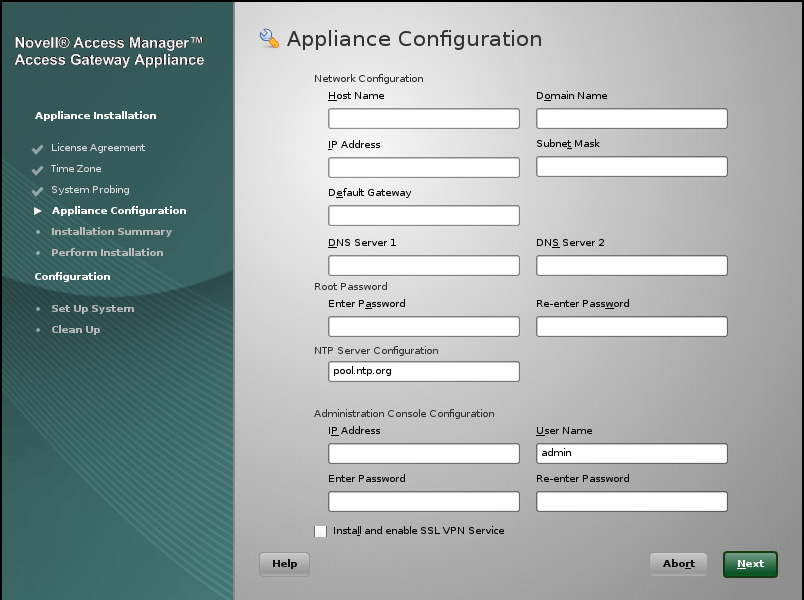
In the Access Administrator Configuration section in the Novell Linux Access Gateway Configuration page, select the check box to install and configure SSL VPN on the Linux Access Gateway.
-
Follow the on-screen instructions to continue with the Linux Access Gateway installation.
-
If the export law permits and you want to install the high bandwidth version of SSL VPN, proceed with Section 7.3, Installing the Key for the High-Bandwidth SSLVPN.
Installing SSL VPN on a Separate Machine, with the Identity Server, or with the Administration Console
You can use an install script to install the traditional Novell SSL VPN on a separate machine, with the Identity Server, with the Administration Console, or with the Identity Server and the Administration Console.
-
Access the install script.
-
Make sure you have downloaded the software or that you have the CD available.
For software download instructions, see the “Novell Access Manager Readme”
-
Do one of the following:
-
If you are installing from CD or DVD, insert the disc into the drive, then navigate to the device. The location might be /media/cdrom, /media/cdrecorder, or /media/dvdrecorder, depending on your hardware.
-
If you downloaded the tar.gz file, unpack the file by using the following command:
tar -xzvf <filename>
-
-
Change to the novell-access-manager-3.1.2-xxx directory.
-
-
At a command prompt, enter the following install script command:
./install.sh
You are prompted to select an installation.
-
Type 3 to install the traditional SSL VPN server, then press Enter.
-
(Optional) When you are prompted to replace the low bandwidth SSL VPN RPM with the high bandwidth RPM, replace it if the security law permits you to do so.
For more information on the high bandwidth SSL VPN, see
High-Bandwidth and Low-Bandwidth Versions
in the NetIQ Access Manager 3.1 SP5 SSL VPN Server Guide. For more information on installing the high bandwidth SSL VPN, see Section 7.3, Installing the Key for the High-Bandwidth SSLVPN. -
Review and accept the License Agreement.
-
(Conditional) If the SSL VPN machine has been configured with multiple IP addresses, select an IP address for the SSL VPN server when you are prompted to do so.
-
Specify the name of the administrator for the Administration Console.
-
Specify the administration password.
-
Confirm the password.
-
Specify the IP address of the Administration Console.
-
Wait while the SSL VPN server is installed on your system and imported into the Administration Console, which takes about 2 minutes.
The installation ends with the following message: Installation complete.
-
To verify the installation of the SSL VPN, continue with Section 7.4, Verifying That Your SSL VPN Service Is Installed.
-
If the export law permits and you want to install the high bandwidth version of SSL VPN, proceed with Section 7.3, Installing the Key for the High-Bandwidth SSLVPN
Reinstalling SSL VPN on the Linux Access Gateway
If you have deleted the SSL VPN server installed along with the Linux Access Gateway from Administration Console, then to re-import it follow the below steps.This is required because SSLVPN does not have a script to import the device to Administration Console.
-
Uninstall the installed SSLVPN rpms by running the uninstall.sh script from /opt/novell/idp-devman-install/ directory. This step is very important. If you have not uninstalled the rpms and try to upgrade the existing rpms, the upgrade is successful but the device does not imported into the Administration Console.
-
Download and copy the Novell Access Manager tar.gz files to the Linux Access Gateway machine.
For the actual filenames and download instructions, see the Novell Access Manager Readme.
-
Unpack the tar.gz file by using the following command:
tar -xzvf <filename>
-
Change to novell-access-manager-<release-version> directory. At the command prompt, enter the following install script command:
./install.sh
-
You are prompted to select an installation. In case of SSLVPN installed on Linux Access Gateway, you would see only one option to install SSLVPN alone.
-
To install the Novell SSL VPN Agent, press Enter.
-
A note with respect to High-Bandwidth rpm key will be displayed. Press Enter to proceed.
NOTE:You are attempting to install the SSLVPN server and this install program has detected that the High-Bandwidth Key rpm for SSLVPN is not installed. The High-Bandwidth Key rpm is not packaged with the SSLVPN install media in order to comply with the USA Export Laws. You can install the novl-sslvpn-hb-key rpm at any time later to turn on the High-Bandwidth capability on this machine. Please refer to the documentation to download and install the novl-sslvpn-hb-key rpm.
-
Review and accept the License Agreement.
-
(Conditional) If the SSL VPN machine has been configured with multiple IP addresses, select an IP address for the SSL VPN server when you are prompted to do so.
-
Specify the IP address of the Administration Console when prompted.
-
Specify the name of the administrator for the Administration Console.
-
Specify the administration password.
-
Confirm the password.
-
Wait while the SSL VPN server is installed on your system and imported into the Administration Console, which takes about 2 minutes.
The installation ends with the following message: Installation complete.
-
To verify the installation of the Access Gateway, continue with Section 7.4, Verifying That Your SSL VPN Service Is Installed.