12.6 Defining the User Provisioning Method
If you have selected as the user identification method or have created an attribute matching setting that allows for provisioning when no match is found, you need to create a provision method. This procedure involves selecting required and optional attributes that the service provider requests from the identity provider during provisioning.
IMPORTANT:When a user object is created in the directory, some attributes are initially created with the value of NAM Generated. Afterwards, an attempt is made to write the required and optional attributes to the new user object. Because required and optional attributes are profile attributes, the system checks the write policy for the profile’s Data Location Settings (specified in > ) and writes the attribute in either LDAP or the configuration store. In order for the LDAP write to succeed, each attribute must be properly mapped as an LDAP Attribute. Additionally, you must enable the read/write permissions for each attribute in the Liberty/LDAP attribute maps. See Section 14.6, Mapping LDAP and Liberty Attributes.
To configure user provisioning:
-
In the Administration Console, click > > > > > > .
-
Click the icon.

-
Select the required attributes from the list and move them to the list.
Required attributes are those used in the creation of a user name, or that are required when creating the account.
-
Click .
-
Select optional attributes from the list and move them to the list.
This step is similar to selecting required attributes. However, the user provisioning request creates the user account whether or not the optional attributes exist on the service provider.
-
Click .
-
Define how to create the username.

You can specify whether users are prompted to create their own usernames or whether the system automatically creates usernames. Selecting an attribute for the username segments from the required attributes list improves the chances that a new username is successfully created.
Maximum length: The maximum length of the user name. This value must be between 1 and 50.
Prompt for user name: Enables users to create their own usernames.
Automatically create user name: Specifies that the system creates usernames. You can configure the segments for the system to use when creating usernames and configure how the names are displayed.
For example, if you are using the required attributes of Common First Name and Common Last Name, a username for Adam Smith might be generated as A.Smith_02, as shown in the following illustration:
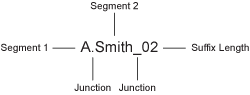
Use the following settings to specify how this is accomplished:
-
Segment 1: The required attribute to use as the first segment for the user name. The values displayed in this drop-down menu correspond to the required attributes you selected. For example, you might select Common First Name to use for .
-
Length: The length of the first attribute segment. For example, if you selected Common First Name for the value, setting the length to 1 specifies that the system uses the first letter of the Common First Name attribute. Therefore, Adam Smith would be ASmith.
-
Junction: The type of junction to use between the attributes of the user name. If a period is selected, Adam Smith would display as A.Smith.
-
Segment 2: The required attribute to use as the second segment for the user name. The values displayed in this drop-down menu correspond to the required attributes you selected. For example, you might select Common Last Name to use for .
-
Length: The length of the second attribute segment. For example, if you selected Common Last Name for the value, you might set the length to , so that the full last name is displayed. However, the system does not allow more than 20 characters for the length of segment 2.
-
Ensure name is unique: Applies a suffix to the colliding name until a unique name is found, if using attributes causes a collision with an existing name. If no attributes are provided, or the lengths for them are 0, and this option is selected, the system creates a unique name.
-
-
Click .
-
Specify password settings.

Use this page to specify whether to prompt the user for a password or to create a password automatically.
Min. password length: The minimum length of the password.
Max. password length: The maximum length of the password.
Prompt for password: Prompts the user for a password.
Automatically create password: Specifies whether to automatically create passwords.
-
Click .
-
Specify the user store and context in which to create the account.

User Store: The user store in which to create the new user account.
Context: The context in the user store you want accounts created.
The system creates the user within a specific context; however, uniqueness is not guaranteed across the directory.
Delete user provisioning accounts if federation is terminated: Specifies whether to automatically delete the provisioned user account at the service provider if the user terminates his or her federation between the identity provider and service provider.
-
Click .
-
Click twice, then update the Identity Server.