15.4 Configuring Session-Based Logging
The session-based logging feature allows the administrator to enable file logging for an individual user. In production environments, this has the following value:
-
Debug logging can be turned on for an individual user rather than all users. The potential size of logged data usually prohibits an administrator from turning on debug logging for all users.
-
All logged messages for this user are directed to a single file. Administrators do not need to sort through the various log files to follow the activity of the user.
-
Isolating the problem and finding the cause is limited to the user who is experiencing the problem.
-
Enabling session-based logging does not require a configuration change to the Identity Server, and thus does not require updating the Identity Server.
The following user scenario explains how this feature could be used in a production environment
-
A user notices a problem and calls the help desk.
-
The help desk operator questions the users and concludes that the problem is caused by either a Novell Identity Server or an Embedded Service Provider.
-
The operator has been granted the rights to create logging tickets, and uses the User Portal to create a logging ticket for the user.
-
The operator sends the logging ticket password and the URL to access the logging ticket class to the user.
-
The user clicks the URL and enters the logging ticket password.
This marks the current session as “active for logging” and adds a small icon to the top right of the page, which makes the session logging feature visible to the user.
-
Using the same browser window, the user duplicates the problem behavior.
-
The operator can then access the data that was logged just for this user and analyze the cause of the behavior.
To enable session-based logging, the following tasks need to be completed:
15.4.1 Creating the Administrator Class, Method, and Contract
The IDP Administrator class, method, and contract control who has the rights to create a logging ticket. You need to know the DNs of the operators who are going to be responding to the users who are experiencing problems.
-
In the Administration Console, click > > >
-
To create the class:
-
Click .
-
Click , then specify the following values:
Display name: IDP Administrator
Java class: Other
Java class path: com.novell.nidp.authentication.local.IDPAdministratorClass
-
Click t, then click .
-
-
To create the method:
-
Click .
-
Click , then specify the following values:
Display name: IDP Administrator Method
Class: IDP Administrator
Identifies user: Deselect this option.
User Stores: Select the user stores that contain your operators, then move them to the list of User Stores.
-
In the section, click , then specify the following to create an IDP Administrator:
Property Name: Administrator1
The Property Name must begin with Administrator; append a value to this so that each property has a unique value.
Property Value: cn=jdoe,o=users
The Property Value must be the DN of an operator in the user stores you selected in Step 3.b. Use LDAP typed comma notation for the DN.
-
Repeat Step 3.c for each IDP Administrator you require.
You can return to this method to add or remove IDP Administrators, when responsibilities change.
-
Click .
-
-
To create the contract:
-
Click .
-
Click , then specify the following values:
Display name: IDP Administrator Contract
URI: urn:novell:nidp:admin:contract
Methods: Move the to the Methods list.
Leave all other fields with their default values.
-
Click , then specify the following values for the authentication card:
ID: IDPAdmin
Text: IDP Administrator
Image: Select an image from the list, such as the IDP Administrator image that was created for this type of contract.
Show Card: Deselect this option.
-
Click .
-
-
Continue with Creating the Logging Session Class, Method, and Contract.
15.4.2 Creating the Logging Session Class, Method, and Contract
-
In the Administration Console, click > > >
-
To create the class:
-
Click .
-
Click , then specify the following values:
Display name: Logging Session
Java class: Other
Java class path: com.novell.nidp.authentication.local.LogTicketClass
-
Click t, then click .
-
-
To create the method:
-
Click .
-
Click , then specify the following values:
Display name: Logging Session Method
Class: Logging Session
Identifies user: Deselect this option.
User Stores: Select the user stores that contain the users that potentially can experience problems, then move them to the list of User Stores.
-
Click .
-
-
To create the contract:
-
Click .
-
Click , then specify the following values:
Display name: Logging Session Contract
URI: urn:novell:nidp:loggingsession:contract
Methods: Move the to the list.
Leave all other fields with their default values.
-
Click , then specify the following values for the authentication card:
ID: LogSession
Text: Logging Session
Image: Select an image from the list, for example the Session Logging image that was created for this type of contract.
Show Card: Deselect this option.
-
Click .
-
-
Click , then update the Identity Server.
-
Continue with Enabling Basic Logging.
15.4.3 Enabling Basic Logging
For session-based logging to function, logging on the Identity Server must be enabled. However, you do not need to select what is logged. The Logging Ticket enables the appropriate components and levels when an incident occurs.
-
In the Administration Console, click > > .
-
Click , then specify the following:
File Logging: Enable this option.
Echo To Console: Enable this option.
No other options need to be enabled. The can be left in their default state of off.
-
Click , then update the Identity Server.
This completes the configuration. You now need to wait for a user to report a problem. For information on using this feature to respond to a problem, see Responding to an Incident.
15.4.4 Responding to an Incident
The following sections explain how to use the feature when a user reports a problem:
Creating a Logging Ticket
These steps are performed by an IDP Administrator when a user reports a problem:
-
Log in to the Identity Server, using the credentials of an IDP Administrator.
If the base URL of the Identity Server is https://idp.amlab.net:8443/nidp, enter the following URL:
https://idp.amlab.net:8443/nidp/app
-
Change to the Logging Ticket page by specifying the following URL:
https://idp.amlab.net:8443/nidp/app/login?id=IDPAdmin
The id specified in the URL must match the ID you specified for the ID of the IDP Administrator Contract. See Step 4.c of Section 15.4.1, Creating the Administrator Class, Method, and Contract.
If you logged in with the credentials of an IDP Administrator, an tab appears.
-
To create a ticket for the user, click the tab.
-
Click .
-
Specify the following:
Ticket: Specify a name for ticket.
You must share this name with the user who reported the problem.
Ticket Good For: Select a time limit for the ticket, from one minute through one year.
When selecting a time limit, consider the following:
-
When a ticket expires, logging is automatically stopped. If you know that user is experiencing a problem that prevents the user from logging out, you might want to create a ticket with a short time limit.
-
If the user does not log out (just closes the browser window or the problem closes it), the session remains in the list of logged sessions. After 10 minutes of inactivity, the session is closed and the lock on the log file is cleared. As long as the log file is locked, no other application can read the file.
Ticket Log Level: Select the level of information to log, from severe-only messages to debug.
Log to Console: Select to log the messages to the user’s file and to the console.
-
If you have set up logging for session-based logging (see Enabling Basic Logging), then this allows you see the messages in the catalina.out or stdout.log file.
-
If you have enabled Component File Logger Levels, selecting this option can create duplicate entries in the catalina.out or stdout.log file.
-
-
Click .
-
-
Create a URL that uses the following format:
https://<base_URL>/nidp/app/login?id=<LogSession>
Replace <base_URL> with the base URL of your Identity Server, including the port. Make sure the port agrees with the HTTP scheme (either http or https).
Replace <LogSession> with the ID you specified for the authentication card when defining the Logging Session contract.
IMPORTANT:The id is the ID of the authentication card of the Logging Session contract (see Step 4.c of Section 15.4.2, Creating the Logging Session Class, Method, and Contract). It is not the name of the ticket you just created.
If the base URL of the Identity Server is https://idp.amlab.net:8443/nidp and the ID for the authentication card is LogSession, create the following URL:
https://idp.amlab.net:8443/nidp/app/login?id=LogSession
-
Send the URL of the LogSession card and the name of the ticket to the user.
Enabling a Logging Session
These steps are performed by the user. The URL needs to be sent to the user, with the ID and ticket values that were specified in Creating a Logging Ticket.
-
Open a browser and enter the log session URL sent by the help desk.
If the URL does not display a page that prompts for the ticket name, check the value of the id string. The id must be set to the ID of the authentication card of the Logging Session contract.
Instead of sending the user a URL, you can enable the option for the Logging Session card. When you do this, all users can see it. You need to decide if this is acceptable.
When the Show Card option is enabled, the login page looks similar to the following:
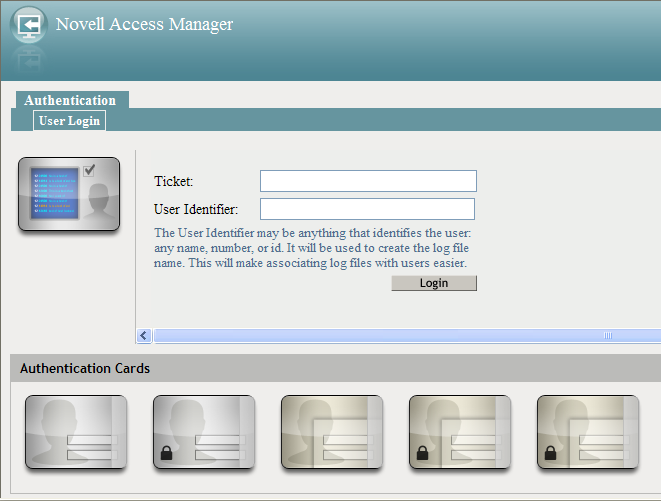
-
When prompted, enter the following:
Ticket: Specify the ticket name that the help desk sent.
User Identifier: Specify a value that the help desk associates with you as a user. The identifier must be less than 33 characters and contain only alphanumeric characters.
-
Click .
This login creates the logging session.
-
Enter your name and password, then click .
This login authenticates you to the Identity Server.
-
In the same browser window, enter the URL of the resource that is causing the problem.
-
Perform any other actions necessary to create the problem behavior.
-
Log out and send your user identifier to the help desk.
Viewing the Log File
These steps are performed by someone who has had Access Manager training and understands the significance of the messages in the log files. This can be an IDP Administrator or a specialist.
-
On the Identity Server, change to the Tomcat log directory.
Linux: /var/opt/novell/tomcat5/webapps/nidp/WEB-INF/logs
Windows Server 2003: \Program Files\Novell\Tomcat\webapps\nidp\WEB-INF\logs
Windows Server 2008: \Program Files (x86)\Novell\Tomcat\webapps\nidp\WEB-INF\logs
-
Open the file that begins with the user identifier to which a session ID is appended.
If the user does not log out (just closes the browser window or the problem closes it), the session remains in the list of logged sessions. After 10 minutes of inactivity, the session is closed and the lock on the logging file is cleared. As long as the file is locked, no other application can read the file.
When a ticket expires, logging is stopped automatically. If you know that user is experiencing a problem that prevents the user from logging out, you might want to create a ticket with a short time limit.
-
(Conditional) If the user was experiencing a problem with an Embedded Service Provider, change to the Tomcat log directory on the device:
Linux: /var/opt/novell/tomcat5/webapps/nesp/WEB-INF/logs
Windows Server 2003: \Program Files\Novell\Tomcat\webapps\nesp\WEB-INF\logs
Windows Server 2008: \Program Files (x86)\Novell\Tomcat\webapps\nesp\WEB-INF\logs
-
Open the file with the same user identifier and session ID.
-
After solving the problem, delete the file from each Identity Server in the cluster and each Access Gateway in the cluster.