1.6 Using netHSM for the Signing Key Pair
netHSM is a Hardware Security Module (HSM) from nCipher. The module is attached to the network and provides cryptographic resources for multiple servers. Keys stored in a netHSM keystore are secure because the key material can never be exposed outside of the module.
Access Manager has not been tested with any other HSM products; it has only been tested with the netHSM module from nCipher.
Figure 1-2 illustrates a simple netHSM configuration with an Identity Server as a netHSM client.
Figure 1-2 A Simple netHSM Configuration
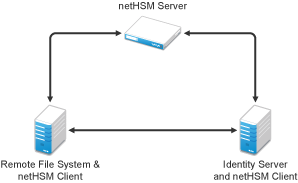
Access Manager allows you to use netHSM to store and manage the signing key pair of the Identity Server. You must use the Administration Console to store and manage the other Access Manager certificates. Access Manager uses the Java Security provider of the netHSM server to interact with the netHSM server.
This section describes the following about the netHSM implementation:
1.6.1 Understanding How Access Manager Uses Signing and Interacts with the netHSM Server
The netHSM server provides a signing certificate that is used instead of the one provided by Access Manager. Requests, responses, assertions, or payloads can be signed when there are interactions during single sign-on or during attribute queries between service providers and identity providers using any of the SAML1.1, SAML2, Liberty ID-FF, Liberty ID-WSF, or ID-SIS protocols.
Access Manager Services That Use the Signing Certificate
The following services can be configured to use signing:
Protocols
The protocols can be configured to sign authentication requests.
To view your current configuration:
-
In the Administration Console, click > > .
-
In the section, view the setting for the option. If it is selected, all authentication requests from identity providers are signed.
-
In the section, view the settings for the s and S options. If these options are selected, assertions and authentication requests are signed.
SOAP Back Channel
The SOAP back channel is the channel that the protocols use to communicate directly with a provider. The SOAP back channel is used for artifact resolutions and attribute queries for the Identity Web Services Framework.
To view your current configuration for the SOAP back channel:
-
In the Administration Console, click > > .
-
Select the protocol (Liberty, SAML 1.1, or SAML 2.0), then click the name of an identity provider or service provider.
-
Click .
-
View the section. If the option is selected, signing is enabled for the SOAP back channel.
Profiles
Any of the Web Service Provider profiles can be enabled for signing by configuring them to use X.509 for their security mechanism.
To view your current configuration:
-
In the Administration Console, click > > > > .
-
Click the name of a profile, then click .
-
Click the .
-
If either or has been selected as the security mechanism, signing has been enabled for the profile.
Understanding the Interaction of the netHSM Server with Access Manager
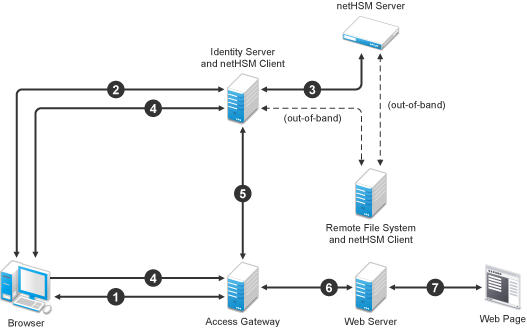
Figure 1-3 outlines one of the basic flows that might occur during single sign-on to the Identity Server when authentication requests have been configured for signing.
Figure 1-3 Basic Flow for an Authentication Request Using netHSM
-
The user requests the Access Gateway to provide access to a protected resource.
-
The Access Gateway redirects the user to the Identity Server, which prompts the user for a username and password.
-
The Identity Server authenticates the user. If signing is enabled, the payload is signed by the netHSM server through the Java JSSE security provider.
-
The Identity Server returns the authentication artifact to the Access Gateway.
-
The Embedded Service Provider of the Access Gateway retrieves the user’s credentials from the Identity Server.
-
The Access Gateway verifies that the credentials allow the user access to the resource, then sends the request to the Web server.
-
The Web server returns the requested Web page.
1.6.2 Configuring the Identity Server for netHSM
Prerequisites for Using netHSM
-
An installed and configured netHSM server.
-
An installed and configured remote file system with the netHSM client.
-
An installed Identity Server, assigned to a cluster configuration.
For instructions on a basic setup that assigns the Identity Server to a cluster configuration, see
Creating a Basic Identity Server Configuration
in the NetIQ Access Manager 3.1 SP5 Setup Guide.
The following instructions describe one way to integrate the Identity Server with a netHSM server. Other ways are possible.
Configuring the Identity Server to Be a netHSM Client
The following instructions are based on nCipher hardware, but you should be able to adapt them for your hardware. The instructions explain how to configure the Identity Server so that it can communicate with both the nCipher server and the remote file system server, how to create a signing key pair and its keystore, how to copy these them to the Identity Server, and how to synchronize the changes with the remote file system server.
-
At the Identity Server, log in as the root or administrator user and install the netHSM client software.
The nCipher software installs files in the /opt/nfast directory on Linux and in the C:\nfast directory on Windows. It creates an nfast user and group. Check your netHSM documentation for the specific steps.
-
(Conditional) If your Identity Server cluster configuration contains more than one Identity Server, install the netHSM client software on the other Identity Servers in the cluster.
-
At the netHSM server, configure the server to allow the Identity Server to be a client.
Check your netHSM documentation for the specific steps.
-
(Conditional) If your Identity Server cluster configuration contains more than one Identity Server, configure the netHSM server to allow the other Identity Servers in the cluster to be a client.
-
At the Identity Server, enroll the client to use the server:
-
To get the ESN and hash numbers for the enroll command, enter the following command:
Linux: /opt/nfast/bin/anonkneti <IP_address>
Windows: C:\nfast\bin>anonkneti <IP_address>
Replace <IP_address> with the IP address of the netHSM server.
-
To enroll the client, enter the following command:
Linux: /opt/nfast/bin/nethsmenroll -p <IP_address> <ESN> <hash>
Windows: C:\nfast\bin>nethsmenroll -p <IP_address> <ESN> <hash>
Replace <IP_address> with the IP address of the netHSM server. Replace <ESN> and <hash> with the values copied from the anonkneti command.
-
-
(Conditional) If the Identity Server and the Administration Console are installed on the same machine, modify the 9000 and 9001 TCP ports:
-
In a text editor, open the sc.conf file located in the following directory:
Linux: /opt/novell/devman/share/conf
Windows Server 2003: \Program Files\Novell\Tomcat\webapps\roma\WEB-INF\conf
Windows Server 2008: \Program Files (x86)\Novell\Tomcat\webapps\roma\ WEB-INF\conf
-
Change the ports from 9000 and 9001 to another value, such as 9010 and 9011.
The lines should look similar to the following:
<stringParam name="ExecutorPort" value="9010" />
<stringParam name="SchedulerPort" value="9011" />
-
Save the changes.
-
Restart Tomcat:
Linux: Enter the following command:
/etc/init.d/novell-tomcat5 restart
Windows: Enter the following commands:
net stop Tomcat5
net start Tomcat5
-
(Conditional) If other Identity Servers in the cluster contain an Administration Console, repeat Step 6.
-
-
At the Identity Server, enable the netHSM client so that it uses TCP:
-
Enter the following command:
Linux: /opt/nfast/bin/config-serverstartup -sp
Windows: C:\nfast\bin>config-serverstartup -sp
-
To restart the nfast client:
Linux: Enter the following command:
/opt/nfast/sbin/init.d-nfast restart
Windows: Enter the following commands:
C:\nfast\bin>net stop "nfast server"
C:\nfast\bin>net start "nfast server"
-
-
Configure communication to the remote file system server. In this sample configuration, the remote file system is installed on a Windows machine.
-
At the remote file system server, enable communication with the Identity Server. For a Windows machine, enter the following command:
C:\nfast\bin\rfs-setup.exe --gang-client --write-noauth <address>Replace <address> with the IP address of the Identity Server.
-
At the Identity Server, enable communication with the remote file system server. For nCipher, enter the following command:
Linux: /opt/nfast/bin/rfs-sync --setup --no-authenticate <address>
Windows: C:\nfast\bin>rfs-sync --setup --no-authenticate <address>
Replace <address> with the IP address of the remote file system server.
-
At the Identity Server, initialize synchronization with the remote file system server.
Linux: Enter the following commands:
/opt/nfast/bin/rfs-sync –-update
/opt/nfast/bin/rfs-sync –-commit
Windows: Enter the following commands:
C:\nfast\bin>rfs-sync --update
C:\nfast\bin>rfs-sync --commit
The first command reads updates from the remote file system server and downloads files to the /opt/nfast/kmdata/local directory on Linux and the C:\nfast\kmdata\local directory on Windows. The second command writes local changes to the remote file system server.
-
-
Continue with Creating the nCipher Signing Key Pair.
Creating the nCipher Signing Key Pair
IMPORTANT:Because of Access Manager configuration conflicts, you need to use a netHSM client other than the Identity Server. The remote file system server is a netHSM client, or if you have configured another device as a client, you can use that device.
The following commands are specific to nCipher; it does not come with a tool to generate a key pair and CSR. nCipher also uses a unique keystore of type nCipher.sworld.
nCipher supports both a Windows and a Linux netHSM client.
-
If you have a Windows netHSM client, the command is located in the following directory:
c:\Program Files\Java\jdk1.5.0_14\jre\bin\java
-
If you have Linux netHSM client, the command is located in the following directory:
/opt/novell/java/bin/java
To create a new key pair for nCipher:
-
On a netHSM client, add the nCipher provider to the provider list of the java.security file:
-
In a text editor, open the C:\Program Files\Java\jdk1.5.0_14\jre\lib\ security\java.security file.
-
Add the following lines to the top of the list of providers:
security.provider.1=com.ncipher.fixup.provider.nCipherRSAPrivateEncrypt
security.provider.2=com.ncipher.provider.km.nCipherKM
The provider section should look similar to the following:
#
# List of providers and their preference orders (see above):
#
security.provider.1=com.ncipher.fixup.provider.nCipherRSAPrivateEncrypt
security.provider.2=com.ncipher.provider.km.nCipherKM
security.provider.3=sun.security.provider.Sun
security.provider.4=sun.security.rsa.SunRsaSign
security.provider.5=com.sun.net.ssl.internal.ssl.Provider
security.provider.6=com.sun.crypto.provider.SunJCE
security.provider.7=sun.security.jgss.SunProvider
security.provider.8=com.sun.security.sasl.Provider
-
Save your changes.
-
-
Add the nfast libraries to the CLASSPATH for Java:
For a Windows client, add the following paths:
c:\nfast\java\classes\keysafe.jar;c:\nfast\java\classes\nfjava.jar
;c:\nfast\java\classes\kmjava.jar;c:\nfast\java\classes\kmcsp.jar;
c:\nfast\java\classes\jutils.jar;c:\nfast\java\classes\jcetools.
jar;c:\nfast\java\classes\spp.jar;c:\nfast\java\classes\rsaprivenc
.jar;
For a Linux client, add the following paths and export them:
/opt/nfast/java/classes/nfjava.jar:/opt/nfast/java/classes/
kmjava.jar:/opt/nfast/java/classes/kmcsp.jar:/opt/nfast/java/
classes/spp.jar:/opt/nfast/java/classes/rsaprivenc.jar:/opt/nfast/
java/classes/jutils.jar:/opt/nfast/java/classes/jcetools.jar:/opt/
nfast/java/classes/keysafe.jar
-
Create a directory for the keystore and change to that directory.
-
On a Windows client, enter the following command to create a new key in a keystore:
"c:\Program Files\Java\jdk1.5.0_14\jre\bin\java" -Dprotect=module
-DignorePassphrase=true sun.security.tools.KeyTool -genkey -v
-alias od93 -keyalg RSA -keystore AMstore.jks -storetype
nCipher.sworld -provider com.ncipher.provider.km.nCipherKM
Enter your values for the following parameters:
Parameter
Description
-Dprotect=module
Required if you want the keystore to be module protected.
-DignorePassphrase=true
Required if you want the keystore to be module protected.
sun.security.tools.KeyTool
The name of the keytool command
-alias
A name that helps you identify the key. In this sample configuration, the name is od93.
-keyalg
The security algorithm.
-keystore
A name for the keystore. In this sample configuration, the name is AMstore.jks.
-storetype
The type of keystore. For nCipher, this must be set to nCipher.sworld.
-provider
The name of the providerClass and providerName. This is the provider that you added to the java.security file in Step 1.
The tool prompts you for a password for the keypass and the storepass. They must be the same password if you are going to use card set protection rather than module protection.
The tool also prompts you for the certificate subject name (first name, last name, organization, organizational unit, locality, state or providence, and country).
-
To generate a certificate request from a key in the keystore, enter the following command:
"c:\Program Files\Java\jdk1.5.0_14\jre\bin\java" -Dprotect=module
-DignorePassphrase=true sun.security.tools.KeyTool -certreq -alias
od93 -file cert.csr -keypass mypwd -keystore AMstore.jks -storepass
mypwd -storetype nCipher.sworld -provider
com.ncipher.provider.km.nCipherKM
Enter your values for the following parameters:
Parameter
Description
-Dprotect=module
Required if you want the keystore to be module protected.
-DignorePassphrase=true
Required if you want the keystore to be module protected.
sun.security.tools.KeyTool
The name of the keytool command
-certreq
The parameter that makes this a certificate request.
-alias
A name that helps you identify the certificate request. In this sample configuration, the name is od93.
-file
The name to be given to the certificate signing request file. In this sample configuration, the name is cert.csr.
-keypass
The password for the key. In this sample configuration, the password is mypwd.
-keystore
A name for the keystore. In this sample configuration, the name is AMstore.jks.
-storepass
The password for the keystore. In this sample configuration, the password is mypwd.
-storetype
The type of keystore. For nCipher, this must be set to nCipher.sworld.
-provider
The name of the providerClass and providerName.
-
Take the CSR created in Step 5 to a certificate authority. The CA needs to send you a DER-encoded public certificate. The CA also needs to send you the public certificate that it used to create the certificate and the public certificates for any CAs in the chain.
-
Load the public certificate of the CA into the keystore by entering the following command:
"c:\Program Files\Java\jdk1.5.0_14\jre\bin\java" -Dprotect=module
-DignorePassphrase=true sun.security.tools.KeyTool -import -alias
publicca –file certca.cer -keystore Amstore.jks -storetype
nCipher.sworld -provider com.ncipher.provider.km.nCipherKM
Enter your values for the following parameters:
Parameter
Description
-Dprotect=module
Required if you want the keystore to be module protected.
-DignorePassphrase=true
Required if you want the keystore to be module protected.
sun.security.tools.KeyTool
The name of the keytool command
-import
The parameter that makes this an import request.
-alias
A name that helps you identify that this is the public certificate from the CA. In this sample configuration, the name is publicca.
-file
The name of the CA certificate file. In this sample configuration, the name is certca.cer.
-keystore
A name for the keystore. In this sample configuration, the name is AMstore.jks.
-storetype
The type of keystore. For nCipher, this must be set to nCipher.sworld.
-provider
The name of the providerClass and providerName.
The tool prompts you for the keystore password and asks whether you want to trust the certificate.
-
(Conditional) Repeat Step 7 for each CA in the chain, giving each CA a unique alias.
-
Import the signed certificated received from the CA by entering the following command:
"c:\Program Files\Java\jdk1.5.0_14\jre\bin\java" -Dprotect=module
-DignorePassphrase=true sun.security.tools.KeyTool -import -alias
od93 –file signcert.der -keystore AMstore.jks -storepass mypwd
-storetype nCipher.sworld -provider
com.ncipher.provider.km.nCipherKM
Enter your values for the following parameters:
Parameter
Description
-Dprotect=module
Required if you want the keystore to be module protected.
-DignorePassphrase=true
Required if you want the keystore to be module protected.
sun.security.tools.KeyTool
The name of the keytool command
-import
The parameter that makes this an import request.
-alias
A name that helps you identify that this is the signing key pair from the CA. It needs to be the same alias you specified when you created the keystore in Step 4. In this sample configuration, the name is od93.
-file
The name of the signing certificate file from the CA. In this sample configuration, the name is signcert.der.
-keystore
A name for the keystore. In this sample configuration, the name is AMstore.jks.
-storepass
The password for the keystore. In this sample configuration, the password is mypwd.
-storetype
The type of keystore. For nCipher, this must be set to nCipher.sworld.
-provider
The name of the providerClass and providerName.
-
(Optional) To verify that the certificates have been added to the keystore, enter the following command:
"c:\Program Files\Java\jdk1.5.0_14\jre\bin\java" -Dprotect=module
-DignorePassphrase=true sun.security.tools.KeyTool -list -v
-keystore AMstore.jks -storetype nCipher.sworld -provider
com.ncipher.provider.km.nCipherKM
The keystore should contain at least two certificates. The certificate that you created should now be issued by the CA you used, and the public certificate of the CA should be there as the owner and the issuer.
-
Copy the keystore to the idp directory on the Identity Server.
Linux: /opt/novell/devman/jcc/certs/idp
Windows Server 2003: \Program Files\Novell\devman\jcc\certs\idp
Windows Server 2008: \Program Files (x86)\Novell\devman\jcc\certs\idp
The keystore is found on the netHSM client in the directory specified by the -keystore parameter when you created the keystore. See Step 4.
-
Synchronize the Identity Server with the remote file system server.
Linux: Enter the following commands:
/opt/nfast/bin/rfs-sync –-update
/opt/nfast/bin/rfs-sync –-commit
Windows: Enter the following commands:
C:\nfast\bin>rfs-sync --update
C:\nfast\bin>rfs-sync --commit
-
(Conditional) If the cluster configuration contains more than one Identity Server, complete the following steps for each cluster member:
-
Copy the keystore to the cluster member. Copy it to the following directory:
Linux: /opt/novell/devman/jcc/certs/idp
Windows Server 2003: \Program Files\Novell\devman\jcc\certs\idp
Windows Server 2008: \Program Files (x86)\Novell\devman\jcc\certs\idp
-
Make sure the novlwww user has at least read rights.
-
Use the netHSM client to synchronize the cluster member with the remote file system server.
Linux: Enter the following commands:
/opt/nfast/bin/rfs-sync –-update
/opt/nfast/bin/rfs-sync –-commit
Windows: Enter the following commands:
C:\nfast\bin>rfs-sync --update
C:\nfast\bin>rfs-sync --commit
-
-
Continue with Configuring the Identity Server to Use the netHSM Certificate.
Configuring the Identity Server to Use the netHSM Certificate
The procedure to modify the classpath names depends upon whether you have a Linux or a Windows Identity Server:
Configuring a Linux Identity Server for the Certificate
-
At the Identity Server, log in as root.
-
Add the nfast jar files to the classpath.
Because the Identity Server runs as a Tomcat service, the following steps explain how to modify the classpath for Tomcat.
-
In an editor, open the /opt/novell/tomcat5/bin/dtomcat5 file.
-
To the CLASSPATH="$JAVA_HOME"/lib/tools.jar line, add the following classes from the /opt/nfast/java/classes directory:
nfjava.jar
kmjava.jar
kmcsp.jar
spp.jar
rsaprivenc.jar
jutils.jar:
jcetools.jar
keysafe.jar
Your line should look similar to the following:
CLASSPATH="$JAVA_HOME"/lib/tools.jar:/opt/nfast/java/classes/
nfjava.jar:/opt/nfast/java/classes/kmjava.jar:/opt/nfast/java/
classes/kmcsp.jar:/opt/nfast/java/classes/spp.jar:/opt/nfast/
java/classes/rsaprivenc.jar:/opt/nfast/java/classes/
jutils.jar:/opt/nfast/java/classes/jcetools.jar:/opt/nfast/
java/classes/keysafe.jar
-
Save your changes.
-
-
Add the novlwww user to the nfast group by entering the following command:
usermod novlwww -G nfast
-
Add the netHSM certificate configuration lines to the tomcat5.conf file:
-
In a text editor, open the /var/opt/novell/tomcat5/conf/tomcat5.conf file.
-
Add the following lines:
JAVA_OPTS="${JAVA_OPTS} -Dcom.novell.nidp.extern.config.file=
/var/opt/novell/tomcat5/webapps/nidp/WEB-INF/classes/
externKeystore.properties"

JAVA_OPTS="${JAVA_OPTS} -Dprotect=module
-DignorePassphrase=true"
The first line specifies the location of the properties file. You can specify another location.
The second line is required only if you want the keystore to be module protected rather than card protected.
-
-
Configure the externKeystore.properties file to use the nCipher key and keystore:
-
In a text editor, create an externKeystore.properties file in the /var/opt/novell/tomcat5/webapps/nidp/WEB-INF/classes directory.
If you specified a different location for this file in Step 4, use that location.
-
Add the following lines:
com.novell.nidp.extern.signing.providerClass=com.ncipher.provider.km.nCipherKM
com.novell.nidp.extern.signing.providerName=nCipherKM
com.novell.nidp.extern.signing.keystoreType=nCipher.sworld
com.novell.nidp.extern.signing.keystoreName=/opt/novell/devman/jcc/certs/idp/AMstore.jks
com.novell.nidp.extern.signing.keystorePwd=mypwd
com.novell.nidp.extern.signing.alias=od93
com.novell.nidp.extern.signing.keyPwd=mypwd
Enter your values for the following variables:
Variable
Value
<provider_class>
The name of the providerClass. For nCipher, this must be set to com.ncipher.provider.km.nCipherKM.
<provider_name>
The name of the provider. For nCipher, this must be set to nCipherKM.
<keystore_type>
The type of keystore. For nCipher, this must be set to nCipher.sworld.
<keystore_name>
The name you specified when you created the keystore. In this sample configuration, the name is AMstore.jks.
<keystore_pwd>
When you use module-protected keys, the keystore password must be null. For example:
com.novell.nidp.extern.signing.keystorePwd=
<key_alias>
The alias you created for the key when you created the key. In this sample configuration, the name is od93.
<key_pwd>
When you use module-protected keys, the key password must be null. For example:
com.novell.nidp.extern.signing.keyPwd=
-
-
To restart Tomcat, enter the following command:
/etc/init.d/novell-tomcat5 restart
-
Continue with Verifying the Use of the nCipher Key Pair.
Configuring a Windows Identity Server for the Certificate
-
At the Identity Server, log in as the Windows administrator.
-
Add the nfast JAR files to the classpath.
Because the Identity Server runs as a Tomcat service, the following steps explain how to modify the classpath for Tomcat.
-
Run the tomcat5w.exe utility located in the following directory:
Windows Server 2003: \Program Files\Novell\Tomcat\bin
Windows Server 2008: \Program Files (x86)\Novell\Tomcat\bin
-
Click the tab.
-
In the text box add the following to the end of the path:
";C:\nfast\java\classes\jcetools.jar;C:\nfast\java\classes\jutils.jar;C:\nfast\java\classes\keysafe.jar;C:\nfast\java\classes\kmcsp.jar;C:\nfast\java\classes\kmjava.jar;C:\nfast\java\classes\nfjava.jar;C:\nfast\java\classes\rsaprivenc.jar;C:\nfast\java\classes\spp.jar"
-
Save your changes.
-
-
Add the netHSM certificate configuration lines to the tomcat5.conf file:
-
Run the tomcat5w.exe utility located in the following directory:
Windows Server 2003: \Program Files\Novell\Tomcat\bin
Windows Server 2008: \Program Files (x86)\Novell\Tomcat\bin
-
Click the tab.
-
In the text box, add the following as three separate lines:
-Dcom.novell.nidp.extern.config.file=C:\PROGRA~1\Novell\Tomcat\webapps
   \nidp\WEB-INF\classes\externKeystore.properties
-Dprotect=module
-DignorePassphrase=true
The first line specifies the location of the properties file. For readability, it has been wrapped and indented. Remove the extra white space when creating the entry in the file. You can specify another location.
The second line is required only if you want the keystore to be module protected rather than card protected.
-
-
Configure the externKeystore.properties file to use the nCipher key and keystore:
-
In a text editor, create an externKeystore.properties file in the following directory:
Windows Server 2003: \Program Files\Novell\Tomcat\webapps\nidp\WEB-INF\classes
Windows Server 2008: \Program Files (x86)\Novell\Tomcat\webapps\nidp \WEB-INF\classes
If you specified a different location for this file in Step 3, use that location.
-
Add the following lines:
com.novell.nidp.extern.signing.providerClass=com.ncipher.provider.km.nCipherKM
com.novell.nidp.extern.signing.providerName=nCipherKM
com.novell.nidp.extern.signing.keystoreType=nCipher.sworld
com.novell.nidp.extern.signing.keystoreName=C:\\Program Files\\Novell\\
   devman\\jcc\\certs\\idp\\AMstore.jks
com.novell.nidp.extern.signing.keystorePwd=mypwd
com.novell.nidp.extern.signing.alias=od93
com.novell.nidp.extern.signing.keyPwd=mypwd
The com.novell.nidp.extern.signing.keystoreName line is wrapped and indented for readability. All extra white space needs to be removed in the file entry. The double slashes in the path are required.
Enter your values for the following variables:
Variable
Value
<provider_class>
The name of the providerClass. For nCipher, this must be set to com.ncipher.provider.km.nCipherKM.
<provider_name>
The name of the provider. For nCipher, this must be set to nCipherKM.
<keystore_type>
The type of keystore. For nCipher, this must be set to nCipher.sworld.
<keystore_name>
The name you specified when you created the keystore. In this sample configuration, the name is AMstore.jks.
<keystore_pwd>
When using module-protected keys, the keystore password must be null. For example:
com.novell.nidp.extern.signing.keystorePwd=
<key_alias>
The alias you created for the key when you created the key. In this sample configuration, the name is od93.
<key_pwd>
When using module-protected keys, the key password must be null. For example:
com.novell.nidp.extern.signing.keyPwd=
-
-
To restart Tomcat, enter the following commands:
net stop Tomcat5
net start Tomcat5
-
Continue with Verifying the Use of the nCipher Key Pair.
Verifying the Use of the nCipher Key Pair
After you have configured the Identity Server to use the nCipher key pair and have restarted Tomcat, the metadata of the Identity Server indicates that the nCipher key pair is being used for the signing certificate.
-
In a browser, enter the following URL:
http://<DNS_name>:8080/nidp/idff/metadataReplace <DNS_name> with the DNS name of your Identity Server.
-
Search for the following string:
<md:KeyDescriptor use="signing">
-
Copy the certificate text between the <ds:X509Certificate> and the </ds:X509Certificate> tags
-
Paste the text into a text editor.
-
Delete the <ds:X509Certificate> tag and replace it with the following text:
-----BEGIN CERTIFICATE-----
-
Delete the </ds:X509Certificate> tag and replace it with the following text:
-----END CERTIFICATE-----
-
Save the file as a text file with a .cer extension.
-
Open the file in Internet Explorer.
-
View the certificate details.
If the Identity Server is using the nCipher signing certificate, the certificate is issued by your CA and the name the certificate is issued to is the name you specified for the certificate.
If the Identity Server is using the Access Manager certificate, the certificate is issued by the Organizational CA and the certificate name is test-signing. For troubleshooting information, see Troubleshooting the netHSM Configuration.
Troubleshooting the netHSM Configuration
To discover potential configuration errors:
-
Verify that you have not enabled the data encryption of resource IDs. There is a known issue with this feature and the Apache libraries in a multi-provider environment. Because of this issue, netHSM is not compatible with encrypting the resource IDs.
-
In the Administration Console, click > > > > .
-
Click a profile, then check the setting for the option.
-
If the option is selected, deselect it, then click .
-
Verify that all profiles have been configured so that they do not encrypt the resource IDs.
-
-
View the nfast log files:
Linux: /opt/nfast/log
Windows: C:\nfast\log
When there is a port conflict, logfile contains entries similar to the following:
nFast server: Notice: Using tcp socket local:9000
nFast server: Fatal error during startup: Operating system call failed: bind tcp socket, Address already in use
For information on how to change the port, see Step 6. For other errors, consult the netHSM documentation.
-
(Linux only) If the novlwww user does not have rights to the cmdadp.log and cmdadp-debug.log files, the Identity Server is halted because it cannot read the keystore. The Health page of the Identity Server displays the following error:
The following error occurred during the identity server configuration. Unable to read keystore: /opt/novell/devman/jcc/certs/idp/AMstore45.jks
To correct the error:
-
View the rights for the nfast log files with the following command:
ll /opt/nfast/log
Your listing should look similar to the following:
-rw-r--r-- 1 novlwww nfast    0 Apr 11 11:50 cmdadp-debug.log
-rw-r--r-- 1 novlwww nfast  134 Apr 11 11:50 cmdadp.log
-rw-r----- 1 root    nfast   43 Apr 11 11:49 debug
-rw-r----- 1 nfast   nfast    5 Apr 11 11:49 hardserver.pid
-rw-r----- 1 nfast   nfast 3057 Apr 11 11:50 logfile
If novlwww is not listed as the owner of the cmdadp.log and cmdadp-debug.log files, continue with Step 3.b.
If novlwww is listed as the owner of the files with rw permissions, log file ownership is not the source of your problem. Continue with Step 4.
-
Stop Tomcat with the following command:
/etc/init.d/novell-tomcat5 stop
-
Stop nfast with the following command:
/opt/nfast/sbin/init.d-nfast stop
-
Delete all the log files in the /opt/nfast/log directory.
-
Start nfast with the following command:
/opt/nfast/sbin/init.d-nfast start
-
Start Tomcat with the following command
/etc/init.d/novell-tomcat5 start
-
Wait a minute, then list the files in the /opt/nfast/log directory.
The nfast client creates the log files and assigns the correct owners and rights.
-
-
Enable Identity Server logging and view the catalina.out file.
-
In the Administration Console, click > > > .
-
Configure the following options:
File Logging: Specify enabled.
Echo to Console: Select this option.
Component File Logger Levels: Set to .
-
Click , then update the Identity Server.
-
Delete the current catalina.out file in the /var/opt/novell/tomcat5/logs directory.
-
Restart Tomcat by entering the following command:
/etc/init.d/novell-tomcat5 restart
-
To tail the catalina.out file, enter the following command:
tail -f /var/opt/novell/tomcat5/logs/catalina.out
-
Search for a list of providers. When nCipher is working, the file contains entries similar to the following nCipher entries:
Security Providers: SUN: 1.42 SUN (DSA key/parameter generation; DSA signing; SHA-1, MD5 digests; SecureRandom; X.509 certificates; JKS keystore; PKIX CertPathValidator; PKIX CertPathBuilder; LDAP, Collection CertStores) SunJSSE: 1.42 Sun JSSE provider(implements RSA Signatures, PKCS12, SunX509 key/trust factories, SSLv3, TLSv1) SunRsaSign: 1.42 SUN's provider for RSA signatures SunJCE: 1.42 SunJCE Provider (implements DES, Triple DES, AES, Blowfish, PBE, Diffie-Hellman, HMAC-MD5, HMAC-SHA1) SunJGSS: 1.0 Sun (Kerberos v5) nCipherRSAPrivateEncrypt: 1.008004 RSA private key encrypt handling provider nCipherKM: 1.008004 nCipher Secure Key Management BC: 1.28 BouncyCastle Security Provider v1.28 SAML: 1.0 SAML SASL Mechanism -
(Conditional) If the catalina.out file does not contain any entries for providers, check for the following errors:
-
Check the Health of the Identity Server. If the status is red, use the error message to resolve the issue.
-
Make sure the novlwww user has read rights to the keystore.
-
Verify that the externKeystore.properties file has all the required lines with valid values. See Step 5.
-
Verify that the tomcat5.conf file is configured correctly. See Step 4.
-
-
-
Enable netHSM logging.
This logging feature is very verbose. It should be turned on only while you are debugging a problem. If it is left on, your machine can quickly run out of disk space.
-
To the tomcat5.conf file in the /var/opt/novell/tomcat5/conf directory, add the following line:
JAVA_OPTS="${JAVA_OPTS} -DJCECSP_DEBUG=255 -DJCECSP_DEBUGFILE=/var/opt/novell/tomcat5/logs/nCipher_jcecsp.debug" -
Restart Tomcat by entering the following command:
/etc/init.d/novell-tomcat5 restart
-
Look for clues in the nCipher_jcecsp.debug file.
-