3.6 Managing Direct Access to the Identity Server
Users usually log into the Identity Server when they request access to a Web resource. They are redirected by the Access Gateway from the resource to the Identity Server to provide the required credentials for the resource. After they are authenticated, they are not prompted for credentials again, unless a resource requires credentials that they haven’t already supplied.
However, users can log directly into the Identity Server and access the User Portal, or they can access information about available Web Services Description Language (WSDL) services. This section describes how to manage access to these pages.
3.6.1 Logging In to the User Portal
Users can log directly in to the Identity Server when they enter the Base URL of the Identity Server in their browsers. For example, if your base URL is http://doc.provo.novell.com:8080/nidp, users can log in directly to the Identity Server by entering the following URL:
http://doc.provo.novell.com:8080/nidp/app
This URL prompts the user to authenticate with the credentials required for the default contract.
Figure 3-4 User Portal
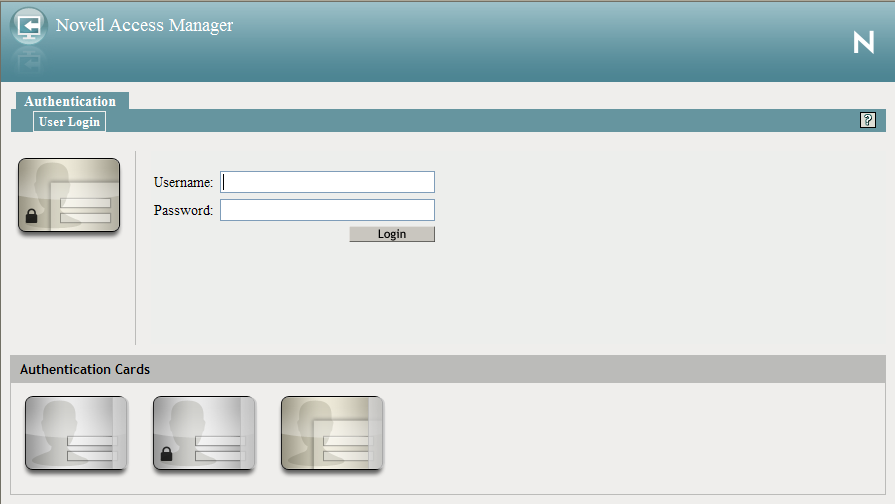
When users log directly into the Identity Server, the users need to use the default card for authentication. This is the card that appears in the top left frame, and the credentials it requires are displayed in the top right frame.
On a newly installed system, cards for all the authentication contracts that are installed with the system are displayed. To avoid confusing your users, you need to disable the option for the contracts you do not want your users to use. In the Administration Console, click > > > > > > .
Also, make sure you modify the default contract to match a card that is displayed. In the Administration Console, click > > > > .
If you display multiple cards, users can use different credentials to authenticate multiple times by selecting another authentication card and entering the required credentials. This is only useful if the credentials grant the user different roles or authorize access to different resources.
If you have configured the Identity Server to be a service provider and have established a trusted relationship with one or more identity providers, the cards of these trusted identity providers appear in the section. Your users can use the identity provider’s authentication card to federate their account at the identity provider with their account at the service provider. When they federate an account, they are telling the service provider to trust the authentication established at the identity provider. This enables single sign-on between the providers. The card can also be used to defederate the accounts. On the authentication card, click , then select .
If you have configured the Identity Server to be an identity provider for service providers, a Federation page is accessible after login. From this page, users can federate and defederate their accounts with trusted service providers.
3.6.2 Specifying a Target
You need to specify a target for the following conditions:
-
You want to direct the users to a specific URL after the users log in to the Identity Server.
-
You do not want users to have access to the User Portal page.
Use one of the following methods to specify the target:
-
Specify a Target in the URL: You can have your users access the Identity Server with a URL that contains the desired target. For example:
https://<domain.com>:8443/nidp/app?target=http://www.novell.comwhere <domain.com> is the DNS name of your Identity Server. In this example, the users would see the Novell Web site after logging in.
-
Specify a Hidden Target on your Form: If you have your own login form to collect credentials and are posting these credentials to the Identity Server, you can add a hidden target to your login form. When authentication succeeds, the user is directed to this target URL. This entry on your form should look similar to the following:
<input type="hidden" target="http://www.novell.com">
These methods work only when the user’s request is for the /nidp/app. If the user’s request is a redirected authentication request for a protected resource, the protected resource is the target and cannot be changed.
3.6.3 Blocking Access to the User Portal Page
If a user is already authenticated and accesses the Identity Server, the user is presented with the Identity Server User Portal page.
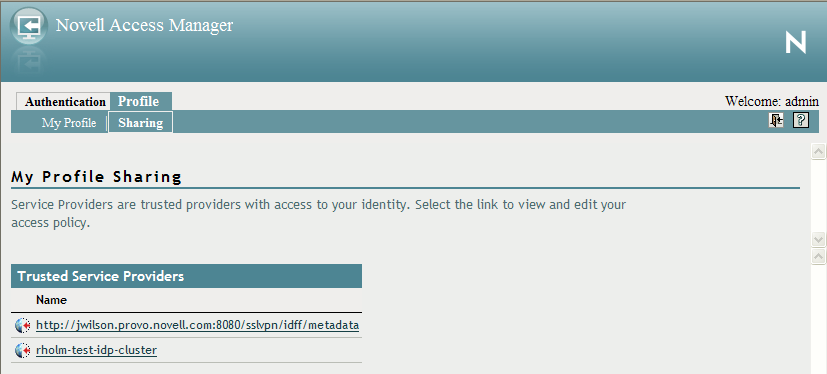
This page provides a wealth of information about the logged-in user:
-
Any federations this user has established with third-party service providers
-
Identity attributes such as Liberty Personal or employee profile attributes, or Access Manager credential or custom profile attributes
-
Policy attributes that users or administrators have selected to share with other service providers
You might want to prevent users from seeing this page for the following reasons:
-
Security: Users accessing this page have access to sensitive information that administrators might want to restrict such as the user’s attributes and federations with other third-party SAML or Liberty providers.
-
Help Desk Support: Most users have no need to access the information presented in this page. As a result, they might be confused if they see it. By preventing access to the page, any potential calls into the help desk are avoided.
The main.jsp page is called with every access to the Identity Server login page. You can modify the code that checks the users status, and if the user is already authenticated, you can redirect the user to another page.
To block access to the User Portal page:
-
Open the main.jsp file for editing. This file is located in the following directory:
Linux: /var/opt/novell/tomcat5/webapps/nidp/jsp
Windows Server 2003: \Program Files\Novell\Tomcat\webapps\nidp\jsp
Windows Server 2008: \Program Files (x86)\Novell\Tomcat\webapps\nidp\jsp
-
Locate the following line:
ContentHandler hand = new ContentHandler(request,response);
-
Add the following lines just below this line:
<%
if (hand.isAuthenticatedSession())
{
    String redirectURL = "http://www.novell.com/";
    response.sendRedirect(redirectURL);
}
%>
Replace the redirectURL value ("http://www.novell.com/") with the URL you want your users redirected to.
When a user accesses the login page and is not authenticated, the login process continues with its default process, and the user is presented with the login page where the user credentials can be entered and submitted. If the user is already logged in, the isAuthenticatedSession()function returns true. Instead of being redirected to the default IDP portal page, the new code is executed, and the user is redirected to a predefined URL.
The following ieHTTPHeaders output confirms this:
GET /nidp/app HTTP/1.1
Accept: image/gif, image/x-xbitmap, image/jpeg, image/pjpeg, application/x-shockwave-flash, application/x-ms-application, application/x-ms-xbap, application/vnd.ms-xpsdocument, application/xaml+xml, */*
Accept-Language: en-US,en-IE;q=0.5
UA-CPU: x86
Accept-Encoding: gzip, deflate
User-Agent: Mozilla/4.0 (compatible; MSIE 7.0; Windows NT 5.1; .NET CLR 2.0.50727; .NET CLR 3.0.04506.648; .NET CLR 3.5.21022; .NET CLR 3.0.4506.2152; .NET CLR 3.5.30729)
Host: idp126.lab.novell.com:8443
Connection: Keep-Alive
Cookie: JSESSIONID=11AB34250B3E79DEC11186168C23B34D; novell_language=en-us; CoreID6=23495995982212440449949; __utma=64695856.419410920.1252432782.1270822885.1271090179.10; __utmz=64695856.1270722077.8.1.utmcsr=(direct)|utmccn=(direct)|utmcmd=(none); WT_FPC=id=83.147.135.44-1904004976.30060919:lv=1266928072031:ss=1266927852968; WT_DC=tsp=1; IPCZQX03a36c6c0a=000002009302249462bb469a9f0f5b43243b858a
HTTP/1.1 302 Moved Temporarily
Server: Apache-Coyote/1.1
Pragma: No-cache
Cache-Control: no-cache
Location: http://www.novell.com/
Content-Type: text/html;charset=UTF-8
Content-Length: 0
Date: Thu, 29 Apr 2010 09:17:19 GMT
-
Copy this modified main.jsp file to each Identity Server in the cluster.
-
Make a backup copy of this file. Whenever you upgrade the Identity Server, this file is overwritten.
3.6.4 Blocking Access to the WSDL Services Page
Users can access the WSDL services page when they enter the base URL of the Identity Server in their browsers with the path to the Services page. For example, if your base URL is http://bfrei.provo.novell.com:8080/nidp, the users can access the services page with the following URL:
http://bfrei.provo.novell.com:8080/nidp/services
The Services page contains the following information and links:
Figure 3-5 WSDL Services Page
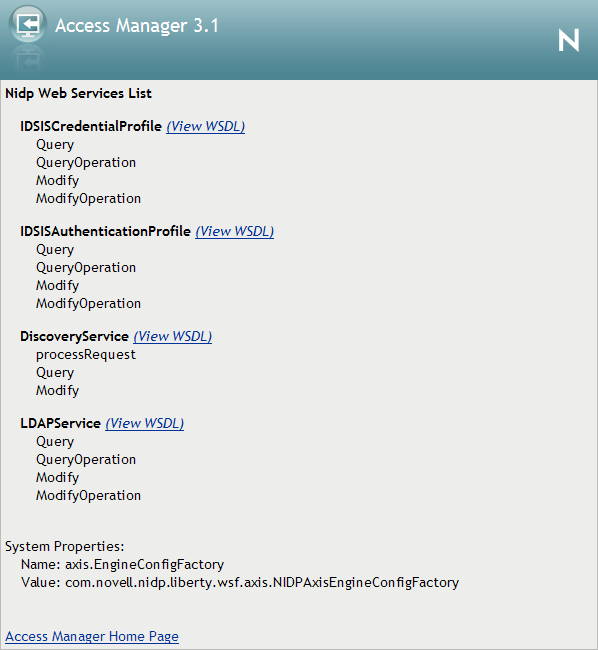
The amount of information displayed on this page depends upon the profiles you have enabled. To enable profiles, click .
If you do not want your users to have access to this page, you can block access.
-
Log in as the root or administrator user.
-
Open the web.xml file for editing:
Linux: /opt/novell/nids/lib/webapp/WEB-INF
Windows Server 2003: \Program Files\Novell\Tomcat\webapps\nidp\WEB-INF
Windows Server 2008: \Program Files (x86)\Novell\Tomcat\webapps\nidp\WEB-INF
-
Near the top of the file, in the context initialization parameters section, add the following lines:
  <context-param>
    <param-name>wsfServicesList</param-name>
    <param-value>full</param-value>
  </context-param>
When <param-value> has a value of full, users can access the Services page. To modify this behavior, replace full with one of the following values:
Value
Description
404
Returns an HTTP 404 status code: Not Found
403
Returns an HTTP 403 status code: Forbidden
empty
Returns an empty services list
If the parameter is removed from the file or if you enter an invalid value, the value is interpreted as full, and users have access to the page.
-
Restart Tomcat for your modifications to take effect:
Linux: Enter the following command:
/etc/init.d/novell-tomcat5 restart
Windows: Enter the following commands:
net stop Tomcat5
net start Tomcat5