7.1 Configuring a Linux Identity Server as a Protected Resource
These configuration steps assume that you are using SSL.
-
(Conditional) If you are using domain-based multi-homing, create a wildcard certificate to be used by the Identity Server and the Access Gateway.
For example, *.provo.novell.com, where the Identity Server DNS is idp.provo.novell.com and the Access Gateway DNS is jwilson1.provo.novell.com.
If you don’t have a wildcard certificate, you cannot use domain-based multi-homing for this configuration scenario.
If you are using path-based multi-homing, you can use the same certificate for the Identity Server and the Access Gateway.
-
Configure the Base URL of the Identity Server. For complete configuration information, see Section 1.3, Creating a Basic Identity Server Configuration.
-
Click .
-
Set the port to 443.
-
Specify the correct domain name for the proxy service type.
Path-Based Proxy Service: If you are using path-based multi-homing, the domain name of the Base URL must match the public DNS of the proxy service set up in the Access Gateway.
For example, if your proxy service has a public DNS name of jwilson1.provo.novell.com, that is the name you must specify for the Base URL.
Domain-Based Proxy Service: If you are using domain-based multi-homing, the domain name of the Base URL can be different than the Access Gateway, but your DNS server must resolve the name to the IP address of the Access Gateway. Specify a name that allows the two to share a common subdomain.
For example, if the proxy service name is jwilson1.provo.novell.com, replace jwilson1with idp so that the name is idp.provo.novell.com.
-
-
Configure the Identity Server to use the correct certificate:
-
Click the icon.
-
Click , then click the icon.
-
For a domain-based proxy service, select the wildcard certificate. For a path-based proxy service, select the certificate that matches the DNS name of the Access Gateway.
-
Click twice, then accept the prompt to restart Tomcat.
-
-
When the health of the Identity Server turns green, continue with Step 5 for a domain-based proxy service or Step 6 for a path-based proxy service.
-
(Domain-Based Proxy Service) Set up a proxy service on the Access Gateway for the Identity Server:
-
Click .
For more information about creating a proxy service, see
Managing Reverse Proxies and Authentication
in the Novell Access Manager 3.1 SP5 Access Gateway Guide. -
In the list, click .
-
Set the field to .
-
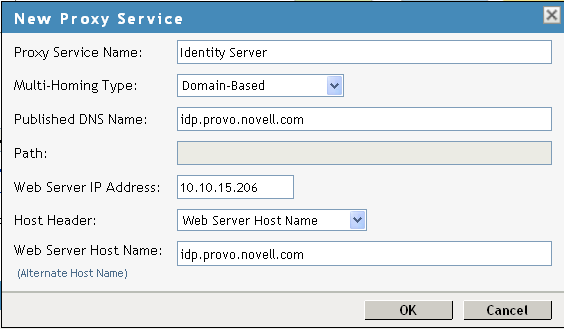
Set the following fields to the specified values:
Published DNS Name: Specify the same name you have specified for the domain name of the Base URL of the Identity Server. Your DNS server must be set up to resolve this name to the Access Gateway.
Web Server IP Address: Specify the IP address of the Identity Server. If the cluster configuration for the Identity Server contains more than one Identity Server, provide the IP address of one of the servers here. This must be the actual IP address of the Identity Server and not the VIP address if the Identity Server is behind an L4 switch.
Host Header: Specify
Web Server Host Name: Specify the domain name of the Base URL of the Identity Server. This entry matches what you specify in the field.
Your proxy service configuration should look similar to the following:
-
-
(Path-Based Proxy Service) Set up a proxy service on the Access Gateway for the Identity Server:
-
Click .
For more information about creating a proxy service, see
Managing Reverse Proxies and Authentication
in the Novell Access Manager 3.1 SP5 Access Gateway Guide -
In the list, click .
-
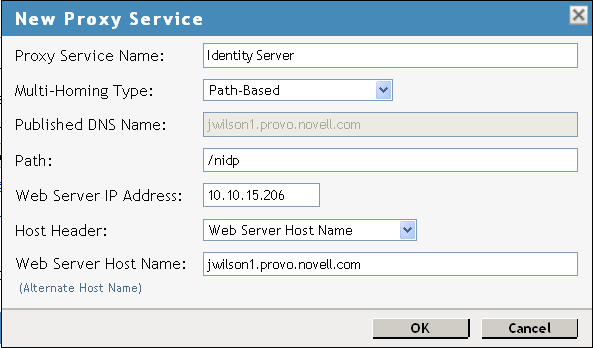
Set the field to and set the field to /nidp.
-
Set the following fields to the specified values:
Published DNS Name: Specify the same name you have specified for the domain name of the Base URL of the Identity Server. Your DNS server must be set up to resolve this name to the Access Gateway.
Web Server IP Address: Specify the IP address of the Identity Server. If the cluster configuration for the Identity Server contains more than one Identity Server, provide the IP address of one of the servers here. This must be the actual IP address of the Identity Server and not the VIP address if the Identity Server is behind an L4 switch.
Host Header: Specify
Web Server Host Name: Specify the domain name of the Base URL of the Identity Server. This entry matches what you specify in the field.
Your proxy service configuration should look similar to the following:
-
Click .
-
Click the name of your proxy service.
-
On the Path-Based Multi-Homing page, make sure the option is not selected.
The Identity Server needs the /nidp path.
-
Click .
-
-
Configure a protected resource for the proxy service:
-
In the , click the link under the column.
For more information about configuring protected resources, see
Configuring Protected Resources
in the How and when does the master ics_dyn know about the slaves?. -
Click , specify a name, then click .
-
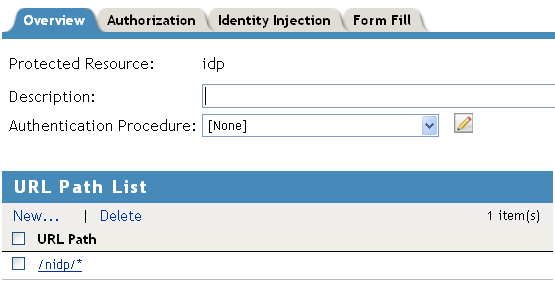
Configure the following fields:
Authentication Procedure: Set this field to .
The Identity Server needs to be set up as a public resource.
URL Path: Set the path of the protected resource to the following value:
/nidp/*
Your protected resource should look similar to the following:
-
Click .
-
-
(Path-Based Proxy Service) Verify the configuration:
-
Click the name of your path-based proxy service.
-
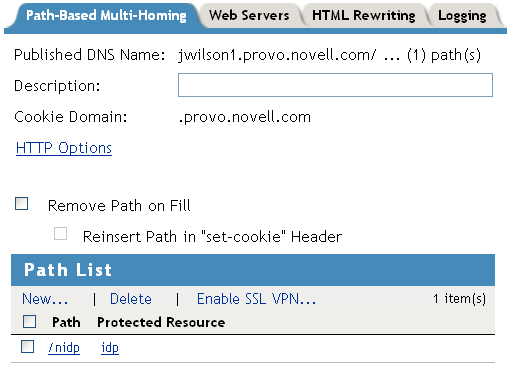
Verify that the option is not selected.
-
Verify that the has an entry with /nidp as the path for the protected resource.
Your configuration should look similar to the following:
-
Click .
-
-
Set up the Access Gateway to use SSL between the browsers and the Access Gateway.
For configuration information, see
Configuring SSL Communication with the Browsers and the Identity Server
in the Novell Access Manager 3.1 SP5 Access Gateway Guide.-
For a domain-based proxy service, select to use the wildcard certificate.
-
For a path-based proxy service, SSL is configured on the parent proxy service. Configure the parent proxy service to use a certificate that matches its DNS name.
-
-
Set up SSL between the proxy service that is protecting the Identity Server and the Identity Server. In this type of configuration, the Identity Server is acting as a protected Web server of the Access Gateway.
-
Click > > > > > .
For additional configuration information, see
Configuring SSL between the Proxy Service and the Web Servers
in the Novell Access Manager 3.1 SP5 Access Gateway Guide. -
Configure the following:
Connect Using SSL: Enable this option.
Web Server Trusted Root: Select .
SSL Mutual Certificate: Do not configure this option.
Connect Port: Specify 8443.
-
-
(Conditional) If the cluster configuration for the Identity Server contains more than one Identity Server, configure the following options:
-
Click > > > > > .
-
Specify the IP addresses of the other Identity Servers in the .
If the Identity Servers are behind an L4 switch, you need to add the IP address of each Identity Server and not the VIP address.
-
Click , then configure the following options:
Policy for Multiple Destination IP Addresses: For the Identity Servers, select .
Enable Persistent Connections: Make sure this option is selected. After the user has established an authenticated session with an Identity Server, you want that user to continue using the same Identity Server as long as that server is running.
-
-
Configure HTML rewriting:
-
Click > > > > >
-
Make sure the option is selected.
-
In the , click , then specify a name for the profile and select for the .
-
Specify the following URLs in the section. The following URLs use jwilson1.provo.novell.com/nidp as the DNS name of the reverse proxy for the Identity Server.
jwilson1.provo.novell.com/nidp/idff/soap
jwilson1.provo.novell.com/nidp/idff/soap/
jwilson1.provo.novell.com/nidp/idff/soap/*
jwilson1.provo.novell.com:443/nidp/idff/soap
jwilson1.provo.novell.com:443/nidp/idff/soap/
jwilson1.provo.novell.com:443/nidp/idff/soap/*
Your rewriter profile should look similar to the following for the path-based proxy service example:
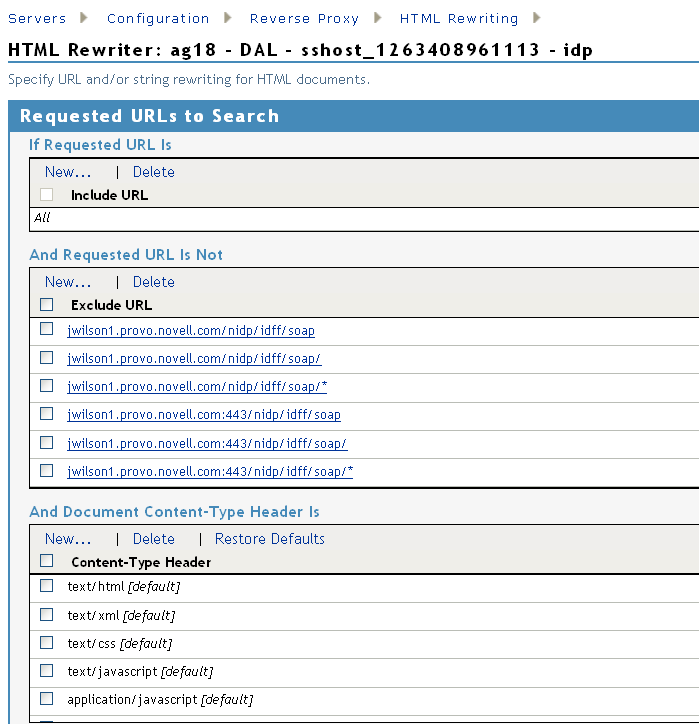
The example name for the domain-based proxy service is idp.provo.novell.com, which is the DNS name you would use when configuring the rewriter for a domain-based proxy service.
-
Click .
-
Use the up-arrow icon to move your profile to the top of the list.
-
-
Configure the Pin List so that the Identity Server pages are not cached:
-
On the Server Configuration page, click .
-
In the list, click , then specify the following values:
URL Mask: Specify /nidp/* for the URL.
Pin Type: Select.
For more information, see
Configuring a Pin List
in the Novell Access Manager 3.1 SP5 Access Gateway Guide. -
Click twice.
-
-
Update the Access Gateway.