6.1 Setting Up a Group of Web Servers
You can configure a proxy service to service a “virtual” group of Web servers, which adds load balancing and redundancy. Each Web server in the group must contain the same material. When you create the proxy service, you set up the first server by specifying the URLs you want users to access and the rights the users need for each URL. When you add additional Web servers to the proxy service, these servers automatically inherit everything you have configured for the first Web server.
Figure 6-2 Adding Redundant Web Servers
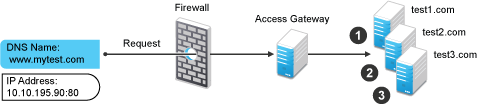
For this configuration, you use a single reverse proxy and proxy service. To add multiple Web servers to a host:
-
In the Administration Console, click > > > > > .
-
In the section, click .
-
Specify the IP address or the fully qualified DNS name of another Web server for the “virtual” group, then click .
-
Repeat Step 2 and Step 3 to add additional Web servers to the group.
-
To save your changes to browser cache, click .
-
To apply the changes, click the link, then click > .
The Access Gateway Service uses a round robin algorithm to select which Web server to send incoming requests to.
The Access Gateway Appliance can be configured to use round robin, or it can be configured to perform a simple failover. Simple failover sends all the traffic to the first Web server as long as it is available. Traffic is sent to another Web server in the list only when the first Web server is no longer available. To configure this option, see Section 2.7.2, Configuring TCP Connect Options for Web Servers.
Connection persistence is enabled by default. This allows the Access Gateway to send multiple HTTP requests to the Web server to be serviced before the connection is closed. To configure this option, see Section 2.7.2, Configuring TCP Connect Options for Web Servers.
Session stickiness option is used if multiple Web Servers are configured for a service. Selecting this option makes the proxy server to use the same Web server for all fills during a session. This option is enabled by default. For more information on persistent connections, see Section 2.7.3, Configuring Connection and Session Persistence.
6.1.1 Configuring Web Servers at Cluster Level
You can configure the web servers at cluster level and view the web servers at cluster level in the lag-cluster drop -down list. You can use this option when you want to create web servers at cluster level.
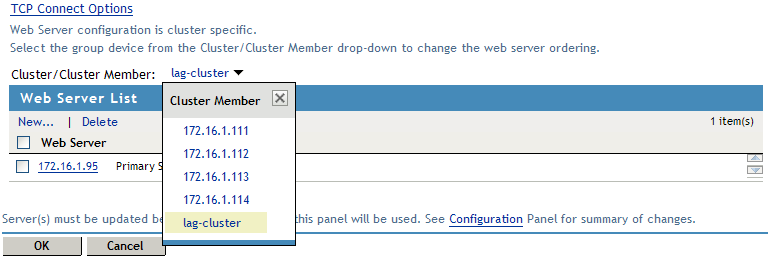
You can sort the web servers in the cluster, add the web servers to the cluster, delete the web servers in the cluster and prioritize the web server list.
-
Select the group device from the Cluster drop-down list to change the web server ordering.
-
Click to add a web server to the cluster or cluster member in the Web Server List.
-
Specify the IP address or the fully qualified DNS name of the Web Server
-
Click to delete the web servers at the cluster/cluster member level. A message is displayed as “ If you delete web server from the cluster, then it will be deleted from all cluster members”.
-
Click to continue orto discard the changes.
NOTE:You can prioritize the web server list at the cluster level and this will reflect the changes in the all the cluster members list but once the web server is configured from cluster member, order cannot be changed from cluster because the order would be different from each cluster member.
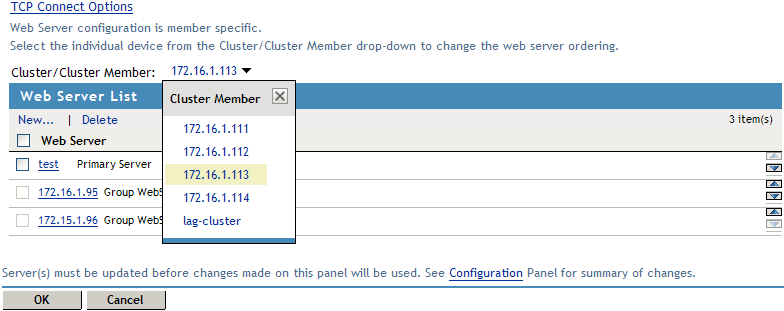
6.1.2 Configuring Web Servers at Member Level
You can configure the web servers at the member level by adding and deleting the web servers. You can move up or down the web servers as primary web server. You can add a new web server at the cluster member level.
-
Click and enter the . A confirmation dialog displays the following message”. The web server addition makes this service's web server configuration as member specific. Henceforth the web server ordering should be changed from each cluster member”.
-
Click to continue.
-
Select the specific web server you ant to delete and click. A message is displayed as "Delete the selected Web Server(s)?". Click to continue.
Once the web server is deleted a message is displayed as "Web Server Address Changed. All cached content on this Server should be purged. Purge All Cache? " The system will purge the details of the deleted server. Using the arrow key you can configure the web servers as primary web server.
NOTE:The primary web server at the member level is not the same at the cluster level. The web server list sorting will be different at both cluster and member level.