7.5 Filtering Alarms
The pane in the Operations Center console is available only for elements that can display alarms.
Alarms can be filtered using criteria based on one or more alarm properties, such as severity, element name, ID, or dates and times. Filtering is useful when you want to see a subset of alarms. For example, you can apply a filter to display only those alarms with a specified severity level and a time stamp within a specified date range.
Both administrators and users can create and apply alarm filters. Administrators can create alarm filters and apply them to service models or metamodel classes to select a subset of alarms. This provides a way to control the alarms seen by users when they open the view. Service model and class filters can be applied in the console, or through scripts.
Users can create and apply alarm filters in their own views. These filters do not affect other users’ view of alarms.
Users can define their own alarm filters using the pane, which is located in the bottom left corner of the view:
Figure 7-4 Alarms View

Applying an alarm filter displays a subset of alarms in the view. For example, apply a filter to display only those alarms with a specific severity message or class, or alarms within a specific date and time range. Combine the filter criteria using AND or ANY logic, as explained in subsequent subsections.
Applying an alarm filter does not change the total number of alarms displayed next to each filter button at the top of the console. For example, if there are 100 CRITICAL alarms, but an applied filter removes these alarms from the Alarms view, 100 still displays next to the red filter button in the console tool bar.
HINT:Click and drag up the top border of the pane to view many filters. Click and drag between column headings to resize filter columns.
To filter alarms, review the following sections:
7.5.1 Displaying or Hiding the Alarm Filter Pane
To hide or show the Alarm Filter pane:
-
From the menu, select .
When selected, the pane displays.
-
To hide the Alarm Filters pane, deselect from the menu.
7.5.2 Creating an Alarm Filter
The options available for a filter depend on the adapter associated with the currently selected element.
To create an alarm filter:
-
In the pane, select an element.
-
Click
 in the pane to open its dialog box.
-
In the field, specify a name for the filter.
The name can contain between 1-50 alphanumeric or space characters only.
-
Do one of the following to determine the type of match: Select the radio button to determine if an alarm must match any or all of the condition statements in order to be selected.
-
Select the radio button to match one or more condition expressions. Selecting this option joins more than one statement with an OR operator.
-
Select the radio button to match all of the condition expressions. Selecting this option joins more than one statement with an AND operator.
-
Select the radio button to specify a boolean expression to match.
For more information, see the table in Step 8.
-
-
To determine how the condition statements are applied in the filter, do one of the following: or radio button to determine if an alarm must match any or all of the condition statements in order to be selected.
-
Select the radio button to match one or more alarm expressions. Selecting this option joins the statements with an OR operator.
-
Select the radio button to match all alarm expressions. Selecting this option joins statements with an AND operator.
For example, to view alarms that have a specific severity and ID prefix, create two filter statements, then select the radio button to join the statements with an AND operator. This is seen as “and” at the beginning of the filter row for the second filter. If you select , “or” begins each subsequent filter row.
-
Select the radio button to join the statements using a custom boolean expression.
-
-
Click .
A blank row displays for defining a filter statement.
-
Click the first drop-down list, then select the alarm column name to match in the filter.
The list varies among adapters and also depends on the currently selected element. For example, select for the filter to search alarms based on the date and time they were received:

Depending on which filter you select, other fields are displayed.
-
Select comparison operators and specify match criteria using the other fields in the row.
When defining the alarm filters, refer to Table 7-3 to understand the relationships among the fields.
Table 7-3 Alarm Filters - Parameters
Alarm Column Type
Operators
Match Criteria
Notes
Text-based (such as Element, Class, Status, Description)
- contains
- does not contain
- is
- is not
- begins with
- ends with
Specify an appropriate value based on the selected alarm column.
-
For exact matches, use or .
-
For partial matches anywhere in an alarm value, use or .
-
For partial matches using the first or last characters, use or .
-
For partial matches using the first or last characters, use or .
- is greater than
- is greater than or equal
- is less than
- is lss than or equal
Specify an appropriate value to compare to the alarm column value.
These are lexicographical comparisons.
- matches regex
Specify a regular expression to perform on the alarm column value.
In regular expressions, standard wildcards (?) and (*) are allowed, as well as standard operators such as OR, AND, or BETWEEN.
Date, Time
- is
- is not
- is before
- is before or equal
- is after
- is after or equal
Specify a date and time.
To select a date range, create a and an statement, joined by selecting ; or use .
- is less than
- is more than
Specify a date/time interval to compare with the alarm date/time.
These are relative date/time comparisons. For example, to match dates that are within 30 days earlier than the current date, use the criteria: date/time is less than 30 days before the current date.
- is within the last
Specify an aligned interval based on a number of minutes, hours, days, weeks, months, or months.
This is a comparison within an aligned interval that is inclusive to the current time interval. For example, to match dates that are within the current month and previous month, select . In this case, if the current date is July 15, the filter searches for dates between June 1 to July 31, but will any alarms from June 1 to July 15.
- is today
- was yesterday
These are comparisons based on the current date.
- is between
Specify beginning and ending dates to compare with the alarm date.
This is a comparison based on a date range.
Severity
- is
- is not
- is higher than
- is lower than
Select from severity levels appropriate to the adapter.
Use to exclude all but one severity code.
To select a contiguous range of severity codes, create two statements using and , joined by selecting .
Numeric (such as ID)
- contains
- does not contain
- is
- is not
- begins with
- ends with
- is greater than
- is greater than or equal
- is less than
- is less than or equal
- is between
Specify the number.
-
For exact matches, use or .
-
For partial matches anywhere in an alarm value, use or .
-
For partial matches using the first or last characters, use or .
-
For a relative match, use or .
-
To select a contiguous range of values, create two statements using and , joined by selecting ; or use .
After placing the cursor in the filter value column (the last column in the row), specify a value, or an error message prompts for a numeric value. It is not possible to edit the other columns or close the Alarm Filter dialog box without first specifying a value.
Some examples of alarm filters:
-
Matching Alarm Dates and Times: If you select in the first drop-down list, you can select in the second drop-down list:
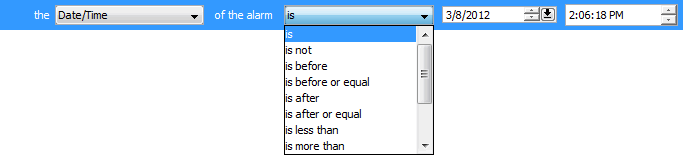
Then, if the comparison involves a specific date and time, use the calendar selector to select a date:

In some cases, a relative “rolling” date/time comparison is necessary. For example, a filter could select alarms that are within 30 days of the current date and time. Use the or operator to specify the time interval for comparing the current date and time. Also specify whether the filter should pull alarms that are before or after the current date and time.
The following example filters alarms whose date/time stamp is within 24 hours before the current date/time:

-
Matching Exact Cases: Case-sensitive matching in alarm filters is optional. When a text type alarm column is used in a filter, the check box is selected by default. This means that when searching for a specific text string, a match occurs only if each letter in the string matches exactly the string entered in the third field of the alarm filter.
For example, if the alarm column values are all capitalized, such as OPEN, use all capital letters to enter the value for the alarm filter:

If case matching is irrelevant in the search, then deselect the check box.
-
Matching Alarm Severity Codes: When is the selected alarm column, a drop-down list of severity codes and colors displays in the right column:

The codes vary among adapters.
-
(Optional) Click to create another alarm filter.
The following example shows a filter with two statements:

The filter matches alarms with a date and time stamp before the specified date and time and a CRITICAL severity.
-
If the radio button was selected in Step 4, specify a boolean expression using alarm expression ids to indicate how the condition statements are to be applied:
-
Expression ids display in the front of each condition statement.
-
Use AND to join two expressions.
-
Use OR to match any of two expressions.
-
Use NOT to not match an expression.
-
The boolean expression is not case-sensitive. Not all alarm expressions must be applied as boolean expressions can be formed in a way that ignores an expression. For example, if the following expression is used, (AF1 OR AF2) AND (NOT AF4), then AF3 would be ignored.
-
In the figure below, the filter allows alarms no older than 24 hours with a severity of CRITICAL, MAJOR, MINOR and UNKNOWN.

-
-
(Conditional) To automatically deactivate the filter upon logout from the console, select the check box.
To leave the filter activated from session to session, leave the check box deselected.
Deactivating filters upon logout ensures that all alarms display after the next login.
If filters remain active upon logout, the active filters apply automatically upon login and only the selected alarms display in the view. Problems might arise from not realizing that all alarms are not displayed.
-
Click to create the filter.
The new filter displays in the pane.
7.5.3 Applying Filters
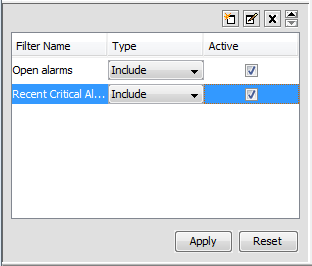
After creating filters, you can apply them to the view using the pane. Multiple filters are applied using the AND operator, meaning the resulting alarm set must match all the active filters. The Figure 7-5 example selects and includes alarms whose IDs begin with 443 and have a MAJOR or CRITICAL severity:
Figure 7-5 Alarm Filter Pane: Apply multiple filters at the same time.
After applying a filter, the status bar at the bottom of the view displays the total number of alarms selected by the active filters, and identifies in red the number of alarms that are not displayed because of the filter.
To apply an alarm filter:
-
Do one of the following:
-
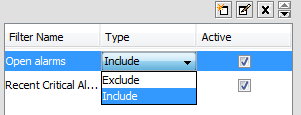
To include alarms selected by the filter in the view, click the drop-down list, then select .
-
To exclude alarms selected by the filter from the view, click the drop-down list, then select .
-
-
Select the check box to apply the filter.
It is possible to apply more than one filter at the same time.
Alarms must match all active filters in order to be selected.
-
Click .
Alarms are selected based on the active filters and the “included” option. The selected alarms display in the view.
7.5.4 Changing Filter Order
Filters apply in the order in which they display in the pane.
To change the order in which filters apply:
-
Select the filter in the pane.
-
Click
 (the up or down scroll arrow button) to move the filter.
7.5.5 Editing and Deleting Filters
Editing a Filter
To edit a filter:
-
Select the filter, then click
 to open the Alarm Filter dialog box.
-
Edit the filter.
-
Click to save changes to the filter.
Deleting a Filter
To delete a filter:
-
Select the filter, then click
 to open the Delete Confirmation dialog box.
-
Click to confirm the deletion.
The filter disappears from the pane.
7.5.6 Reapplying Filters to Update the Alarms View
Alarm filters are reapplied and the view is updated when alarm activity occurs, such as when a new alarm is received, a condition filter is selected in the console toolbar, or the button is clicked. However, it is possible to set a timer to reapply all alarm filters at a specified interval. This requires editing the /OperationsCenter_install_path/html/applet_params.xml file.
To specify a time interval for reapplying all alarm filters and updating the view:
-
Open the /OperationsCenter_install_path/html/applet_params.xml file.
-
Set the following parameter:
param name="AlarmPanel.AlarmFilterTimerFrequency" value="900000"
The time interval is in milliseconds. 900000 equals 15 minutes:
7.5.7 Disabling Filters
To disable alarm filters and display all alarms in the view:
-
In the pane, click to clear all check boxes.
-
Click .
All alarms display in the view.
7.5.8 Resolving Filters with No Data in Alarms View
In some situations, applying a filter results in no matching alarms; the view is blank. Attempting to edit a filter results in being unable to select a different alarm column value in the Alarm Filter dialog box.
For example, if is the selected alarm column, it is the only option in the drop-down list.The reason for this behavior is there are no alarm columns currently available for editing (or creating) alarm filters.
To restore alarm data:
-
Deactivate the alarm filter by clicking to clear the check boxes in the pane.
-
Click .
The view updates to display one or more alarms.
It is now possible to edit the alarm filters.