8.1 Creating and Configuring an Event Manager Agent
IMPORTANT:You should have the agent software for the Event Manager installed on each machine where the agents reside. For more information, see Section 3.1, Installing the Event Manager Agent on a Remote Host.
Use caution in configuring more than six agents, as some server hardware could have limitations on the number agents that can be handled, particularly machines with slower processors.
To create and configure an Event Manager agent:
-
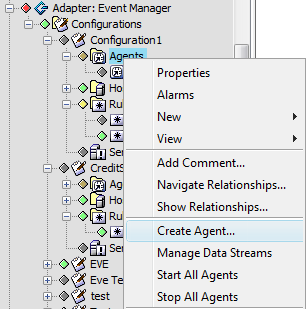
In the pane, expand the root element > > the Event Manager adapter > > a configuration profile for the adapter.
-
Right-click , then select to open the Create Agent dialog box:
-
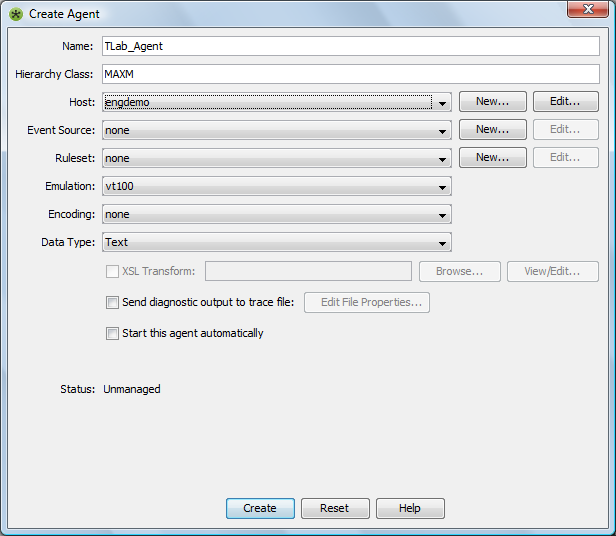
In the field, enter a name for the agent.
-
In the field, enter the class name of objects to associate with the agent. If a special icon is defined for the object class, the agent displays using that icon.
-
From the drop-down list, select a host where the agent resides.
If a specific host is not listed, click to create a new host. For more information regarding creating host definitions, see Section 6.1, Creating Hosts.
Click to edit the selected host definition.
-
From the drop-down list, select a source from the list of all sources available on the selected host .
If the agent is to process events via a ruleset and more than one port is listed, select the port to use for the ruleset.
Agents that are used as a cut through need only select a port from the list.
If a particular source is not listed, click to create the source. For more information regarding creating source definitions, see Section 6.3, Creating Sources.
If necessary, click to edit the selected source definition.
-
From the drop-down list, select a ruleset to apply to the data collected by the agent. Select from a list of available rulesets on the selected host.
If necessary, click to create a ruleset.
If necessary, click to edit the selected ruleset.
-
From the drop-down list, select the type of emulation that this agent uses. Options are vt100, vt220, or vt320.
-
From the drop-down list, select a character encoding type. Options are:
-
None: The default. No encoding type is used.
-
US‑ASCII: Seven-bit ASCII, a.k.a. ISO646‑US, a.k.a. the Basic Latin block of the Unicode character set.
-
ISO‑8859‑1: ISO Latin Alphabet No. 1, a.k.a. ISO‑LATIN‑1.
-
UTF‑8: Eight-bit Unicode Transformation Format.
For information on various Unicode Transformation Formats, see the Frequently Asked Question section on the Unicode Standard Web site.
-
-
From the drop-down list, select the type of data expected. Options are Text, TEC, or XML.
-
If is selected, the Event Manager Agent requires that either the XML already be in normalized format, or that you attach the XLST file to translate it into the normalized format, which conforms to the following tag structure:
<events>
   <event class="event_class">
      name=value,
      name2=value2,
         ...
      nameN=valueN
  </event>
  <event...
  </event>
</events>
For XML that does not originally conform to the Operations Center Normalized Event Format, select the check box and specify an XSL file used to transform the data received.
Enter the XSL file name in the field or click to locate and select the file.
Note that you can only browse to files located on the local file system where the Operations Center client runs. To specify a file where the agent or the Operations Center server is running (or any other location), enter the file’s path and pathname based on that.
Click to view or edit the XSL file code.
-
-
Select the check box to maintain a log file to track agent activity.
Identify the path to that file by clicking . The Edit Agent Diagnostic File Properties dialog box opens:
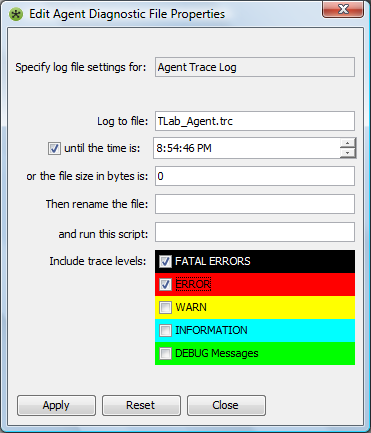
The following defines the agent trace log properties that are required for the trace file setup:
-
Log to file: Specify the file name for storing log information. Edit this entry to reflect the path to the Operations Center directory.
-
Until the time is: Use the spinner buttons to select a cut-off time for storing log data. The time format is HH:MM:SS AM/PM. For example, specify 12:00:00 PM for noon or 09:30:00 PM for 9:30 PM.
-
Until the file’s size is: Enter the cut-off file size for collecting trace log data.
-
Then rename the file: When the trace log file reaches one of the cut-offs above, it renames the file to this entry, and starts a new log file.
-
And run this script: Any program can be run here, but the default is a file compression application, gzip.
-
Include trace Levels: Mark the levels of output messages to include in the trace file.
Click when selections are complete.
-
-
Select the check box to start this agent automatically when the Agent Container starts up.
If you do not select this check box, the agent must be manually started.
-
Click to create the agent definition.
-
To set up a T/EC Server Socket connection, create a source for a server socket connection, then select as the Data Type for the agent.