6.3 Creating Sources
Sources are access points for agents to receive data from a host. Therefore, sources are the communication channel by which agents can:
-
Receive events from a log file
-
Listen to accept text for the rules engine
-
Receive the output from an external program and apply a ruleset
-
Accept SNMP traps from SNMP agents
-
Act as a proxy so that Operations Center users can connect to another system
-
Connect a physical device such as a modem
-
Accept T/EC Native feeds
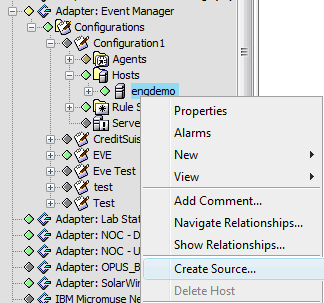
To set up a source for a host:
-
In the pane, expand the root element > > the Event Manager adapter > > a particular configuration > .
-
Right-click a host, then select to open the Create Source dialog box:
-
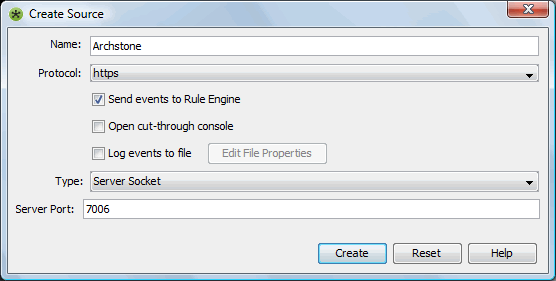
Complete the settings:
Name: The name of the source.
Protocol: Click the drop-down list, then select a protocol for the source:
-
none: establishes a raw socket transport without any protocol being used.
-
telnet: establishes a Telnet session.
-
ftp: establishes an FTP session.
-
http or https: establishes an HTTP or HTTPS connection.
When the agent queries the web site, if the If-Modifed_Since header property is greater than the last query, then the query will return data. Otherwise the query returns data every time.
-
smtp/pop3/nntp: establishes an SMPT/POP3/NNTP connection.
Send events to rule engine: Select the check box to collect alarms from this source.
Open cut-through console: Select the check box to provide a console window for the user to access the source.
Log events to file: Select the check box to write the raw events to a file. Click to configure the destination in the Edit Source Input File Properties dialog box opens:
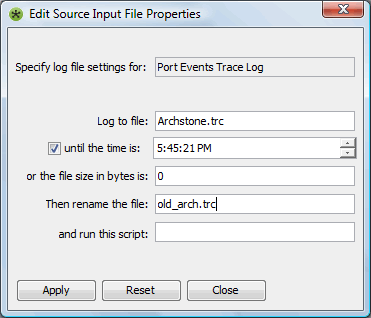
The following describes the properties required for the setup:
-
Log to file: Specify the file name for storing the log information. Edit this entry to reflect the path to the Operations Center directory.
-
Until the time is: Select the check box to set a cut-off time. Use the spinner buttons to select a cut-off time for collecting log data.
-
Or the file size in bytes is: Enter the cut-off file size for collecting trace log data. The file size is used as a cut-off unless a cut-off time is selected.
-
Then rename the file: When the trace log file reaches one of the cut-offs above, it renames the file to this entry, and start a new log file.
-
And run this script: Any program can be run here, but the default is a file compression application, gzip.
Click to save settings and close the dialog box when selections are complete.
Type: Click the drop-down list, then select a source type. The dialog box changes to show required options for the selected source type. Select from the following source types:
-
Server Socket: Passively listens and waits to be connected to the port. Specify:
-
Port: The server port where the agent connects. Make sure the port selected does not conflict with the ports already in use for Operations Center. For more information on port usage in Operations Center, see the Operations Center 5.5 Server Configuration Guide.
-
-
Client Socket: Initiates a socket connection to the specified host and port, from which it receives lines of text to process. Specify:
-
Host: The name of the host to connect to.
-
Port: The port number for the host. Make sure the port selected does not conflict with the ports already in use for Operations Center. For more information on port usage in Operations Center, see the Operations Center 5.5 Server Configuration Guide.
-
-
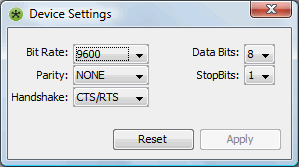
Device: Defines a device where the agent assigned is connected. Specify:
-
Device: The device name.
Click to customize the standard connection parameters, then click .
-
-
Process: Runs a specified command at the command line prompt and collects the output of that command. Specify:
-
Process: Enter a command to return output to the agent. To send all updates to the trace file (formula.trc) are sent to the agent, enter:
tail –f d:/OperationsCenter_install_path/logs/formula.trc
-
-
SNMP Trap: Defines a new SNMP trap port in the Event Manager. Specify:
-
SNMP trap port: the port number for the SNMP trap. The default value is 162.
-
-
File Tail: Obtains information from a file:
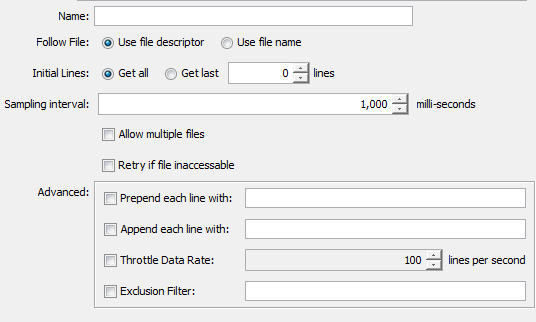
Specify the following values:
-
Name: A single tail file, a file that contains a list of files to follow, or a file expression (UNIX or WINTEL). Use commas as a delimiter if specifying more than one file.
WARNING:If specifying a tail file on a mapped or network drive, the Operations Center Service Account must have permissions to access the file. Without permissions, the source will be unable to access the file.
If using a file expression, the name can consist of a sequence of characters, path expressions, and date expressions as follows:
fileName{pathexp}{date}where {pathexp} is a sequence of standard UNIX or WINTEL path expression syntax characters. For example:
my_file_???.txt matches my_file_0000.txt and my_file_172.txt and *.txt
Date expressions must be differentiated from regular expressions. Inject a special set of tags that follow the XML convention:
<date>datexp</date>
The datexp portion of the name is defined as:
‑datexp: %YYYY, %yyyy – Year expressed as a four-digit numeral (such as 2008)
%yy – Year expressed as a two-digit numeral (such as 08)
%M, %m – Month
%D,%d – Day
For example:
my_files_*_<date>%m.%d.%yy</date>.txt
matches:
my_files_friday_10.22.07
Using expression syntax means that more than one file can match. However, if the option is not selected, only the first file is tailed.
-
Follow File radio buttons: Select one of the following to specify how the file is identified:
-
Use file descriptor: Uses the operating system descriptor of the file for identification. If the file name is changed, the process continues to use the original file regardless of the file name.
-
Use file name: Searches for the file based on the file name.
-
-
Initial lines radio buttons: Select one of the following ways to specify how many lines are returned to the source:
-
Get all lines: Returns the entire contents of the file.
-
Get Last X Lines: Use the spinner to select the number of lines to take from the end of the files.
-
-
Sampling interval: Use the spinner to set the time interval, in milliseconds, for checking the file for new data.
-
Allow multiple files check box: Select to allow more than one file to be tailed. If this is deselected and multiple files are matched, the first file found is tailed.
-
Retry if file inaccessible check box: Select to automatically attempt another connection if the file is not accessible.
-
Prepend each line with check box: Includes the specified text at the beginning of each line.
-
Append each line with check box: Includes the specified text at the end of each line.
-
Throttle data rate check box: Use the spinner to set the number of lines per second as the rate of data transmission.
-
Exclusion filter check box: Use a regular expression to exclude matching lines. Enter the regular expression in the field.
-
-
FormulaScript: Runs a script using the eventIntegrator object and returns the results. Available methods include:
-
eventIntegrator.postEvent(eventString) - Sends an event string into theprocessing engine (similar to reading a line from a file tail.)
-
eventIntegrator.getLog() - returns the logger for the agent.
-
eventIntegrator.getAgentHandle() - provides access to agent configuration object, from which the script can see:
-
host()
-
name()
-
className()
-
maxQueuedAlarms()
-
dataType()
-
emulation()
-
encoding()
-
startOnStartup()
-
processRuleSetOnStart()
-
isInUse()
-
lastModified()
-
serverName()
-
traceLevel()
-
Select the radio button to use a stored script file.
Specify the location or file name in the field or click to find, then select a file.
Alternatively, select the radio button to enter (or cut and paste) a script into the script dialog box, as shown:
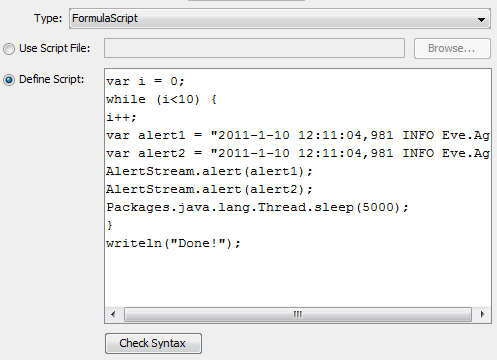
Then, click to verify correct FormulaScript syntax.
-
-
URL: Connects to a source using Internet protocols. Specify:
-
Source URL: Specify a URL address/location.
-
-
-
Click to save changes and complete the configuration.