7.4 Defining and Editing Rulesets
Use the Operations Center Event Manager Ruleset Editor to create, edit and manage rulesets. Ruleset files are contained within Operations Center files and can only be accessed through the Event Manager.
Rulesets do not interact with the data source nor do they provide any connectivity or integration points with the data source. Rulesets do provide a customizable approach to handling highly variable raw data streams and the delivery of event management with the Event Manager.
HINT:View instructions for setting up rulesets and how to use the Event Manager Ruleset Editor by selecting the menu option.
7.4.1 Understanding the Ruleset Editor
The Ruleset Editor directly supports building rulesets and processing raw text.
The following topics provide an overview of using the Ruelset Editor tool:
Understanding the Ruleset Editor’s Views
The Ruleset Editor consists of a left pane and two tabular views: and .
Figure 7-1 Event Manager Ruleset Editor

The following lists the Ruleset Editor panes:
-
Rules Hierarchy: A hierarchy tree displays parent and child rules defined for the current ruleset. Select a rule. The data in panes to the right update to reflect the properties for the currently selected rule. This pane displays when either the or tab displays.
-
Variables: A list of reserved system variables and user-defined variables used for parsing and filtering incoming events. System variables display in bold typeface. This pane displays when either the or tab displays.
-
Raw Data: Displays the contents of a selected imported text file. This pane is part of the tab.
-
Rule Matching: Statements that identify specific text strings to match in the incoming data. Incoming lines that contain matching text strings are then processed by statements in the pane. This pane is part of the tab.
-
Rule Parsing: Statements that specify the rules for parsing and storing text from incoming event data in variables defined for the ruleset. This pane is part of the tab.
-
Rule Logic: Statements that evaluate variable values for the incoming events and define actions to perform based on these values. This pane is part of the tab.
Understanding How the Ruleset Editor Processes Incoming Text
In the simplest scenario, the following actions occur when the Ruleset Editor processes incoming event data:
-
A selected rule applies to an event message received by the Event Manager.
-
If the message contains text that matches the statements in the pane, it is parsed into variables specified in the pane.
-
Statements in the pane process the parsed variables.
-
Alarm properties specified in the tab of the Ruleset Editor apply to the event.
Alarms are sent to the Alarm Server and subsequently to the Operations Center Event Manager adapter.
7.4.2 Creating Rules within a Ruleset
The following steps explain the general process of defining new rules within a ruleset. Subsequent sections explain the details.
The general steps for defining new rules within a ruleset are:
-
In the pane, identify the location of the new rule in the hierarchy, then add the rule.
For more information, see Understanding Rule Inheritance and Event Processing.
-
In the pane, define the rule name and description.
The name can contain spaces, periods, underscores and dashes.
For more information, see Adding Rules.
-
In the pane, define variables that will store some of the parsed incoming raw text.
For more information, see Section 7.4.4, Defining and Editing Variables.
-
Load sample event data to facilitate the creation and testing of rules.
For more information, see Section 7.4.5, Loading Sample Data.
-
In the pane, identify the text strings to look for in the incoming lines of raw text. Lines with matching text strings are selected for further processing by statements in the pane.
For more information, see Section 7.4.6, Editing the Rule Matching Pane.
-
In the pane, define statements that parse the incoming event data into variable values.
For more information, see Section 7.4.7, Editing the Rule Parsing Pane.
-
Define statements in the pane. Define statements that evaluate the variable values and perform actions based on these values.
For more information, see Section 7.4.8, Editing the Rule Logic Pane.
-
In the tab, define alarm properties for events that match all conditions of the selected rule in the pane.
The tab defines the alarms that display in the Operations Center console.
For more information, see Section 7.4.9, Configuring Alarms.
-
Test rules using sample data.
After defining a new rule, use the pane to test the rule and make adjustments before putting it into production.
For more information, see Section 7.4.10, Testing Rulesets Using Sample Data.
7.4.3 Creating and Managing Rules
The rule hierarchy is designed to process events efficiently. The following sections cover aspects of rule inheritance and event processing, as well as outline steps for adding rules, deleting rules, moving rules, and setting a default rule.
Understanding Rule Inheritance and Event Processing
Typically, multiple parents and child level rules process an incoming event. The processing occurs through a branch of the rule tree structure.
If an event successfully matches a parent rule, then all rules that are children of the parent rule process the event.
Each rule can contain one or more statements in the pane. If an incoming event matches all the statements in the pane, additional processing occurs:
-
The pane extracts specific characters in the raw text as named variables
-
Statements in the pane evaluate the variable values and perform actions based on these values
-
An alarm is generated, unless a rule in the pane specifies a action
If an event fails to match a parent rule, parsing and screening do not occur and none of the child rules apply.
Processing from the top-level parent through the lowest-level child stops when one of the following conditions is met:
-
Rule processing reaches the lowest level in the rule branch
-
The incoming data fails to match a statement the pane
-
A rule in the pane specifies not to convert an event to an alarm (a action)
Adding Rules
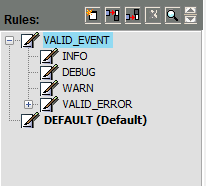
Define parent and child rules using the tree structure in the pane. Child rules display indented beneath their parents.
Figure 7-2 illustrates parent and child rules in the hierarchy tree:
Figure 7-2 Ruleset Editor
Adding Child Rules
To add a child rule to an existing rule:
-
Select a rule in the pane.
-
To open the Create New Rule dialog box, do one of the following:
-
Click
 ().
().
-
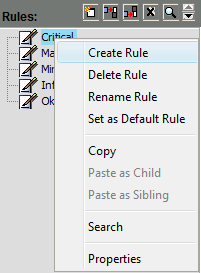
Right-click a rule, then select .
-
-
In the Create New Rule dialog box, specify a name and a description for the new rule:
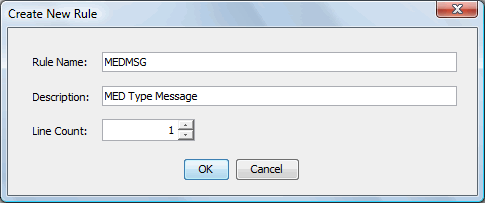
A rule name can consist of any combination of alphanumeric and underscore, space and dash characters, between 1 and 40 characters.
If a rule name that exceeds 37 characters is pasted, the rule name is truncated at 37 characters.
If this rule name is not unique, additional characters are appended until a unique rule name (40 characters or fewer) is created.
The default line count is 1, but can be a number between 1 and 999. The line count is the number of lines in an incoming event.
-
Click .
The new rule displays as a child of the currently selected rule. It displays beneath all other child rules in the branch.
It is possible to move the rule (see Moving Rules) elsewhere within the same branch.
Adding Rules at the Same Level
To add rules at the same level:
-
Select a rule in the pane.
-
Click
 () or
() or  () to open the Create New Rule dialog box.
-
Specify the Rule Name, Description and Line Count.
-
Click .
The new rule displays before or after the currently selected rule, at the same level.
Copy, Pasting and Renaming Rules
It is possible to create new rules from existing rules. Copy and paste an existing rule, then modify it using the and tabs.
Copying and Pasting a Rule
To copy and paste a rule in the Ruleset Editor:
-
Right-click a rule in the pane, then select .
-
To paste the rule as a child of another rule, right-click a rule, then select .
A copy of the original rule displays as a child of the selected rule.
Pasting at the Same Level of a Rule
To paste a rule at the same level as another rule in the Ruleset Editor:
-
Right-click a rule, then select .
A copy of the original rule displays as a sibling of the selected rule.
Renaming a Rule
To rename a rule in the Ruleset Editor:
-
Right-click the rule, then select .
-
Specify the new name.
Editing a Rule Properties
To edit a rule’s description and line count:
-
Right-click a rule, then select to open the Edit Rule Properties dialog box.
Edit the description and line count.
-
Click to save changes.
Deleting Rules
To delete a rule in the Ruleset Editor:
-
Do one of the following:
-
Select a rule in the pane, then click
 ().
().
-
Right-click a rule, then select .
This option works only for rules with no children.
-
Moving Rules
It is possible to change the order that rules display within a branch in the pane.
Understanding Moving Rules
A rule can move only within its current branch. At the top level, a parent rule (and all its children) can move above or below other rules at the same level.
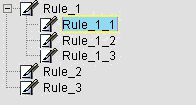
In the following example, Rule_1_1, Rule_1_2 and Rule_1_3 can move within the branch. For example, Rule_1_2 can move above Rule_1_1 or below Rule_1_3. However, none of the rules can move beyond its parent, Rule_1.
At the top level of this example, only Rule_2 and Rule_3 can move. For example, Rule_2 can move above Rule_1 or move below Rule_3. Although Rule_1 cannot move, changing the order of Rule_2 and Rule_3 could cause this to happen inadvertently.
Figure 7-3 illustrates reordering rules within a branch:
Figure 7-3 Ruleset Editor
Moving a Rule
To move a rule in the Ruleset Editor:
-
Select a rule, then click
 ( or ) to move the rule.
Only rules with no children can move.
Defining and Applying a Default Rule
Use the default rule to handle unexpected events. Apply it to an event after all the other rules in a ruleset fail to identify a match.
Understanding Default Rules
The default rule must be at the top level of the rule hierarchy; it has no parent and no children.
A greyed out option means the rule cannot be the default rule. The rule has children or is not at the top level of the rule hierarchy.
Figure 7-4 Ruleset Editor: Rule Right-Click Menu
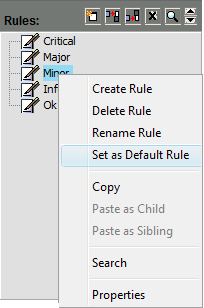
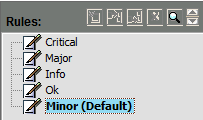
When selected, the rule name changes to include the text: (Default). The rule moves to the bottom of the rule hierarchy. It is not possible to add new rules after it, or to move existing rules move beneath it.
Figure 7-5 Ruleset Editor: The default rule is identified.
Defining a Default Rule
To define a default rule:
-
Right-click a rule, then select .
Changing a Default Rule
To change the default rule:
-
Right-click a rule, then select to open the following dialog box:

-
Click to confirm the change.
Searching for a Rule
When many rules display in the pane, use the Search feature to locate a rule quickly.
To search for a rule:
-
Click
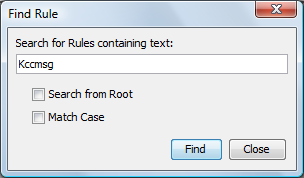
 () to open the Find Rule dialog box.
-
Enter search criteria for finding a rule in the pane. In the following dialog box, enter the search string:
Do the following in this dialog box as necessary:
-
To search the entire hierarchy from the top, select the check box.
To search the current branch starting from the selected rule, deselect the check box.
The search includes the current level and lower levels for the current branch only.
-
To conduct a case-sensitive search, select the check box.
To search using any combination of uppercase and lowercase text strings, deselect the check box.
-
-
Click to begin the search.
The first rule containing a matching string is selected. If necessary, the search automatically expands the rule hierarchy tree to locate a matching rule.
-
Continue clicking to locate additional matches.
A message displays when there are no more matches.
-
Click to end the search.
7.4.4 Defining and Editing Variables
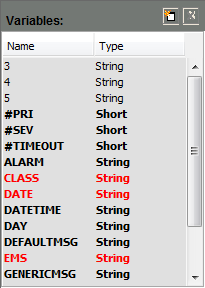
The pane contains a list of reserved system variables and user-defined variables used to parse and screen incoming events. Variables can consist of text or numbers. System variables display in bold typeface. Variables display in alphabetical order; user-defined variables display first, followed by system variables.
Figure 7-6 Variables Pane
The following topics describe how to add and maintain variables:
Understanding the System Variables for the Ruleset Editor
Table 7-1 lists all system variables currently defined in the Ruleset Editor:
Table 7-1 Variables
|
Variable |
Definition |
Values |
|---|---|---|
|
#PRI |
Priority of the alarm. |
1–99; 1 is the highest priority (Default = 50) |
|
#SEV |
Severity of the alarm. |
|
|
#TIMEOUT |
The time interval (number of minutes) after which an alarm closes automatically. |
0–32767 minutes |
|
CLASS |
The class assigned to the agent from which the event was received. |
N/A |
|
DATE |
The date that the event was received. |
Format is: mm/dd/yyyy, Where:
|
|
DATETIME |
The date and time that the event was received. When intending to use the Alarm data to set event date/time, be sure that the usedatetime custom properties are set correctly. See Section 3.4.3, Custom Properties Related to Alarm Server Functions. |
Format is: yyyy‑mm‑dd hh:MM:ss Where:
|
|
DAY |
The day of the week that the event was received. |
Format is: Sunday, Monday, Tuesday, Wednesday, Thursday, Friday, and Saturday |
|
EMS |
The agent from which the event was received. |
N/A |
|
TOD |
The time of day that the event message was received. |
Format is: hh:mm Where:
|
Reserved Words
The following are reserved words and cannot be used when defining variables:
-
id
-
severity
-
date
-
accum
-
is_assigned
-
escalated_up
-
escalated_down
-
class
-
can_escalate
-
can_delay
-
can_threshold
-
can_accumulate
-
can_discard
-
can_timeout
-
ems
-
ems_class
-
initdate
-
assignedto
-
enrouteto
-
text
-
priority
-
rule
-
group
-
circuit
-
segment
-
object
-
hrlt3
-
hrlt4
-
hrlt5
Adding Variables
To add a variable in the Ruleset Editor:
-
Click
() in the pane to open the Create New Variable dialog box:
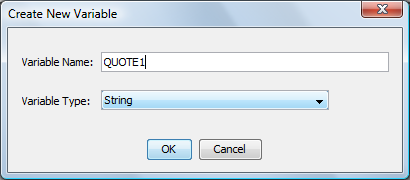
-
Specify a name for the new variable.
Variable names must consist of alphanumeric characters (no `spaces) between 1 and 40 characters in length.
-
Click the drop-down list, then select a variable type: , , , or .
-
Click .
The new variable displays in the pane in alphabetical order.
Editing Variables
The name of a user-defined variable cannot change. Instead, delete the variable and add a new one. It is also not possible to edit the name or type of a system-defined variable. However, it is possible to change the type of a user-defined variable.
To change the type of a user-defined variable:
In the pane, click the drop-down list next to the variable name, then select one of the following variable types:
String: Any text string.
Long: Any signed 32‑bit decimal (‑2147483647 to +2147483647).
Short: Any signed 16‑bit decimal (‑32767 to +32767).
Float: Any valid IEEE 754 32‑bit floating point number (3.40282347e+38f to 1.40239846e‑45f).
Deleting Variables
It is not possible to delete some system variables. The button is dimmed after selecting these variables.
To delete a variable:
-
In the pane, select the variable, then click
().
A dialog box opens to confirm the deletion.
-
Click to delete the variable.
7.4.5 Loading Sample Data
Load sample event data to facilitate the creation and testing of rules. When defining rules, select text and identify start and stop columns using the sample event data.
The  () button located in the pane tests the current ruleset using the sample event data. Both of these features are explained later in Section 7.4.10, Testing Rulesets Using Sample Data.
Loading a Text File Containing Sample Data
To load a text file that contains sample data:
-
In the pane, click
 ().
().
-
Browse and select a data file.
The file content displays in the pane:

This text is read-only.
-
Do any of the following:
-
Use the vertical scroll bar to view additional rows of sample data.
-
Use the horizontal scroll bar to view additional data on a line.
-
Copying Raw Data to Other Panes
To minimize data entry errors, copy text strings and the start and end column numbers from the sample raw data to fill in cells in the , , and panes.
To copy the raw data:
-
Click and drag to select information in the pane.
-
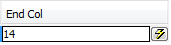
Confirm the selection by checking the status bar of the pane, which displays the selected start, text, and end columns:

-
In the , , or pane, select the cell to paste the information.
-
Click the
 (lightning bolt icon) next to the cell to paste the information.
7.4.6 Editing the Rule Matching Pane
Statements in the pane evaluate specific sections of the incoming data for string matches. String matches are based on user-defined text strings and the start and end columns of the incoming data. Incoming data with string matches that meet the True or False criteria specified by the Rule Matching statements are further processed by statements in the pane.
Understanding the Rule Matching Pane
In Figure 7-7, each statement searches for a single character.
Figure 7-7 Ruleset Editor: Rule Matching Pane

Before editing the pane, select the appropriate rule in the pane. The title bar displays the currently selected rule name and description:
Figure 7-8 Ruleset Editor - The Title Bar Identifies the Current Rule.

The pane can contain one or more rows automatically joined by the AND operator. Multiple statements mean incoming events must match all the specified criteria.
Specifying a value is not required. A blank in these columns instructs the search to start at the beginning of a line and finish at the end of a line.
In the following example, the matching events must contain the string MessageType:PCC1, but must not contain the string ISPCC1. There is no value, so the search ends at the last column of the line.
Figure 7-9 Ruleset Editor: Rule Matching pane with both True and False search strings

Adding Statements
Adding a Statement at the Bottom of the Rule Matching Pane
To add a statement at the bottom of the Rule Matching Pane:
-
Click
 () in the pane.
A new row displays.
-
Specify the match statement in the new row.
Adding a Statement Beneath the Currently Selected Statement
To add a statement beneath the currently selected statement:
-
Click
 ().
().
A new row displays beneath the current row.
HINT:Be aware that clicking a cell in a row can automatically place it in an edit mode.
Adding a Statement Above the Currently Selected Statement
To add a statement above the currently selected statement:
-
Click
 ().
().
A new row displays above the current row.
Moving Statements
To move a statement within the pane:
-
Select a statement.
-
Click
 ( or ) to move the statement.
Editing Rule Matching Columns
Table 7-2 provides a description of each column in the pane:
Table 7-2 Rule Matching Columns
|
Column |
Value |
Description |
|---|---|---|
|
|
True (Default) |
Rule fires if the event message contains the text specified between the start and end columns. |
|
False |
Rule fires if the event message does not contain the text specified between the start and end columns. |
|
|
|
1–999 |
The target line to search for a match in the event data. The default is 1. If the line count for the associated rule is greater than 1, select a different number from the drop-down list. If the line count for the rule equals 1, do not change this value. |
|
|
1–999 |
The position in the specified line where the string search begins. If this column is blank, the search begins at the first column of the line. |
|
|
Any characters |
The exact text found (True) or not found (False) in the event message. Trailing spaces are not trimmed and are represented using the space character (““). |
|
|
1–999 |
The position in the specified line where the string search ends. If this column is blank, the search ends at the last column of the line. |
Copying and Pasting Statements
Copying a Statement
To copy a statement:
-
Right-click a statement, then select .
Pasting a Statement Above or Below an Existing Statement
To paste a statement:
-
Right-click any location in the row, then select or .
Pasting the Statement at the End of the Pane
To paste a statement at the end of the pane:
-
Right-click any location in the bottom section of the pane that is not part of a row, then select .
Deleting Statements
To delete a statement:
-
Select the row, then click
 () to open a dialog box where you can confirm the deletion.
-
Click to delete the statement.
7.4.7 Editing the Rule Parsing Pane
The pane specifies how to parse and store the incoming event data in variables defined for the ruleset. Be sure to define variables in the pane before editing the pane.
In Figure 7-10, the Ruleset Editor parses the string “|”into the variables named DATE, ALARM, and CLASS.
Figure 7-10 Ruleset Editor: Parse strings using relative start columns.

It searches the entire incoming line for the string because no start or end column is specified.
Subsequent parsing depends on the location of the first parsed variable by defining a value of ‑1 which specifies that the search begins after the last parsed column.
Adding Statements
See Adding Statements.
Moving Statements
See Moving Statements.
Editing the Rule Parsing Pane
Table 7-3 provides a description of each column in the pane:
Table 7-3 Rule Parsing Columns
|
Column |
Value |
Description |
|---|---|---|
|
|
1–999 |
The target line to search for a match in the event data. The default is 1. If the line count for the associated rule is greater than 1, select a different number from the drop-down list. If the line count for the rule equals 1, do not change this value. |
|
|
Select from a drop-down list |
The variable in which to store the parsed value specified by the start/end strings and columns. Select a variable from the drop-down list. The variables are defined using the pane on the left side of the Ruleset Editor. |
|
|
1–999; ‑1 |
The position in the specified line where the string search begins. If this column is blank, the search begins at the first column of the line. –1 indicates the search starts in the position after the last parsed column. |
|
|
Any characters |
The exact text found in the event message beginning with at the start column. Trailing spaces are not trimmed and are represented using the space character (““). |
|
|
1–999; ‑1 |
The position in the specified line where the string search ends. If this column is blank, the search ends at the last column of the line. –1 indicates the search ends in the position after the last parsed column. |
|
|
Any characters |
The exact text found in the event message, starting at the specified end column. Trailing spaces are not trimmed and are represented using the space character (““). |
To minimize data entry errors, copy text strings and the start and end column numbers from sample event data to fill in cells in the pane.
For more information, see Copying Raw Data to Other Panes.
Copying and Pasting Rule Parsing Statements
See Copying and Pasting Statements for details.
Deleting Statements
To delete a statement in the pane:
-
Select the statement, then click
() to open a dialog box where you can confirm the deletion.
-
Click to delete the statement.
7.4.8 Editing the Rule Logic Pane
Statements in the pane apply logic to incoming events that match the statements in the pane. IF/THEN comparison statements can screen incoming events based on variable values and perform actions such as not firing an alarm, assigning variable values or resetting variable values.
Adding Statements
See Adding Statements.
Moving Statements
See Moving Statements.
Editing Rule Logic Column
Table 7-4 provides a description of each column in the pane:
Table 7-4 Rule Logic Columns
|
Column |
Value |
Description |
|---|---|---|
|
* |
Filled in automatically, depending on contents of other columns |
A read-only column used to show the logic flow represented by the rows in the pane. This column is automatically filled in as rows are added and removed from the pane. The possible values are:
|
|
|
Select from a drop-down list |
The variable to change or test using an operator. Select a variable from the drop-down list. The variables are defined using the Variables pane. |
|
|
Select from a drop-down list |
Comparison operators that require an operand:
Action operators:
|
|
|
Alphanumeric characters |
The variable value to test using a comparison operator. |
To minimize data entry errors:
-
Copy text strings and the start and end column numbers from sample event data to fill in cells in the pane.
For more information, see Copying Raw Data to Other Panes.
Copying and Pasting Rule Logic Rows
It is possible to copy and paste rows in the pane. For more information, see Copying and Pasting Statements.
Using Set To and Un-set Operators
The Set To operator assigns variable values, do the following:
Assigning the Set To Operator
To assign the Set To operator to a variable:
-
Select a variable in the column.
-
Select in the column.
-
Enter the new value for the variable in the column.
The following example sets the severity and priority numerical values for events that match the statements in the pane:

If one variable value depends on another variable value, use the operator in conjunction with an IF/THEN comparison statement. In the following example, the #SEV value is set to 1 if the code equals CRITICAL:

Using the Un-Set Operator
To assign the Un-Set operator to a variable:
-
Select a variable in the column.
-
Select in the column.
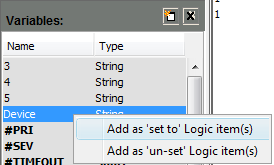
Using an Alternative Method of Applying the Set To or Un-Set Operator
To assign the set to or the Un-Set operator to a variable using an alternative method:
-
Right-click a variable in the pane.
-
Select or :
-
Select and the new statement displays in the pane:
-
Select and the following dialog box prompts for an initial value to use as the variable, specify the value to assign to that variable, then click .
This assignment displays in a new row in the pane:

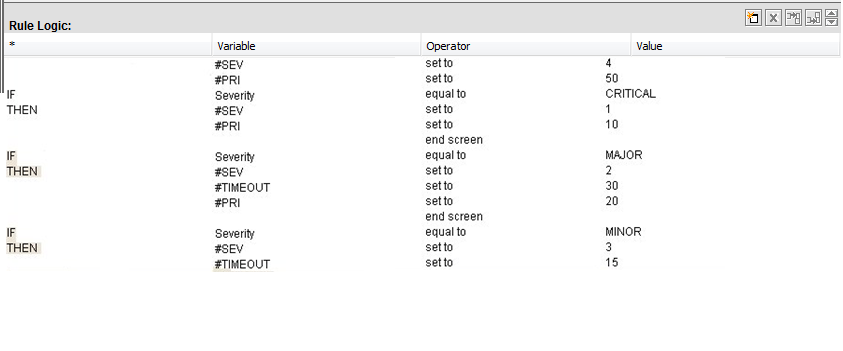
Constructing Comparison Statements
Use IF/THEN comparison statements to test the values of particular variables of incoming events. The actions can consist of assigning values to specific variables or not firing an alarm for an event (No Fire). Use the End Screen operator (explained in the next section) to separate IF/THEN comparison statements.
In Figure 7-11, multiple IF/THEN statements assign #SEV and #PRI values based on the severity code value.
Figure 7-11 Ruleset Editor: IF/THEN statements assign variable values.
Using No Fire and End Screen Statements
Ruleset hierarchy is designed to process events efficiently. If a parent rule does not identify an event or instructs a No Fire action through screening logic in the pane, then none of its child rules are used. In some situations, it is desirable to perform a No Fire action (do not fire the alarm) to exclude peripheral or unwanted events.
The statements in Figure 7-12 specify that if the value of the #SEV variable is not equal to 1, then do not fire an alarm for the event.
Figure 7-12 Ruleset Editor: No alarm is fired for events whose #SEV value does not equal 1.

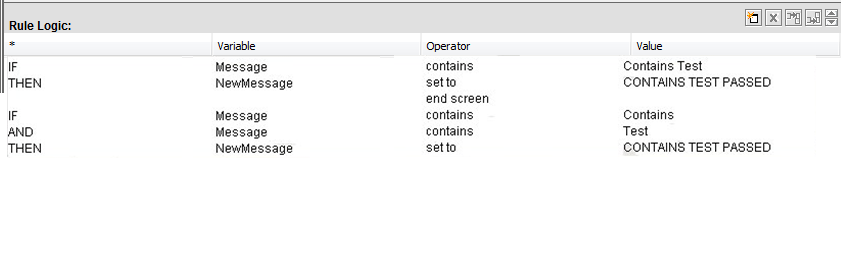
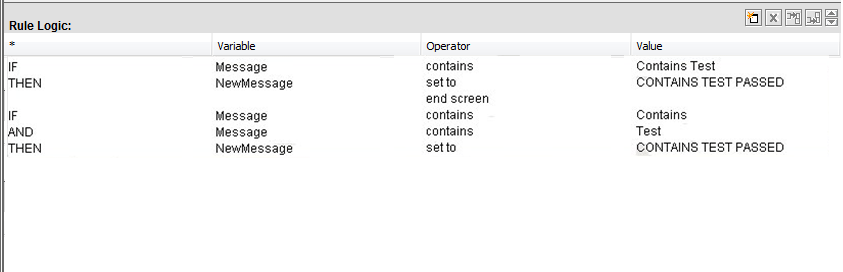
Use the End Screen operator by itself, with no values in the or column. End Screen separates multiple IF/THEN comparison statements. In most situations, when an event tests True for an IF statement, a THEN action occurs and nothing else should happen. Place End Screen after the THEN statement to prevent further processing of the event by subsequent IF/THEN comparison statements.
In Figure 7-13, the first comparison statement checks for the string “Contains Test.” If it exists, the THEN statement sets the NewMessage variable to “CONTAINS TEST PASSED”. The End Screen operator halts further processing of the event if it tests True; the second comparison statement does not apply.
Figure 7-13 Ruleset Editor: The End Screen operator is used to separate condition statements.
After completing the pane, the next step is to set up the rules for generating alarms in the tab. Refer to next section for details.
7.4.9 Configuring Alarms
In the tab, define alarm properties for events that match all conditions of the selected rule in the pane. The tab defines the alarms that display in the Operations Center console.
Configuring the Alarms Generated by Incoming Events
To configure the alarms generated by incoming events that meet the criteria specified in the pane:
-
Select a rule in the pane.
-
Click the tab in the Ruleset Editor to display the tab:
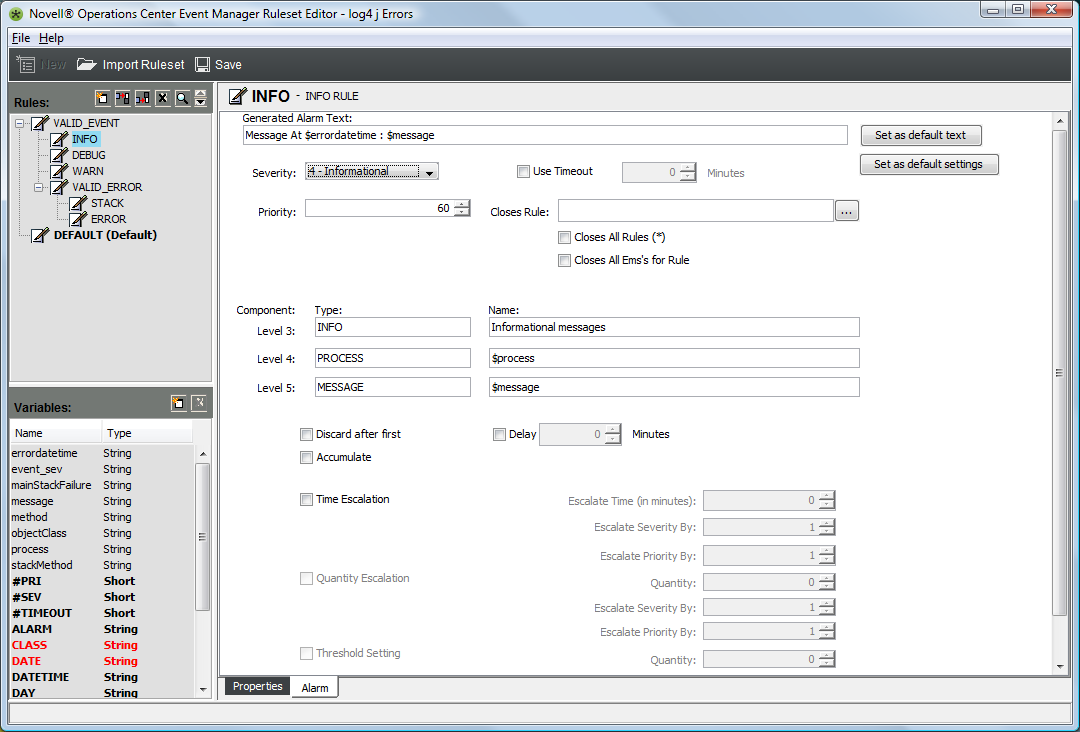
The remaining subsections explain these settings.
Editing the Generated Alarm Text Strings
The field specifies the alarm description that displays for the generated alarms in the Operations Center console.
HINT:To exit the drop-down list without selecting a variable, press the Esc key or the spacebar.
Specifying the Text for Alarms
To specify the text for alarms generated for events that match the selected rule:
In the field, enter a text string or enter one or more ruleset variables.
Adding a Ruleset Variable
To add a ruleset variable:
-
Enter the prefix $, followed by the variable name.
For example, enter $DATE to display the DATE string.
After typing $, a drop-down list of variables displays, to save time and minimize typing errors.

-
Select a variable by double-clicking it, then press the Tab or Enter key.
Displaying the Current Generated Alarm Text
To display the text currently displayed in the field as the default text for all future new rules:
-
Click .
A dialog box asks to confirm setting the text as the default for all future rules.
-
Click to confirm.
It is possible to override the default text by editing the field subsequent rules.
Saving the Current Alarm Settings as the Default for All New Rules
To save the current alarm settings as default settings for all new rules:
-
Click .
-
Define the following options under :
Severity: Defines the severity level of the alarm, which can range from 1 (highest severity) to 5 (lowest severity).
Priority: Defines the criticality and functional responsibility level of the alarm. The priority assignment can range from 1 (highest) to 99 (lowest).
Use Timeout: Select this check box to automatically close the alarm after the specified number of minutes. If the check box is deselected, the active alarm never times out. If the check box is selected and set to 0, then all alarms, active or delayed, are closed, provided they meet any parameters. A new alarm is not created nor is any other alarm processing performed.
-
For nondelayed alarms, the timeout time is the initial event time + x minutes.
-
For delayed alarms and threshold alarms, the timeout is the time the alarm became active + x minutes.
-
For active accumulated alarms, the timeout is reset to the time of the latest accumulating event + x minutes.
-
For discarded alarms, the active alarm timeout time is not updated when matching events are discarded.
Closes Rule: One rule might close another, thereby closing all alarms triggered by the second rule. For example, RULE A closes RULE B, thereby closing all alarms triggered by RULE B.
The drop-down list is read-only. Click the “…” button to the right to select a rule from the pane. In addition, the following options are available:
-
Closes All Rules(*): Select this check box and the rule closes all alarms, active or delayed, fired by any other rule that has a matching EMS, HRL3, HRL4, and HRL5, regardless of rule name. (It ignores the rule name. HRL represents Hierarchy Resource List.)
HINT:
- EMS = Event Manager Agents
- HRL3 = host
- HRL4 = source
- HRL5 = sub_source
-
Closes All EMSs for Rule: Select this check box and the rule closes all alarms, active or delayed, fired by the rule under any EMS that has the same HRLs, except for HRLT2 and HRLN2.
If both the and the check boxes are selected, the rule closes all alarms fired by anything that has matching HRL3, HRL4, and HRL5 values. Both the rule name and HRL2 are ignored.
Currently there is an issue with the $EMS parameter setting in the Event Manager Agent that does not allow setting the $EMS globally. To work around this issue, the EMS class defined when the agent is created is used (instead of $EMS) for this function.
-
Editing the Component Level Section
The section of the tab identifies the resource or component that generated the event. The field defines the category of the component. The Name is the specific component.
To enter a variable name in the or field, Enter $ and select from a list of variables.
Editing Alarm Display Options
The following options in the tab define the details of alarm display:
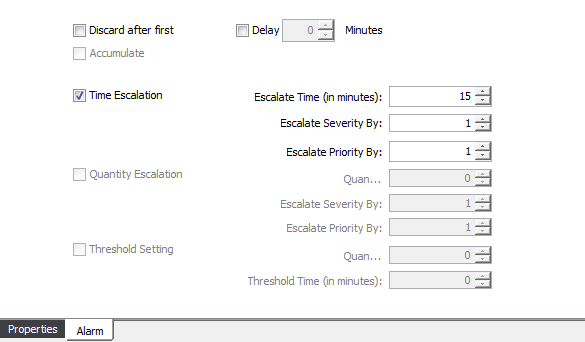
Ruleset Editor: Escalate alarm severity and priority using time, quantity, and thresholds factors.
The following describes the Alarm display options on the tab:
-
Discard after first: When selected, discards duplicate alarms. No other alarm processing is performed. Selecting this check box disables the and fields. Discard and Accumulate cannot both be True. If Discard is True, then Accumulate is evaluated as False.
-
Delay: When selected, postpones the creation of an alarm for x minutes. Alarms do not display in the Alarms view until the specified time interval (in minutes) elapses. A delayed alarm can be closed by another event before it becomes active. The time interval is the time the alarm became active + x minutes. and is independent of all other fields in the tab. After the alarm is created, normal event processing applies as for all other alarms.
-
Accumulate: When selected, duplicate alarms do not display as new alarms in the Alarms view. An active alarm is updated every time an event with a matching rule name and HRL is processed. Discard must be False in order for Accumulate to be evaluated.
An accumulation counter is updated by N + 1 each time an alarm is accumulated. The timeout time is reset to the time of the latest accumulating event + x minutes. The alarm’s initial date and time is set to the date and time that the first alarm was created and its most recent date and time is set to the date and time that the alarm was last accumulated. The alarm’s date and time in Operations Center is the most recent date and time. Selecting this check box activates the , and check boxes.
Accumulated alarms that have escalated/de-escalated will not have their severity or priority properties updated.
-
Time Escalation: If an alarm has been active for the specified number of minutes since the initial date and time, then increase or decrease the severity and/or priority by a rule-determined threshold amount until the upper or lower limit is reached. This is done for each multiple (nx) of the threshold time. Accumulating alarms that have time escalated/de-escalated no longer have their severity or priority properties updated.
Selecting the check box enables the following spinners to the right of the check box:
- Escalate Time (in minutes)
- Escalate Severity By
- Escalate Priority By
Use the spinner to select the interval in which the severity and priority levels escalate.
For example, specify 5 minutes for Time Escalation, 1 for Severity Interval and 1 for Priority Escalation. Assume an event creates a MINOR active alarm with the counter set to 1 and a priority of 50. When the alarm has been active for 5 (x) minutes, the alarm severity increases to MAJOR and the priority increases to 49. (Note that a lower priority number is actually a higher priority.)
When the alarm has been active for 10 minutes (2x), the alarm severity increases to CRITICAL and the priority increases to 48. The same behavior occurs for each nx increment, except that the severity remains CRITICAL because it cannot go any higher. Severities can go no higher than CRITICAL nor lower than INFO via escalation.
The valid range of values for Escalate Severity is: 0–3; ‑1, ‑2, ‑3. Select a negative number to decrease severity.
The valid range of values for Escalate Priority is: 0–99; ‑1 to ‑99. Select a negative number to decrease priority.
-
Quantity Escalation: The alarm severity and priority escalate depending on the number of alarm occurrences. Select the check box to enable Quantity Escalation.
Selecting the check box enables the following spinners:
- Quantity
- Escalate Severity By
- Escalate Priority By
Use the Quantity spinner to select the number of alarm occurrences that trigger the severity and/or priority escalation. The valid range of values is: 0 – 9,999.
The definitions and valid values for Escalate Severity and Escalate Priority are the same as for Time Escalation.
For example, set Quantity Escalation equal to 5, Escalate Severity By to 1, and Escalate Priority By to 1. Assume an event creates a MINOR active alarm with the accumulation counter set to 1 and a priority of 50. With subsequent alarms and the accumulation counter between 1 and 4, no change occurs to alarm severity or priority.
When the accumulation counter increments to 5 (x), the alarm severity increases to MAJOR and the priority is increased to 49. (Lower priority number is actually a higher priority.)
With subsequent alarms and the accumulation counter less than 10, no change occurs to alarm severity or priority. When the accumulation counter increments to 10 (2x), the alarm severity increases to CRITICAL and the priority increases to 48. The same behavior occurs for the next increment of 5 alarms, except that the severity remains CRITICAL because it cannot go any higher.
Severities can go no higher than CRITICAL nor lower than INFO via escalation. Priorities can go no higher than 1 nor lower than 99 with escalation.
-
Threshold Setting: If the check box is selected, the alarm count does not advance until the alarm fires a specific number of times () within a specific number of minutes (). Select the check box, then use the and spinners.
If the Alarm server receives an event with the threshold set and there is a matching active alarm, normal event processing related to an active alarm takes place. If there is no matching active alarm, events are kept in a pending state and evaluated on a sliding time scale each time a new event arrives. An alarm is created if the number of events matches the quantity threshold within the past threshold time (in minutes). The alarm accumulation count is set to the quantity threshold setting.
Note that and are mutually exclusive, with taking precedence if both are set.
Threshold events are evaluated when the Alarm server receives them and older pending events falling outside the time threshold are discarded.
The alarm’s initial date and time is set to the date and time when the oldest threshold event and its most recent date and time is set to the date and time when the alarm became active.
For example, set to 5 and to 2. In order to create an alarm, there must be five events in the past two minutes evaluated at the time of the most recent event. All five events are accumulated as a single alarm with an alarm count of 5. Events older than two minutes are discarded. Subsequent events increment the alarm counter as normal accumulated alarms.
7.4.10 Testing Rulesets Using Sample Data
During the process of defining rules, click () in the pane to apply the current selections/definitions to the sample data. The results display in a separate dialog box, as shown in Figure 7-14:
Figure 7-14 Ruleset Test Dialog Box: Use the Scroll Bar to View Additional Columns.
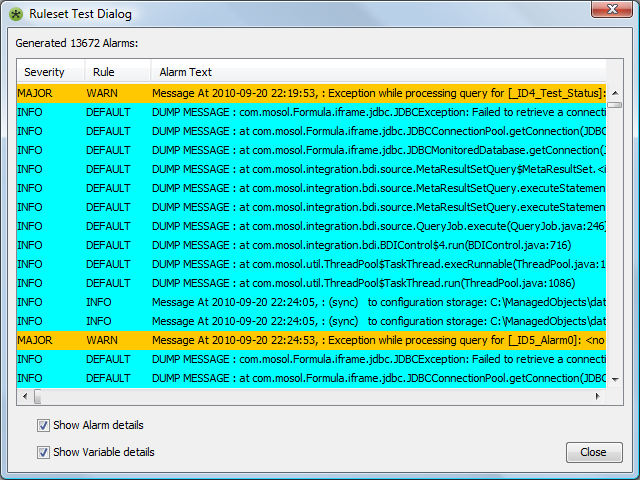
By default, all alarm details and variable details display in the Ruleset Test dialog box.
Viewing Additional Information in the Dialog
To view additional information in the Ruleset Test dialog:
-
Use the scroll bar on the bottom to view columns to the right.
Suppressing the Alarm or Variables Details
To hide the alarm or variable details in the Ruleset Test dialog:
-
Deselect the and check boxes.
The alarm’s , , and always display.
-
Use the output in the Ruleset Test dialog box to verify that the correct parsing and processing occurred.
The column identifies the rule used to generate each alarm.
7.4.11 Clearing the Ruleset Editor to Create a New Ruleset Definition
To clear the Ruleset Editor to create a new ruleset:
-
Do one of the following:
-
Click
 () on the tool bar.
-
Click > .
-
7.4.12 Exiting the Ruleset Editor
To close the Ruleset Editor:
-
Do one of the following:
-
Click in the upper right corner of the Ruleset Editor dialog box.
-
Click > .
-
-
When asked to confirm exiting the Ruleset Editor, click .
The following prompt asks you to save changes to the current ruleset:

-
Click or .