3.4 BMC Software PATROL
PATROL manages data regarding hosts, all applications discovered on these hosts, and parameters that are discovered for hosts and applications. The PATROL adapter integrates to PATROL to manage and display this data in Operations Center.
Figure 3-1 PATROL hosts, applications, instances and parameters display under the PATROL adapter in the Explorer pane
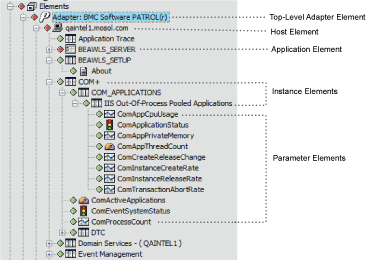
Operations Center displays all hosts and other objects defined in PATROL. The element hierarchy, as illustrated in Figure 3-1, displays as follows:
-
The top-level element displays directly beneath Elements.
-
Hosts display beneath the top-level element.
-
Elements that represent the applications defined for a host display beneath each host.
-
Each application has a container object (instance element) and contains parameters defined for the application.
You can recognize the type of object by looking at the element icon or class, as described in Table 3-1:
Table 3-1 Reference showing how PATROL objects map to
|
PATROL Object Type |
Element Class |
Element Icon Examples |
|---|---|---|
|
Host |
patrol_AgentType For example, patrolNT or patrolLinux |

|
|
Application |
patrolAppl |

|
|
Instance |
patrolInst |

|
|
Parameter |
patrolParm |

|
The following sections provide instructions for integrating to PATROL:
3.4.1 Integrating to PATROL
To integrate to PATROL:
-
If running on Solaris, enable Daemon Shell Access for shell access in the Operations Center Configuration Manager.
For details, see
Daemon Pane
in the Operations Center 5.5 Server Configuration Guide. -
Create a BMC Software PATROL adapter for each instance on the network.
For instructions, see Section 2.1, Creating an Adapter.
-
Configure adapter properties.
Configure the property to set the access rights for Hosts, Libraries, Communication Settings, and Host property pages. This controls a user’s ability to view and edit the property pages of PATROL elements that display in the Operations Center console.
For for a detailed list of properties, including the property, see Section A.5, BMC Software PATROL.
-
Add a library, one ore more hosts, and configure communication settings.
For instructions, continue to Configuring the PATROL Integration.
3.4.2 Configuring the PATROL Integration
The following sections describe how to configure the PATROL integration:
Adding and Managing Libraries
The first step in PATROL adapter configuration is adding a library used by PATROL hosts. This is the same library specified in the PATROL_HOME environment variable in your existing PATROL implementation.
Operations Center supports multiple libraries to enable managing multiple agent versions. Using multiple library installations enables an administrator to manage a set of PATROL agents using multiple versions of PATROL from one Operations Center installation.
For example, if an infrastructure is migrating from PATROL version 7.0 to PATROL version 7.5, the administrator can create two library definitions, one for each version. Later, when creating the host/agent definitions for the adapter, select one of these library definitions, depending on which version of PATROL is running on the target agent. After upgrading an agent, the administrator simply changes the library used for the agent, then restarts the connection in Operations Center for that agent.
If upgrading from a previous version, for instructions on copying PATROL libraries to the Operations Center server, see the Operations Center 5.5 Server Installation Guide.
Adding a Library
To add a PATROL library:
-
In the pane, expand .
-
Right-click the top-level BMC Software PATROL element, then click .
-
In the left pane, click .
-
Click .
-
In the New Library dialog box, specify the directory location of PATROL_HOME relative to the Operations Center server,
or
click the
 button and locate the directory, then specify a library name. The browse button is only available if you are running the Operations Center console local to the Operations Center server.

-
Specify a descriptive name for the library in the field.
Changing a Library Location or Name
Change a library’s location or name through the top-level PATROL element property pages.
To update a library location or name:
-
In the pane, expand .
-
Right-click the top-level BMC Software PATROL element, then click .
-
In the left pane, click .
-
Select the library name and then click .

-
Specify the new name and/or path for the library.
Changing a Library Assigned to a Host
To change a library assigned to a host:
-
In the pane, expand > the top-level BMC Software PATROL element.
-
Right-click a host element, then click .
-
In the left pane, click .
-
Select a new library from the drop-down list.
Removing a Library
To remove a library:
-
In the pane, expand .
-
Right-click the top-level BMC Software PATROL element, then click .
-
In the left pane, click .
-
Select a library name and then click .
Resolving Not Found Libraries
Removing a library that is assigned to one or more hosts has no visible effect during the current session. However, after stopping and restarting the adapter, sometimes a message states that Operations Center cannot find a library.
To resolve Libraries Not Found messages:
-
Check the libraries assigned to each host and find the hosts to which the deleted library is assigned.
-
Assign a different library to these hosts. For instructions, see Changing a Library Assigned to a Host.
Adding and Managing Hosts
In Operations Center, it is necessary to configure the hosts monitored by the PATROL integration. Configuring the PATROL adapter requires that you add one or more hosts to the PATROL adapter.
Hosts display beneath the top-level BMC Software PATROL element in the pane. On initial adapter startup, only the connected hosts display in the Hosts property page for the top-level BMC Software PATROL element.
Operations Center displays both monitored and unmonitored elements. However, Operations Center tracks and regularly updates conditions for monitored (or managed) hosts only. Unmonitored (or unmanaged) elements are displayed, but their condition is always UNMANAGED. This saves bandwidth and processor time, especially if a large section of network is designated as unmonitored /unmanaged.
The following topics explains how to add, monitor, and locate hosts; import configuration files, change host passwords; and remove hosts:
Adding Hosts
To add a host:
-
In the pane, expand .
-
Right-click the top-level BMC Software PATROL element, do one of the following:
-
Select .
-
Select . In the left pane, click , and then click
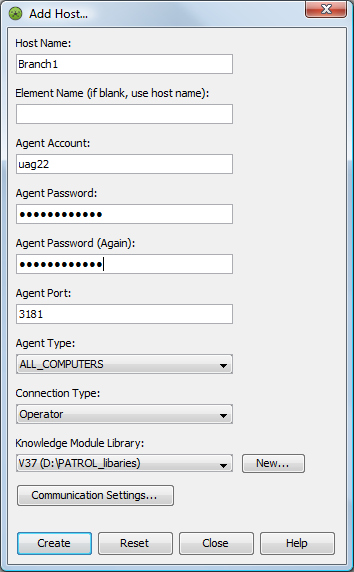
The Add Host dialog box opens:
-
-
Fill in the host setting fields:
Host Name: The host name of the machine where the PATROL agent is running.
Element Name: The host definition of an element. If blank, the target host is used.
Agent Account, Password, Port, Type, Connection Type: For definitions of agent settings and the connection type, see your PATROL documentation.
Knowledge Module Library: Required. PATROL monitors and manages resources on hosts using information from files called Knowledge Modules (KMs). If multiple libraries exist, click the drop-down arrow to select a different library, then click to define a new library.
For more information, see Adding and Managing Libraries.
-
To override the global settings and establish custom settings for an individual host, click on the Add Host dialog box and see Establishing Communication Settings for additional information.
Normally, the top-level BMC Software PATROL element sets communication settings globally for all hosts.
Monitoring Hosts
To monitor a host:
-
In the pane, expand > the top-level BMC Software PATROL element.
-
To monitor a host, right-click a host element, then click > .
The values in the pane’s column change from to a different value such as or .
-
To stop monitoring a host, right-click a host element, then click > .
The unmanaged element and its subcomponents display in the and panes, but Operations Center does not load their conditions. The values in the column change to .
Finding Hosts
To locate a host in a long list on the Hosts property page:
-
In the pane, expand .
-
Right-click the top-level BMC Software PATROL element, then click .
-
In the left pane, click to open the Hosts property page.
-
Click to open the following dialog box:

-
Do one of the following:
-
Specify a keyword that matches the host name.
-
Use Perl 5 regular expressions to search for hosts. For example, .*Acme.com matches all host names containing Acme.com:
-
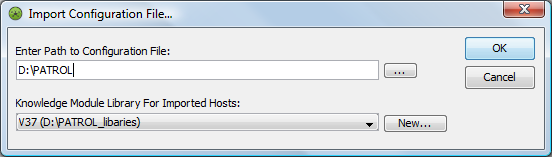
Importing Host Configuration Files
You can import PATROL host configuration files, config.pet files, and the PATROL Console desktop.dt file.
Because host passwords are imported, you can change them using the feature. For instructions see Changing Host Passwords.
To import a host configuration file:
-
To create the PATROL desktop.dt file from your PATROL console, click > > .
-
To import the configuration files, do the following from the Operations Center console:
-
In the pane, expand .
-
Right-click the top-level BMC Software PATROL element, then click .
-
Enter the path to the configuration file and select the Knowledge Module Library to use for imported hosts.
-
Changing Host Passwords
Entering an invalid password results in a normal connection, but the element is in the UNMANAGED state. A message states that an invalid password was used.
To change the password for an individual host:
-
In the pane, expand > the top-level BMC Software PATROL element.
-
To change the password for an individual host:
-
Right-click a host element, then click .
-
In the left pane, click .
-
Enter the new password in the and fields.
-
-
To change the password for one or more hosts through the top-level element:
-
Right-click the top-level BMC Software PATROL element, then click .
-
In the left pane, click .
-
Select one or more hosts, then click .
Use Ctrl or Shift to select multiple host names.
-
Enter the new password, then click .
-
Removing Hosts
To remove a host using the element menu:
-
In the pane, expand > the top-level BMC Software PATROL element.
-
Right-click a host, then click .
Establishing Communication Settings
Communication settings establish basic connection properties between Operations Center and the PATROL agents, and enable the dynamic loading of applications that are not static.
Adding a new application through the PATROL Console results in displaying the new application in Operations Center, if the application loading interval is greater than zero. New applications do not display in Operations Center if the time out is less than zero.
Set communication settings at the global level for all hosts using the top-level PATROL element in the Operations Center pane, then override settings for a specific host.
The following topics describe configuring communication settings:
Identifying Static Applications in PATROL
To identify static applications in PATROL:
-
Run the PSL %DUMP KM_LIST command, which lists or in the fourth column.
Configuring Global Communication Settings
To configure global communication settings:
-
In the pane, expand .
-
Right-click the top-level BMC Software PATROL element, then click .
-
In the left pane, click .

-
Specify to monitor the downstream connection between the agent and the client, which is the integration between PATROL and Operations Center:
Heartbeat: The amount of time between heartbeat packets that indicate the client is still communicating with the agent.
Retries: The maximum number of retry attempts.
Timeout: The maximum number of seconds to wait to establish a connection to the agent.
Character Set: A language standard for the encoding of characters from bytes. For example, BG18030 is the Chinese encoding standard.
-
Specify settings by selecting the event types to monitor.
By default, all are enabled. Deselect event types that are not monitored.
-
Specify :
Reconnect Interval: The number of seconds between attempts to reconnect.
Operation Timeout: The number of seconds to wait before ceasing to send operation requests.
Show Only Static Applications for this Agent: Select to display current applications only and do not check for new applications.
Monitor Agent for New Applications: Select and specify the interval in seconds to check for new applications.
If new Knowledge Modules (KM) are loaded in the PATROL console, the new KMs appear in the agent tree and in Operations Center. Conversely, removing a KM causes an application to unload and Operations Center removes the object also.
Include Instance Parameters During Discovery: Leave unselected to discover PATROL parameter elements only as needed and save memory resources in Operations Center.
Because parameter elements contribute to the state of instances in Operations Center, they may have an impact your service views. When this is the case, or when parameters are included in the service views using dynamic matching, selecting this option allows those views to be correctly populated and updated on adapter start up.
WARNING:Selecting this option means a parameter discovery is performed during the initial connection to the agent, with the potential additional cost of time and memory.
-
Select only when instructed by Support for troubleshooting. When selected, a large amount of data is logged in the formula.trc file.
Saving Memory Resources on the Operations Center server
When considering the check box, note that leaving the option deselected can save memory resources in Operations Center. Instance parameter objects might not be important to provide value to a business view within Operations Center. However, instance parameters do help determine the state of instances. Many uses of the PATROL adapter include the presence of a particular instance in a business view, instead of a single parameter or parameters within a business view.
Furthermore, if using dynamic matching criteria in creating business views, deselecting the check box enables the Operations Center server to save memory while providing parameters to the business views.
To save memory resources on the Operations Center server:
-
Leave the option deselected in the Communication Settings property page.
Parameter data is not discovered until it is needed. Selecting this option means discovering the parameters during the initial connection to the agent, with the potential additional cost of time and memory.
Overriding Global Communication Settings
To override the global communication settings for a particular host and establish custom settings:
-
In the pane, expand > the top-level BMC Software PATROL element.
-
Right-click a host element, then click .
-
In the left pane, click .
-
Click .
-
Select .
-
Specify the agent, event and integration settings for the host.
See Step 4 in Configuring Global Communication Settings for setting definitions.
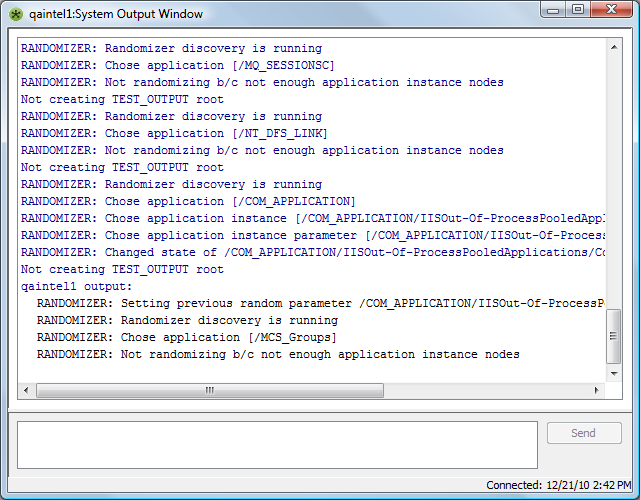
3.4.3 Issuing Commands to Agents Using a System Output Window
Operations Center provides a terminal window console to issue Windows or UNIX commands, such as such as %PSLPS, to PATROL agents and get output.
To interactively issue commands to agents:
-
To configure the System Output Window to show time stamps, set the to true in the adapter properties.
For information on PATROL adapter properties, see Section A.5, BMC Software PATROL.
-
In the pane, expand > the top-level BMC Software PATROL element.
-
Right-click a host element, then click to open the System Output window:
-
In the System Output window, enter Windows or UNIX commands.
3.4.4 Performing Knowledge Module (KM) Commands
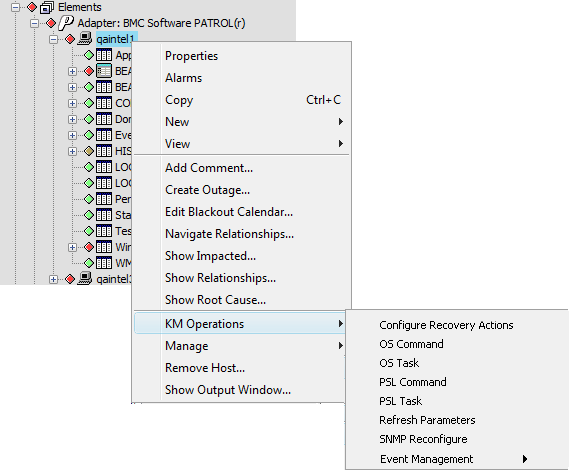
The KM commands that are available in the PATROL system surface in Operations Center through the KM Operations command.
To access KM commands:
-
In the pane, expand > the top-level BMC Software PATROL element.
-
Right-click a host element, click and select a command.
Because the set of commands varies among customers, and users can create custom commands, Figure 3-2 shows only a sample of the available commands:
Figure 3-2 PATROL Element Menu: This menu surfaces KM operations.
3.4.5 Understanding PATROL Element Condition in Operations Center
As in PATROL, events (or alarms) do not affect the element conditions in Operations Center. The Operations Center adapter performs a status query to the PATROL application to retrieve the element’s connection state.
IMPORTANT:Alarm severities have no influence on the state of PATROL adapter elements. For this reason, conditions may be counterintuitive as an element might be OK when it has many CRITICAL alarms.
An element condition change is any change that takes place on a resource that the PATROL application is monitoring. For example:
-
A parameter goes above or below its normal range
-
The connection state of a computer changes
-
A parameter description changes for a class of objects
Table 3-2 lists the PATROL states and their corresponding element conditions.
Table 3-2 Mapping PATROL Connection States to Element Conditions
|
PATROL State |
Operations Center Element Condition |
|---|---|
|
VOID, UNKNOWN, INVALID |
UNKNOWN |
|
OFFLINE |
INITIAL |
|
OK |
OK |
|
WARN |
MINOR |
|
ALARM |
CRITICAL |
In order to register an instance condition change, Operations Center requeries all parameter element children for their updated status, since an event might not occur because of event filtering. Properties for a parameter element identify the attribute to monitor and the frequency to check it. These properties can include:
-
A description of the monitored attribute
-
The frequency for checking the attribute
-
The instructions for measuring and monitoring the attribute
-
Detection thresholds for abnormal attribute values
The condition of an instance element is then determined using a roll‑up condition from parameter element children. For example, if the parameter element Test > SWAP > Summary > SWAP > SwapTotSwapUsedPercent changes to an ALARM state in PATROL, Operations Center sets its parent elements’ conditions as follows:
-
SwapTotSwapUsedPercent changes to CRITICAL
-
Summary changes to CRITICAL
-
SWAP changes to CRITICAL
-
Test changes to CRITICAL
When the SwapTotSwapUsedPercent state changes to OK, all of its parent elements’ conditions also change to OK.
A PATROL agent stores parameter commands and periodically executes them to retrieve data about the managed computer or application. Parameters add information to the built‑in rules about computers and applications. Parameters also contain recovery actions that result from the parameter detecting an unhealthy state; for example, when a returned value falls outside specified alarm ranges.
3.4.6 Understanding PATROL Events in Operations Center
In the Operations Center view, new alarms display with parity to the PATROL event console. Standard alarm filtering occurs through the MODL (Managed Objects Definition Language™).
A PATROL event signifies the occurrence of a state change in a PATROL element. Examples of events include:
-
Elevation of a parameter to an Alarm level
-
Modification of a global parameter description
-
Activation or deactivation of parameters
-
Suspension or resumption of parameters
-
Discovery of new applications
Table 3-3 lists PATROL event types and their corresponding Operations Center alarm severities.
Table 3-3 PATROL Event Types and Corresponding Severity in Operations Center
|
PATROL Event Type |
Operations Center Alarm Severity |
Filtered Out in Operations Center |
|---|---|---|
|
ZERO, UNKNOWN |
UNKNOWN |
No |
|
INFORMATION, RESPONSE |
INFO |
Yes |
|
CHANGE_STATUS |
OK |
Yes |
|
WARNING |
MINOR |
No |
|
ERROR |
MAJOR |
No |
|
ALARM |
CRITICAL |
No |
Each PATROL event also has a corresponding status: OPEN, ACKNOWLEDGED, CLOSED, ESCALATED, DELETED. By default, queries run only for OPEN, ACKNOWLEDGED and CLOSED events. State change events are disregarded as the latest state originates from the metadata discovery. You can filter events according to their status in the XML hierarchy file.
3.4.7 PATROL Element Conditions and Algorithms
To implement a persisted state, use the algorithm engine available via the Hierarchy file. For example, the following XML tag in the adapter hierarchy file causes elements to supply algorithms to control conditions:
<param name="usesAlgorithms" value="true" />
The algorithm engine must have available the following inputs:
-
Current internal condition of the element in Operations Center
-
Desired (or True) condition of the element in PATROL
Given these two items of information, it is possible to keep the condition at CRITICAL until it is explicitly set to OK. If the desired condition is not available, modify the PATROL adapter to provide the True condition of the remote object as input to the algorithm engine.
The algorithm can be a script. The previously documented state is now called conditionState, since state already has a meaning in all other NOC Script contexts. Also, a script can appear in the body of the <exec command="script"> tag.
For more information, see Section 9.0, Using the HierarchyFile.