6.7 Performing Alarm Operations
Alarm options vary by adapter and management system and are available only after selecting one or more alarms in the view. For a list of alarm options by adapter type, see Section B.2, Understanding Alarm View Menus.
Some options have shortcut buttons listed on the menu. Also, the appropriate user access privileges are required for the ability to access some alarm operations.
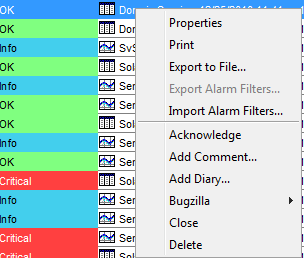
Figure 6-6 depicts an example of the right-click menu for an alarm:
Figure 6-6 Alarm Element Right-Click Menu
This section discusses the following common alarm operations:
6.7.1 Accessing Alarm Options
To select alarm options:
-
In the view, right-click an alarm, then select an option.
6.7.2 Selecting Alarms
There are several ways to select alarms in the view:
Selecting One Alarm
To select an alarm:
-
Click the alarm in the view.
The selected alarm is highlighted.
Selecting Multiple Alarms
To select non-contiguous alarms:
-
Press the Ctrl key while clicking each alarm.
The selected alarms are highlighted.
Selecting Multiple Adjacent Alarms
To select multiple contiguous alarms:
-
Press the Shift key, then click the first and last alarms.
This also selects all alarms in between the first and last alarms.
Selecting or Deselecting All Alarms
To select/deselect alarms:
-
From the menu, select .
or
Select to deselect all alarms.
6.7.3 Pausing and Resuming Alarm Updates
After alarm selection occurs in the view, the server automatically pauses all updates to the view. On the toolbar, a blinking  button replaces the
  button. The status bar in the bottom left of the console displays a PAUSED message with the date and time.
To resume continuous updating of alarms:
-
On the toolbar, click the
button to update the view.
On the toolbar, the
button replaces the button.
-
To resume alarm updates, press the ESC (Escape) key on the keyboard.
6.7.4 Acknowledging Alarms
The Acknowledge operation is useful for technicians who need to indicate that they reviewed, but did not solve the problem, and perhaps escalated it to the next level.
If another user deletes a paused alarm, the alarm continues to display in the view.
To acknowledge alarms:
-
On the view toolbar, click the
 button to change the alarm status to ACK (ACKNOWLEDGED).
Acknowledgements are designed to be short term in duration. Therefore, after the alarm server completes a cycle, the acknowledged alarm status is lost.
IMPORTANT:T/EC users’ accounts must have Manage permission in order to acknowledge an alarm.
6.7.5 Assigning Alarms
When supported by the management system, alarms can be assigned to any user who is a member of the same user group. The ability to assign alarms requires Manage permissions assigned by the administrator.
NOTE:The following functionality is only available when integrating to management systems – such as HP OpenView, IBM Tivoli NetView, HP ServiceCenter, and HP Service Manager – that support the assigning of alarms.
When available, leverage the following functionality to assign alarms:
IMPORTANT:NetView and OpenView users should note that an operation could be unavailable based on the current state of the element. If unavailable, the operation cannot be selected from the menu because it is dimmed.
Assigning Alarms to Another User
To assign an alarm to another user:
-
In the view, select the alarms to assign.
-
On the toolbar, click the
 button.
The Browse for User dialog box opens and displays the names of all users in the system to whom alarms can be assigned.
-
Select the user’s name.
-
Click to close the Browse for User dialog box.
In the view, an additional column, , displays and identifies the users to whom alarms are assigned.
Viewing Users to Whom Alarms Are Assigned
To view alarm assignments:
-
Do one of the following:
-
In the Alarms view, review the column for the alarms.
-
Double-click an alarm to open the alarm’s page. The user to whom the alarm is assigned is listed.
-
Assigning Alarms to Yourself
The ability to assign alarms to yourself depends on the adapter type. Some adapters provide the option on the alarm right-click menu or from the menu.
Depending on the adapter and which alarm columns display, an column could be available in the view. Also view the assignment in the alarm’s page. For more information, see Section 6.8, Using Alarm Properties.
You have the following options in assigning alarms to yourself:
Assigning an Alarm to Yourself and Closing It
To assign and close an alarm:
-
Right-click the alarm and then select .
Removing the Assignment and Leaving the Alarm Open
To deassign an alarm while leaving it open:
-
Do one of the following depending on the adapter:
-
Right-click the alarm, then select .
-
Right-click the alarm, then select .
This option is not available for all adapters.
Accepting responsibility indicates to other users that you are working on resolving the alarm and will close or clear it. Depending on the adapter and which columns display, a check mark displays in the column.
-
Rejecting Responsibility for an Alarm
To reject an alarm:
-
Right-click the alarm and select .
6.7.6 Clearing Alarms
Clear alarms assigned to you after resolving the problem. The option is unavailable for Audit alarms.
To clear alarms:
-
Select one or more alarms in the view, then click the
 button on the toolbar.
The alarm disappears from the view.
6.7.7 Printing Alarms
Selecting the option gives you the option of printing either the selected alarms or all the alarms in the view. It is necessary to pause alarm updates before accessing the option.
To print all alarms in the view:
-
Right-click one or more alarms, then select .
A message opens with the following question:
Would you like to print just the selected alarms?
-
Click to print just the selected alarms.
or
Click to print all the Alarms currently showing in the view to open the Print dialog box.
-
Select a printer, then click .
Additional dialog box options are available, such as the number of copies to print and landscape, portrait, or reverse landscape orientation.
6.7.8 Exporting Alarm Data
Use the option to export selected alarm data to a comma-delimited file, for further analysis or printing. First configure the alarm columns using the options listed in Section 3.4, Working with Tabular Data. Only the alarms columns displayed in the view are exported.
To export alarm data:
-
Right-click an alarm, then select to open the Save dialog box.
-
Specify a file name, then click .
The file format is .csv (Comma Separated Value).
A dialog box opens, informing you that the export process can take considerable time depending on the number of rows exported.
-
Click to proceed.
A dialog box confirms completion of the export.