4.4 Creating and Deleting Classes
Create classes that can be assigned to new elements defined in the hierarchy. Also attach behavior models to a class, to determine which property pages display for elements in the class.
The element class can be used to automatically correlate different types of elements. Define Class Relationship templates to generate relationships between elements of different classes and automatically associate element conditions and alarms. For more information, see Defining Class Relationship Templates.
Class names in the hierarchy are not required to be unique if the classes are retained in different folders in the hierarchy. A fully qualified class name refer to a single specific instance of the class within the hierarchy (such as Classes > Custom > router), but a class of router refers to all instances of the class name router (such as Classes > Custom > router and Classes > MyClasses > router).
Review the following sections to manage classes. The fourth section provides examples of three use cases:
4.4.1 Creating a Class
To create a class:
-
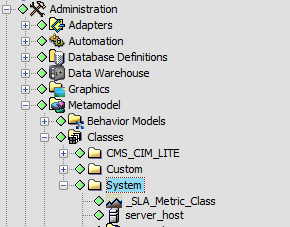
In the Explorer pane, expand > .
-
Right-click the folder where the new class is created, then select to open the Create Class dialog:

-
Specify a name and description of the class in the and fields.
-
Select any options in the section to apply CIM model qualifier attributes as appropriate:
Association: The class defines a relationship between two objects.
Aggregation: The class defines a relationship between parent and child objects.
Composition: The class defines a relationship where the child object is a part of the parent. In this case, the child can only have one parent.
Abstract: The class serves as a base to define new classes.
Deprecated: The class is obsolete and is only used for backwards support only.
These options apply to the Operations Center Configuration Management System (CMS) only. For more information about CMS, see the Operations Center 5.0 Configuration Management System (CMS) Guide.
-
To assign an icon to the class, select one of the following options:
Inherit parent class icon: Reuses the class’ parent icon. This assumes the class is created as a child of another class. If the parent is not a class, but a folder, then the default formula_org icon is used.
Assign icon from the icon library: Select this radio button, click the drop-down list, then select the existing icon to display for the class.
Define icon using custom graphics: Select this radio button, and , click , navigate to the icon, then click . The selected icon displays on the Create Class dialog box.
If the icon graphics are later edited or replaced, it is necessary to restart the server in order to display the updated icons.
-
To make the class available as search criteria when finding elements, select the check box.
For more information, see Using Classes and Properties to Enhance Finding Elements.
-
Select one or more behavior model definitions to apply to elements of this class using one of the following steps:
-
Click
 Browse to select one or more behavior model definitions.
Behavior model definitions contain a list of property pages that show for elements of this class.
-
Click
 Create a Class Model to create a behavior model to open the Create Model dialog box.
For more information, see Creating and Deleting Behavior Models.
-
Click
 Edit to display the behavior model and to edit it.
-
-
Click .
The new class displays in the hierarchy.
4.4.2 Deleting a Class
When a class is deleted, elements of the class revert to the default org or map class. Data associated with property pages is retained.
It is possible to associate a view component with a class. All elements created using the class inherit the associated drawing, graphic, nodestyle or drawing template. For more information, see the Operations Center 5.0 Custom Drawing and Layout Guide.
To delete a class:
-
In the Explorer pane, expand > > .
-
Right-click a class element, then select to open a confirmation dialog box.
-
Click to delete the class.
The class and all subclasses are removed from the hierarchy.
4.4.3 Defining Class Relationship Templates
The element class can be used to automatically correlate different types of elements. Define Class Relationship templates to generate relationships between elements of different classes, and associate element conditions and alarms.
A Class Relationship template is one of several methods that can be used to correlate different types of elements. For descriptions of all available correlation methods, see Section 8.2, Understanding Element Correlation Methods.
To define a Class Relationship template:
-
Right-click a class element, then select .
-
In the left pane, click Relationship Templates.
The right pane updates to display a list of class correlation rules used in the template. The list is empty if no rules have been created.

-
Click
() to define a rule for correlating the selected element class with another class.
The Create Class Correlation Rule dialog box opens:

-
Define the following correlation rule settings:
Name: A name for the rule.
Description: A description of the rule’s purpose or function.
Relationship Target Root Element: Identify a branch in the hierarchy that should be automatically correlated.
Click , then select an element that serves a starting point (or root) for correlation with the selected class.
Relationship Type: Source or Named: If the relationship is between structural data and monitoring sources, select the radio button, then select a relationship type from the drop-down list (, , or ).
Otherwise, select the radio button and specify a name for the relationship.
Relationship Template: Specify template parameters, usually the class name to correlate. Use the ${formula.util()} macro expansion to encode a DName component with URL encoding syntax:
${formula.util.encodeURL($name)}
This is required for formatting a DName in the proper match output to escape spaces into ‘+’ characters.
For use case examples, see Use Case Examples.
For additional syntax tips, see Understanding Expression Template Parameters.
-
Click to save changes on the Create Class Correlation Rule dialog box.
-
Click to save changes on the Relationship Templates properties page.
This uses the correlation rule and automatically associates elements with different classes. For example:

4.4.4 Use Case Examples
The following sections walk you through various use case examples:
Use Case 1: Correlation between Elements in Different Branches
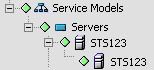
A simple use case automatically correlates elements created with a class named server, in the hierarchy, with like-named elements with a class named host in a branch of the hierarchy:
|
Under the Servers element: 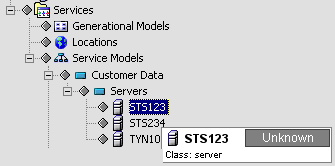 
|
Under the Hosts element: 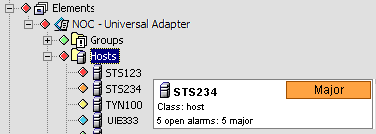
|
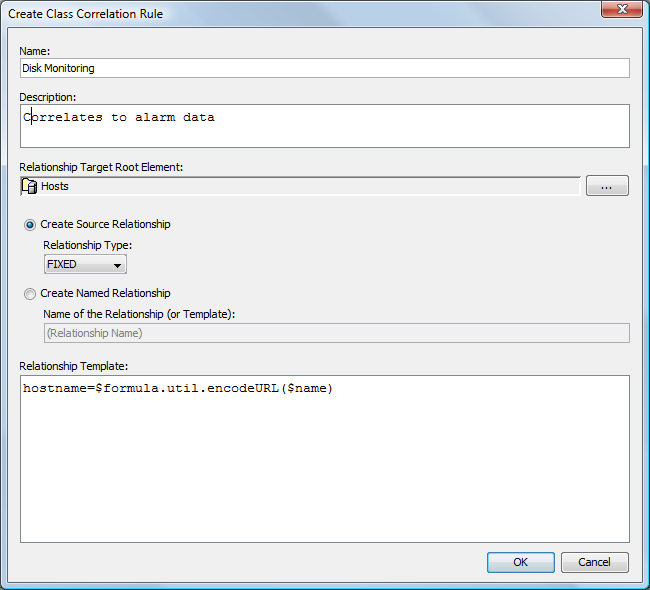
Example of creating a Class Relationship template for the server class:
Figure 4-2 Hierarchy of Class Relationship
The template correlation rule, shown in Figure 4-3, identifies the branch of the hierarchy as the starting point for automatic element correlation. A FIXED Source relationship is specified.
In the section, the specified expression generates the DName portion to correlate, using the $formula.util.encodeURL() function to ensure DName rules are followed. host is specified as this is the URL encoding for the host string. An alternative expression is:
$formula.util.encodeURL('host')=$formula.util.encodeURL($name)
This DName match template is similar to the Dynamic correlation, FIXED policy in SCM. For more information, see Section 8.3.6, STEP 6: Select Element Correlation Options.
The following illustrates a correlation rule for a relationship template associated with the Server Class:
Figure 4-3 Create Class Correlation Rule Dialog Box
View the results in the element hierarchy. In this example, creating a service model element with the server class automatically generates a static relationship with an element that has the identical name but with the host class, in the branch of the hierarchy. Note the element condition and all alarms are also correlated:
Figure 4-4 Service Models Hierarchy
Use Case 2: BSM Correlation using Fixed and Variable Names
A common application of Class Relationship templates is BSM correlation. Assume that conditions and alarms from a Tivoli T/EC data source should be correlated with any element that has the class Model Disk Array. The Class Relationship template is created for the Model Disk Array class.
The correlation rule is shown in Figure 4-5:
Figure 4-5 Create Class Correlation Rule Dialog Box
The correlation begins with the element and include all elements in this container whose names match those with a Model Disk Array class. A FIXED Source relationship is specified.
In the section, the specified expression generates the DName portion to correlate, using the $formula.util.encodeURL() function to ensure DName rules are followed. hostname is specified as this is the URL encoding for the hostname string. An alternative expression is:
$formula.util.encodeURL('hostname')=$formula.util.encodeURL($name)
Use an LDAP expression to allow for variability under the container. Figure 4-6 shows two elements with the same name but different capitalization:
Figure 4-6 Browse for Element Dialog Box
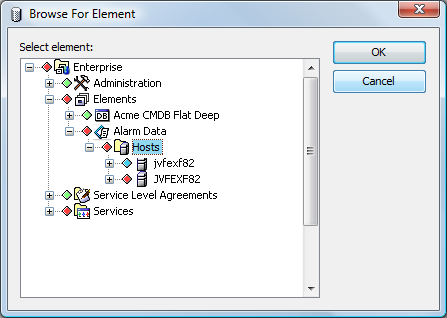
Create an LDAP expression that requires the name (cn) of the element to match elements of the class hostname anywhere in the branch of the hierarchy:
(&(cn=$name) (objectClass=hostname))
Figure 4-7 shows the modified correlation rule. Note the relationship type is changed to LDAP and the expression above is entered in the section.
Figure 4-7 Create Class Correlation Rule Dialog Box
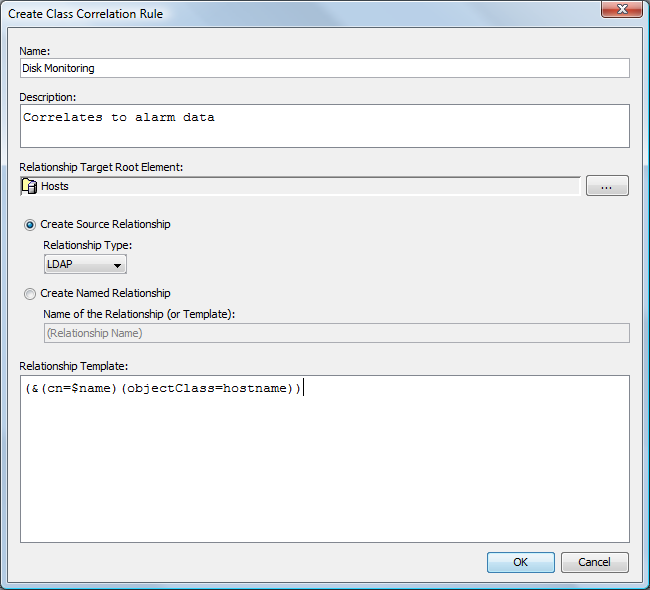
The modified correlation rule requires the name (cn) of the element to match elements of the class hostname anywhere in the branch of the hierarchy
Use Case 3: Named, Property-Based Relationships for CMDB
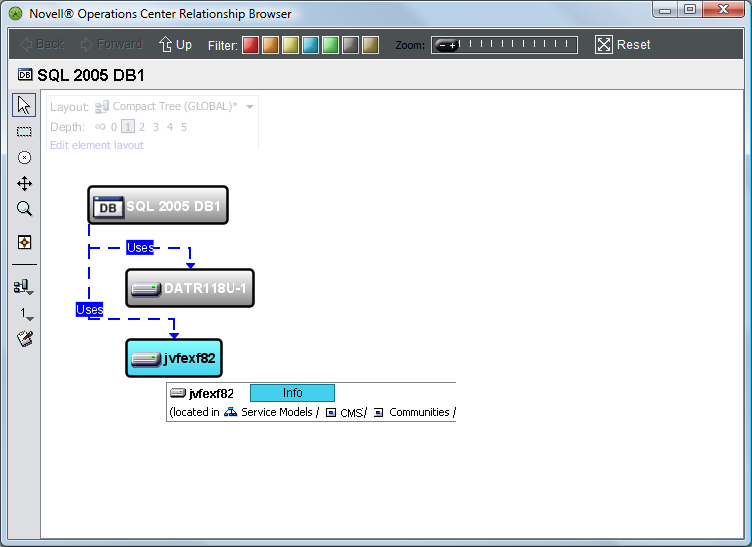
Another common application of Class Relationship templates uses metamodel property values to generate relationships between two element classes. For example, a metamodel property named StoredOnArrays contains a comma-delimited list of elements that should be associated between Model Database classes and Model Disk Array classes. This property could be automatically pulled from an external data feed into a comma-separated list of array names.
The result of the correlation rule shown in Figure 4-8 is that a new relationship named Uses is generated between any Model Database, which contains such a property and which matches applicable elements:
Figure 4-8 Create Class Correlation Rule Dialog Box
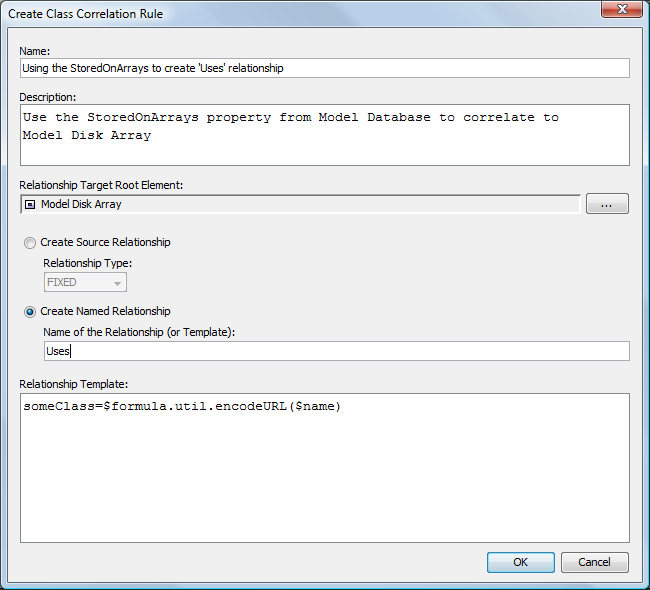
Figure 4-9 shows the generated new type of relationship named “Uses” displayed in the Operations Center Relationship Browser:
Figure 4-9 Relationship Browser