6.1 Setting Up Breach Alarms
Breaches can be either alarms or warnings. Breach warnings are automatically issued prior to the violation of an objective. They indicate when the health of an objective or SLA is trending toward a service violation.
6.1.1 Understanding Breach Alarms
Breach alarms can be issued for either objectives or SLAs independently. A breach alarm is issued for an SLA when health rules that determine the health of the SLA is in violation. A breach alarm is issued for an objective when the objective is out of compliance (for example, it fails).
When an objective is halfway to a breach condition, the condition of the objective is Major (warning). This occurs even if you specify Minor as the option for what the objective should be when a violation is reached.
Breach alarms can show the following:
-
Severity
-
Element
-
Date/Time
-
ID
-
Status
-
Agreement name
-
Objective name
-
Applied agreement, which shows element path based on the point at which the SLA was evaluated to issue the breach alarm
-
Metric key, which is the current measurement based on objective type
-
Reason
-
Comments
-
History
Breaches are displayed as long as the breach condition applies within a measured interval. Alarm data can be filtered based on severity.
Breach alarms can be viewed in the view of the Operations Center console, and in the Alarms portlet in the Operations Center dashboard.
6.1.2 Actions on Breaches
For breach alarms, the following actions are available:
Perform these actions in the Alarms portlet in the Operations Center dashboard or in the Operations Center console view, by right-clicking the alarm.
Another option is to set up an automatic action by configuring the automation function in Operations Center by setting up a script to execute when a breach occurs.
6.1.3 Automating Notice of Breaches
In addition to monitoring breach warning and alarms in a Operations Center tool, you can also receive automatic notice or have an action performed for breach warnings or alarms for an objective or an SLA.
Understanding Automation of Notices
To receive automated notice for an objective, add an action when the objective is defined. More than one action can be defined per objective.
Set up automation for an element so that if any of the Service Level Agreements for that element have either a violation or warning, the automated action occurs. Automation for an element is defined on the Automation property page for the element’s properties.
The automated actions available are:
-
Open an alarm pop‑up dialog box.
-
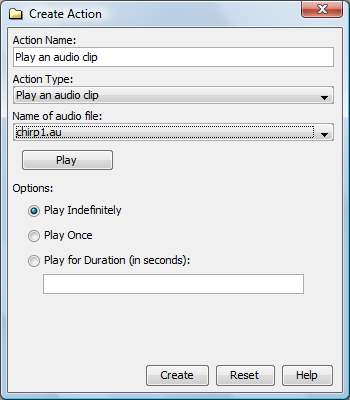
Play or stop a noise, such as an audio clip, gong, chirping, or a computer-generated noise.
-
Send an e‑mail with alarm and element information.
-
Send a page with element information.
-
Post an alarm to the IBM Tivoli Enterprise Console (T/EC).
-
Run a script, either one configured specifically for this automation action or one from the script library.
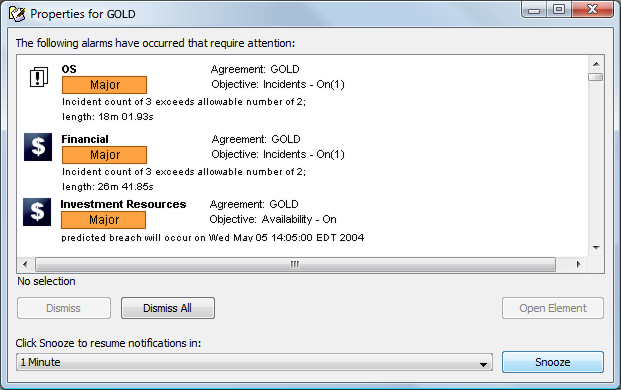
In the alarm pop‑up dialog box, the agreement and objective names display if agreement and objective are specified in the Alarm’s detail fields for the automation definition.
A predicted time for the violation message displays (as shown in the highlighted item in Figure 6-1) if predict.* is specified for the field in the automation definition and the alarm contains a predicted time for failure. Predicted failure is only available for alerts pertaining to Availability objectives.
It is possible to clear an alert from this dialog box:
Figure 6-1 Alarm Pop-up Dialog Box
For more information on automated action and automation in general, see Defining and Managing Automation Events
in the Operations Center 5.0 Server Configuration Guide
Adding an Automated Action to an Objective
To add an automated action to an objective:
-
When defining or editing an objective, click the link found at the bottom of the objective definition.
-
Specify the name for the action in the field.
-
Click the drop-down list, then select an action.
Other options display, depending on the type selected.
-
Click to save the action.
A link to the new action displays at the bottom of the objective definition.
Adding Automation to a Service Level Agreement
To add an automation to an agreement:
-
At the highest applicable level in the hierarchy, right-click the top element, then select .
-
Click :
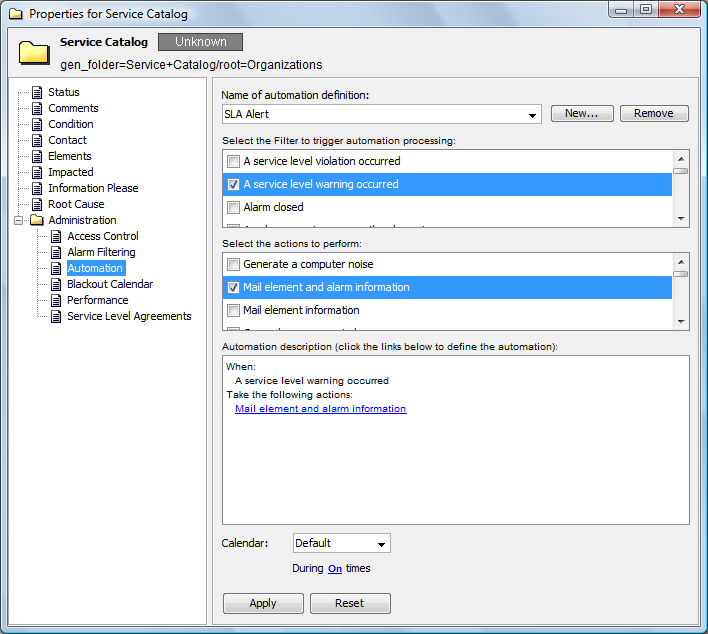
-
In the drop-down list, select a definition, or click to specify a new name.
-
Under , select the appropriate check box.
-
Under , select the appropriate check boxes.
-
Complete the other fields, which can vary, depending on the action selected.