3.2 Customizing the Console Login
To further customize browser defaults, console configuration and console focus:
3.2.1 Adding Custom Content to the Server Login Page
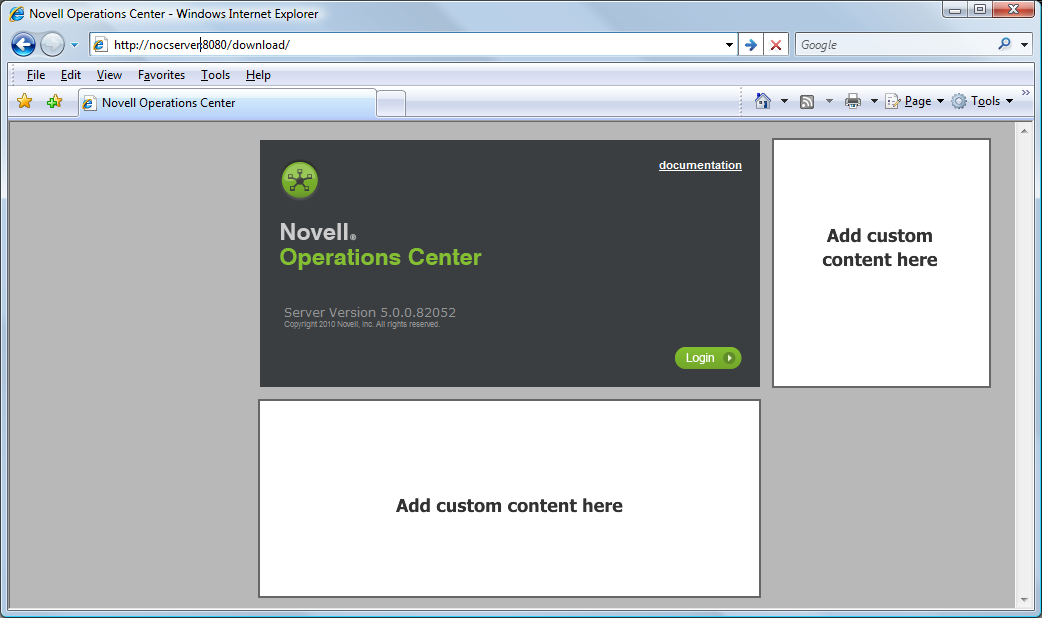
Custom content can be added to the Home or Documentation Web pages using Hypertext Markup Language (HTML). Custom content can be placed on the right side or bottom of the Operations Center server Login page as shown below.
Figure 3-1 Add Custom Content to the Server Login or Documentation Pages.
Because adding custom HTML content requires a working knowledge of HTML and XML (Extensible Markup Language), a basic understanding of HTML is required to complete this procedure.
To add custom content to a Operations Center server Login page:
-
In a text editor, create an HTML file containing content to display on the Operations Center server Login page and save it to the /OperationsCenter_install_path/config directory:
-
Do not use well-formed HTML files since this code is imported into a well-formed document. Use only the HTML code that is normally between the <body> tags.
-
Do not use frames because they cause formatting errors.
-
To retain the customized files in a separate folder, save them in a new folder named custom in the /OperationsCenter_install_path/config directory.
-
-
Create a new file named customcode.xml in the /OperationsCenter_install_path/config directory.
-
Insert and edit the following code to refer to the HTML files created in Step 1:
<clientconfig>
<page name="default">
<position name="right" relativeUrl="/custom/test.html" />
<position name="bottom" relativeUrl="default" />
</page>
</clientconfig>
-
Re-start the Operations Center server.
3.2.2 Browser Default and Console Configuration
The /OperationsCenter_install_path/html/browser_defaults.xml file specifies the defaults for running the Operations Center Client via a browser. If a user has not run Operations Center before, the browser uses the default behavior specified in this file.
You can change the current Operations Center console configuration directly through the applet_params.xml file located in the /OperationsCenter_install_path/html directory.
You can create a custom applet parameters file that is not overwritten during installation. Saving custom parameters in a separate file called applet_params.custom.xml guarantees that you need not reapply them after installation.
The Operations Center server merges the applet_params.xml and the apple_params.custom.xml upon startup and creates a file named applet_params.GENERATED.xml. Do not modify this file. The server uses this file to create all applet parameters. During future installations, the applet_params.custom.xml file remains intact and is merged with the updated applet_params.xml.
WARNING:Do not modify the applet_params.GENERATED.xml file.
To create a custom applet_params.xml file:
-
Copy the existing /OperationsCenter_install_path/html/applet_params.xml file to a new file named applet_params.custom.xml.
-
Follow the same XML hierarchy as the applet_params.xml file and remove all duplicate parameters. Add new parameters where necessary.
-
Restart the Operations Center server.
3.2.3 Customizing the Console Element Focus
Optionally, append the login URL with the -targetdname parameter to override the profile preferences for the primary user window and specify the element to be selected when the client starts:
http://OperationsCenterServer:port/client?-targetdname=Base64encoded_dname
To find the Base64 dname, go to http://OperationsCenterServer:port/toolkit/util/dname.jsp and navigate to the desired element. View dname, and the URL encoded and Base64 id displayed.
Note that this option can be used to customize the Operations Center Client start script in the /OperationsCenterServer/bin directory.