13.2 Creating and Maintaining Calendars
A calendar defines specific times and days for monitoring and capturing alarm history. Define a general calendar that captures data using the same days and times every month of the year, or define a more specific calendar that restricts data capture to specific months or days of the year.
Calendars consist of one or more time definitions. Each time definition specifies the days and time intervals for capturing data. You can define new time intervals for a calendar or copy existing ones from other calendars.
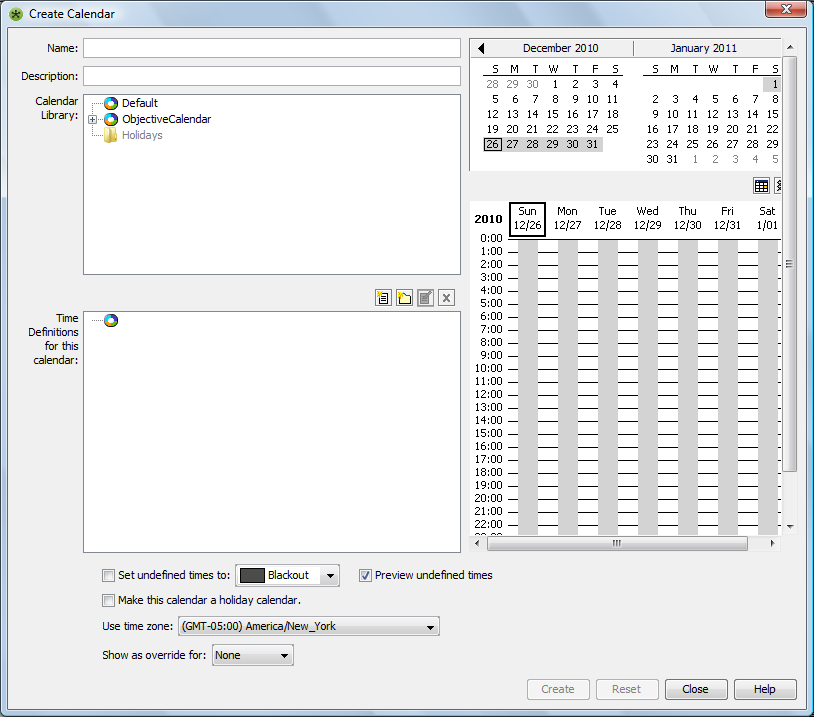
The Create Calendar dialog box contains a two-month calendar navigator (in the top right corner of the dialog box) for quick browsing and viewing of the scheduled data capture times for a specific date, as shown by colored blocks in the section directly below the calendar navigator:
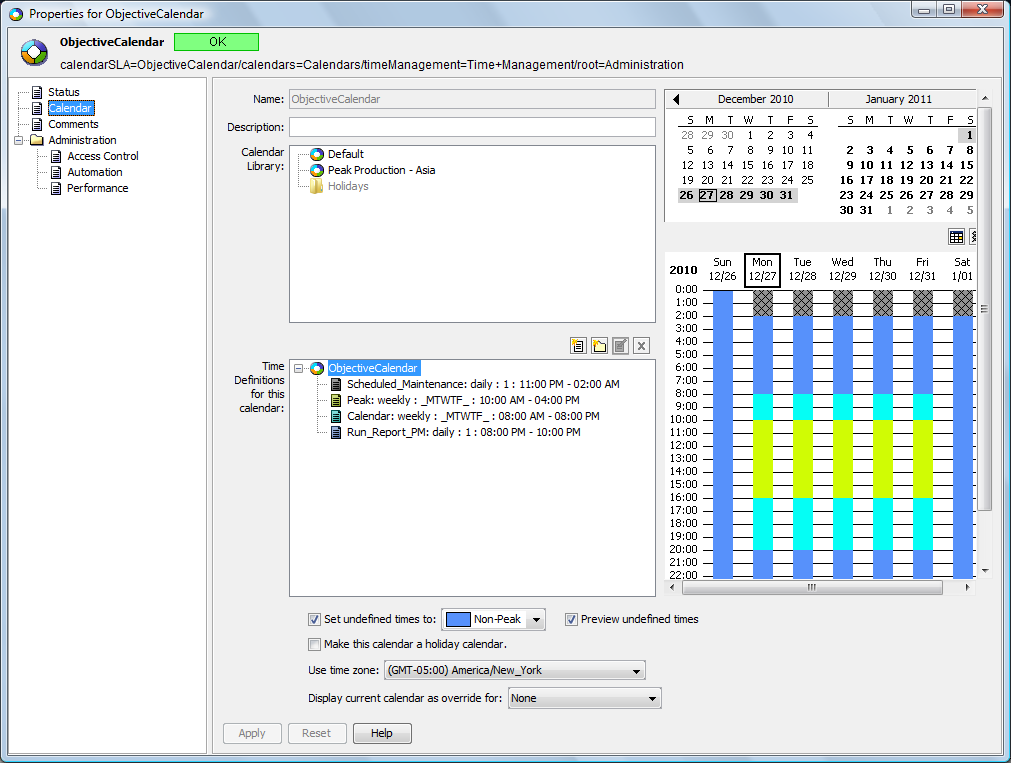
Figure 13-2 Calendar Properties
The following sections explain how to create, configure, and maintain calendars:
13.2.1 Creating Calendars
You can create calendars to associate with profiles used to select elements for which performance and alarm data is collected. For more information on profiles, see Section 12.2, Using Profiles and Expressions to Capture Alarm History.
To create a calendar:
-
In the pane, expand > .
-
Right-click the element, then select to open the Create Calendar dialog box.
-
Enter text in the calendar and fields.
-
To define the dates and times in the calendar, use the instructions in the following sections:
-
Make selections for the remaining calendar options:
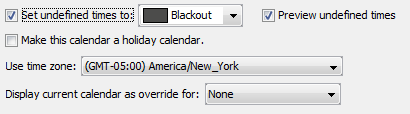
Set undefined times: For instructions, see Section 13.2.5, Assigning Undesignated Times.
Make this calendar a holiday calendar : Select the check box to add the new calendar to the folder in the Calendar Library.
Use Time Zone: Select the time zone for the start and end times for the calendar.
Show as Override for: Merges a view of the current calendar with another calendar selected from the drop-down list. The time definitions of the selected calendar display in a merged view with the current calendar. This is for viewing purposes only. The merged view cannot be saved.
-
Click to save the settings and create the calendar.
The new calendar is added under the element in the pane.
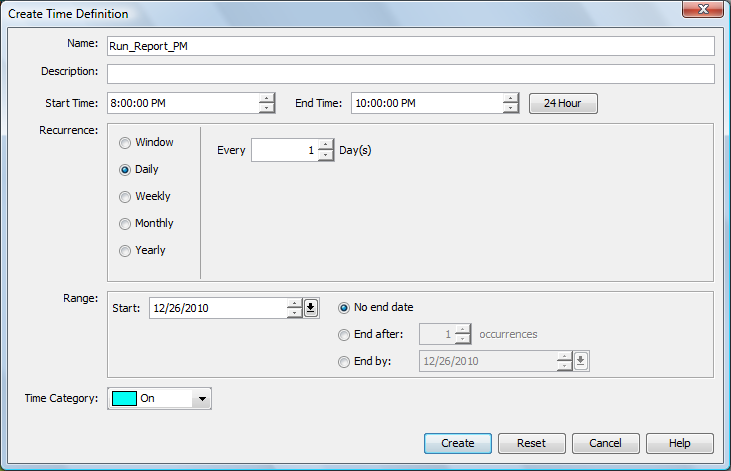
13.2.2 Specifying Time Definitions
In order to define a calendar, consider the days and times when alarm history and performance data should be captured. These time definitions can be created for a calendar or can be copied from an existing calendar.
Concerning defining overnight time definitions, if a time definition is set up to start on one day and finish sometime the next day (it runs overnight), on the first day the calendar is used, it starts at the start time specified by the time definition and there might be no overnight data collection. For example, assume the time definition specifies a peak time from 8 PM until 5 AM. On the first affected day, the calendar starts running at 8 PM, but does not continue to run from midnight until 5 AM on that first day. To capture this early morning time, you must define a separate time definition.
To define a new time definition to the calendar:
-
In the section of the Create Calendar dialog box, click
 to open the Create Time Definition dialog box:
-
Enter the following information to define the time definition:
Name: Name for the time definition.
Description: Description for the time definition.
Start/End Time: Starting and ending times for the time definition.
Use 24 hour period: Select to set the time definition to run a full 24 hours from the start time. Start Time and End Time are reset to 12:00 AM.
Recurrence: Select the interval for applying the time definition; for example, every day, every 2 weeks, and so on. Select to select a specific start date/time and end date/time.
Range: Set the start date and optional ending date.
Time Category: Click the drop-down list, then select the appropriate category for the time definition (such as Peak, On/Off time, and so on).
-
Click to save the as part of the current calendar.
It displays in the section of the dialog box.
13.2.3 Using Existing Calendars to Create New Calendars
Time definitions from existing calendars can be copied or linked to a new calendar.
Linked calendars are only editable in the original calendar definition and all changes to the original calendar affect all linked calendars.
To copy or link to an existing calendar:
-
In the section of the Create Calendar dialog box, navigate to a calendar to use as the basis for the new calendar.
-
Right-click the calendar or portion of a calendar (entire calendar, or a specific folder or time definition), then select .
-
In the section, right-click and do one of the following:
-
Select to create an editable duplicate in the current calendar.
-
Select to create a link to the original calendar.
A linked read-only item is created. Only the original can be edited.
-
13.2.4 Navigating the Calendar Visualization Section
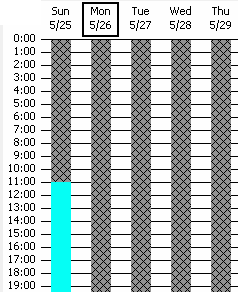
The section on the right side of the page consists of a two-month calendar and a weekly calendar. The weekly calendar displays shaded blocks of time to represent time definitions for the selected week. The colors correspond to the time definition category (Peak, On, Critical, and so on).
Figure 13-3 illustrates how you can view the time definitions as colored blocks in the weekly calendar:
Figure 13-3 The Calendar Visualization Section of the Create Calendar Dialog Box
Tasks that you can perform in this dialog box:
Navigating the Two-Month Calendar
-
Click the right and left arrows (
 and
and  ) to display previous or next month.
-
Click a day in the calendar to display the associated week in the detailed calendar section below the two-month calendar.
Viewing Shaded Blocks That Represent All Time Definitions in the Calendar
Select the calendar name in the section.
Viewing Only One Time Definition
Select a time definition name in the section.
Returning to the Current Date in the Visualization Window
Click  to display the current date.
Displaying or Hiding Times When SLM Data Collection Is Disabled
Click  .
.
When enabled, a black grid displays in the calendar to identify when SLM data collection is turned off.
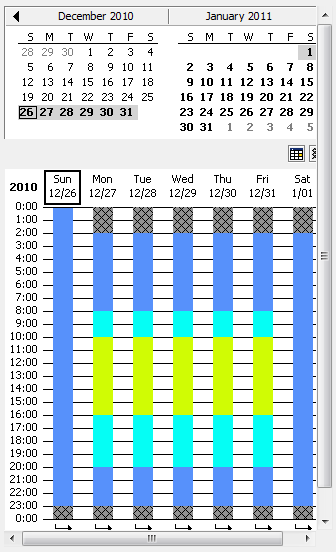
13.2.5 Assigning Undesignated Times
After designating some specific time periods, it is possible to assign all remaining undefined times to a specific time category. For example, if the time period 12 AM to 5 AM is not associated with a time definition, it can be assigned to an existing time category, such as Blackout.
To assign all undesignated time in a calendar to a specific time category:
-
Select the check box.
-
Click the drop-down list, then select a time category:
-
Select the check box.
The calendar columns update to show the undefined time color.
For example, in the following figure, the undefined times are assigned to the Blackout time category and are shaded black in the calendar:
13.2.6 Editing Calendars
The Default calendar cannot be edited or deleted. You can do the following to edit calendars:
Editing an Existing Calendar
To edit a calendar:
-
In the pane, expand > t > .
-
Right-click a calendar, then select to open the calendar’s property page.
-
In the left pane, click to open its property page.
-
Edit the calendar as needed.
-
Click to update the calendar.
Editing a Time Definition or Folder
To edit a time definition or folder:
-
In the section of the property page, select the time definition or folder, then click
 to open the Edit Time Definition dialog box.
-
Edit the time definitions information as needed.
-
Click to update the time definition.
Deleting a Time Definition or Folder
To delete a time definition or folder:
-
In the section of the property page, select a definition or folder, and then click
 to open a confirmation dialog box.
-
Click to confirm the deletion to remove the definition or folder.
Adding a New Folder to the Calendar
To add a new folder:
-
In the section, click
 to open the Create Folder dialog box.
-
Enter a folder name, then click .
The new folder displays in the section.
Editing Calendar Time Intervals
Individual time intervals displayed in the weekly calendar section of the Create Calendar or Edit Calendar dialog box can be modified.
You can do the following to edit calendar time intervals:
Modifying an Individual Time Interval
In the calendar visualization section of the property page, right-click a time interval, then select an option:

Edit Time Definition: Enables editing the time definition associated with the selected time interval. Note that all changes made apply to all dates affected by the time definition.
Create Override: Enables changing the start and/or end time or time category for the time interval. To remove the override later and use the default interval defined by the time definition, right-click the interval, then select .
Cancel this Interval: Removes the time interval from the time definition for the selected date only. To restore the interval, right-click the interval, then select .
Select on Definitions Tree: Highlights the time definition associated with the interval. This is useful when many time intervals and definitions exist.
Editing a Time Interval or Time Definition Directly
To edit a time interval or definition:
-
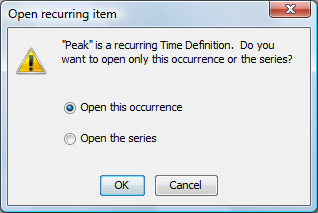
In the calendar visualization section of the property page, double-click a time interval to open the Open Recurring Item dialog box:
-
Do one of the following:
-
Select the radio button to edit the start and/or end time or time category associated with this interval only.
-
Select the radio button to edit the time definition associated with the time interval.
-
-
Click to open the Edit Time Definitions dialog box.
-
Edit the Time Category and start and end times as needed.
-
Click to update the time interval.
13.2.7 Setting Blackout Calendars on Elements
It is possible to apply a blackout calendar only at the element level for selected elements. Settings in the element’s blackout calendar override all other calendar settings applied to that element.
However, as an exception to the rule, data is collected during all blackout calendars when capturing SLA data, to ensure that data is available in the event that blackout periods change after data capture. In this case, the blackout data can be excluded when running SLA reports. For more information, see the Operations Center 5.0 Service Level Agreement Guide.
To create a blackout calendar for a specific element:
-
In the pane, navigate to the element for which a blackout calendar is needed.
-
Right-click the element, then select to open its dialog box.
-
Create Time Definitions as necessary to specify blackout times for the element.
For more information regarding creating calendars and defining time definitions, see Section 13.2.1, Creating Calendars.
-
Click to save the blackout calendar settings.