2.6 Organizing Users Into Groups
Users can be organized into groups based on a variety of criteria such as job function, department, and security clearance level. In Operations Center, access privileges to various elements are assigned to groups. In general, it is efficient to define groups first, then assign access privileges to these groups. The last step is assigning users to the groups.
2.6.1 Creating a Group
Groups can be defined with a specific set of access privileges. Later, users are assigned to groups and inherit the access privileges. This process allows administrators to assign access privileges to multiple users at once. Two default groups, and , are provided. The default admin user belongs to the group, and the default guest user belongs to the group. New users are added to the group by default.
This section covers the creating of a standard user group where users and groups are manually assigned to the group. For more information about an LDAP group where users are imported and maintained using an LDAP look up, see Section 3.2.2, Configuring LDAP Authentication.
To create a group:
-
In the pane, double-click the root element and .
-
Right-click and select .
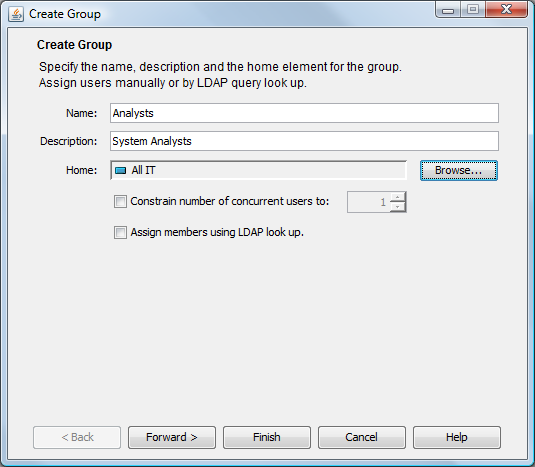
The dialog box opens.
-
Type the new group name in the field.
The
 symbol identifies required fields.
-
Type a description for the group in the field.
-
(Optional) To restrict the number of users in the group who can concurrently log in to Operations Center software, select and type the maximum number of concurrent users.
-
Leave the unselected to create a group by manually selecting users and subgroups.
For more information about creating an LDAP group, see Section 3.2.2, Configuring LDAP Authentication.
-
Click next the field to select a root element for group users.
-
Click .
Existing users and groups display in the list.
-
Perform one of the following steps to assign users to the group:
-
To assign one user, click a user name and then click .
The user name moves to the list.
-
To assign all users at once, click .
All users move to the list.
Any user that is a member of the group, displays in bold text.
-
-
Click .
The new group is added to the element in the root.
If you are familiar with NOC Script, you can use the SetGroupNames function to change a user’s group membership. For instructions, see the Operations Center 5.0 Scripting Guide.
2.6.2 Editing a Group
If an LDAP user group is converted from an LDAP imported group to a standard user group (by unselecting ), all LDAP users are deleted unless the LDAP user is selected as a member of the group or is a member of another group.
NOTE:It is not possible to edit the privileges for the group.
To edit a user group:
-
In the pane, expand the root element > > .
-
Right-click a group and select to open the property page.
-
In the left pane, click to open the property page.
-
Perform one of the following steps to edit a group composed of standard users and user groups:
-
To add a user to a group, select a group name in the list, then click .
The user is added to the list.
-
To add all users to the group, click .
All users are added to the list.
-
To remove a user from a group, select the group name in the right pane, then click .
The user is removed from the list.
-
Click to remove all users from the group.
All users are removed from the list.
Any user that is a member of the group, displays in bold text.
-
-
Perform one of the following steps to edit an LDAP user group:
-
Click next to to create a new LDAP connection.
-
Click next to to update an existing LDAP connection.
LDAP Connection definitions can be edited directly. For more information, see Maintaining LDAP Connections.
-
Modify LDAP query seach filters and parameters as desired.
For more information on the LDAP search query filters and parameters, see Scheduling Regular Import and Maintainance of LDAP Users from an LDAP Directory Server.
-
Click to verify or modify the LDAP query schedule.
Click to view the job schedule settings. Modify the schedule as desired.
LDAP Connections use Job Scheduling. For more information, see
Scheduling Jobs
in the Operations Center 5.0 Server Configuration Guide.Click .
-
-
Click to save the changes.
2.6.3 Deleting a Group
It is not possible to delete the Admins group or Admin user account.
To delete a user group:
-
In the pane, right-click the group and select to open a confirmation dialog box.
-
Click to confirm the deletion.
The group is removed from assigned user accounts and also from the Operations Center system. However, users who were members of the group are not deleted.