5.7 Element Children Containers
Children Containers make it easy to use the bind language to create a container of an element’s children. After a Children Container is added to a drawing, you can:
-
Filter the element.
-
Modify how elements are sorted.
-
Change the layout of how element nodes are displayed.
-
Change the number of levels of children shown.
-
Specify the maximum number of children shown.
-
Apply a new node style.
For more information about Node Styles, see Section 6.0, Working with Node Styles and Custom Graphics.
NOTE:Stack containers are another type of container that can be added to a drawing. Stack containers are especially useful when creating new node styles as they can layer multiple objects which can be hidden or shown based on a condition that is met. For more information about Stack Containers, see Section 9.6, Looking at the Source Code with a Toggling Graphic Node Style Example.
5.7.1 Adding Containers for Child Elements
To add a child container to a drawing:
-
In the pane, navigate to the desired element under or , then open the Layout view.
-
Right-click the background of the Layout View, and select .
All elements are removed leaving the Layout view empty and in Edit Mode.
-
Right-click the Layout View, and select > > > .
A child container displaying all elements displays:

-
To filter the elements, do the following:
-
Adjust the display, as desired.
In this example, we’ll adjust the layout and sort by condition.
Do the following:
-
Right-click the container, then select > > > to open the Adjust Layout dialog box.
-
Select the radio button from .
-
Click to close the Adjust Layout dialog box.
-
Right-click the container, then select > > > to open the Adjust Sorting dialog box.
-
Select the radio button from .
-
Select the radio button from .
-
Click .
The Adjust Sorting dialog box closes:

-
-
To update with the desired node style, do the following:
-
Right-click the container, then select .
-
From the pane, expand > > .
-
Navigate within the folder until you find the desired node style.
HINT:Be careful not to select any of the objects under , else the Layout view changes focus and leaves the Layout drawing you are working with.
-
Drag the selected node style over onto one of the elements inside the Layout view container.
-
Select from the pop‑up menu.
All element nodes update with the new node style:

-
Right-click the container, then select .
-
5.7.2 Customizing a Child Container
Child Containers can be customized to display every configuration of elements that you need. The following sections address the various options you can apply on Child Containers:
Adjusting Element Depth and Maximum Children
To set element depth and maximum children:
-
In the drawing, right-click the container, then select > > > . The dialog box opens.

-
To change the number of levels of children to include, select one of the radio buttons.
-
To set the maximum number of children to display, specify the number in the field.
-
Click .
The view updates to repect the depth and maximum number specified.
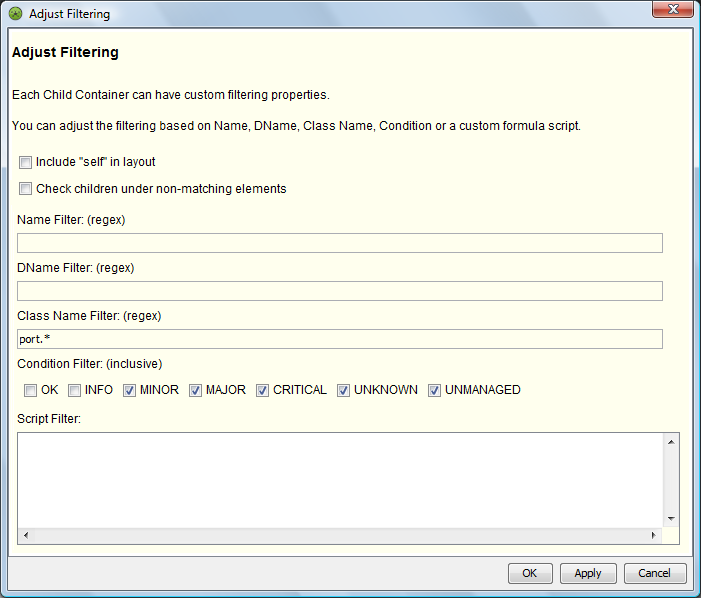
Adding Filtering Commands
To customize filtering:
-
In the drawing, right-click the container, then select > > > . The dialog box opens.
-
Do any of the following:
-
To include the parent element in the container, select the radio button.
-
To filter on all child elements (even when the parent element does not match the filter), select the radio button. When unselected, the filter looks for matching elements only when a parent element matches the filter criteria.
-
To filter elements based on name, specify filter criteria in the field.
Enter a regular expression to define, based on element name, which elements are acceptable to display.
-
To filter elements based on dname, specify filter criteria in the field.
Enter a regular expression to define, based on element dname, which elements are acceptable to display.
-
To filter elements based on class, specify filter criteria in the field.
Enter a regular expression to define, based on element class, which elements are acceptable to display.
-
To filter elements based on condition, select any of the options.
Elements with the selected conditions display.
-
To create a custom filter, enter FormulaScript code in the field.
-
-
Click .
The view updates to filter the elements.
Adding Sorting Commands
To customize sorting:
-
In the drawing, right-click the container, then select > > > . The dialog box opens.

-
To change the sort direction, select the , , or radio button.
-
To change the criteria to sort by, select the , , , or radio button.
-
Click .
The view updates to sort the elements.
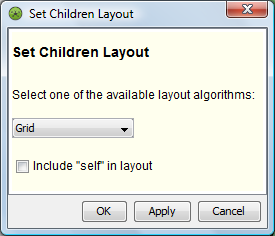
Adjusting the Layout Type and Layout Options
There are many types of layouts available for a container that set how components are displayed in the container. Grid and Flow layouts have additional settings for configuration.
To change the layout type and set layout settings:
-
In the drawing, right-click the container, then select > > > . The dialog box opens.
-
Select the layout type in the drop-down list.
-
To include the parent element in the container, select the radio button.
-
Click .
The view updates to the new layout type.
-
To adjust setting on a Grid Layout, right-click the container and select > > > . The dialog box opens.

Specify options as desired for the number of columns, node alignment, spacing widths, column width and row height.
Click .
-
To adjust setting on a Flow Layout, right-click the container and select > > > . The dialog box opens.

Specify options as desired for the spacing and width.
Click .