11.1 Assigning Permissions Using Roles
Roles are groupings of users that share a particular function within the portal, according to a particular scope. Roles can be granted permissions to various functions within portlet applications.
Roles are used to define permissions across their scope: across the portal, across an organization, or across a community. For example, consider a role which grants access to create a Service Management category. A Portal role would grant that access across the portal, wherever there was a Service Management portlet.
Roles are scoped by:
-
Portal
-
Organization
-
Community
A Community role grants access only within a single community. An Organization role grants that access only within an Organization. Because Roles are used strictly for portal security, they also do not have pages, like Communities and Organizations.
Administrators can define roles through the Control Panel. Roles are assigned permissions and then are assigned users or user groups. Users, User Groups, Communities, or Organizations can be members of a role.
In the Dashboard, there are two types of roles that you are likely to require:
-
Roles related to portal administration. For example, these roles might have rights to create new communities and maintain their pages.
-
Roles that allow users to perform specific tasks within or for a community.
NOTE:While the following sections cover setting and assigning permissions for a community, these same features and steps apply for organizations.
The following sections cover roles and assigning permissions to them:
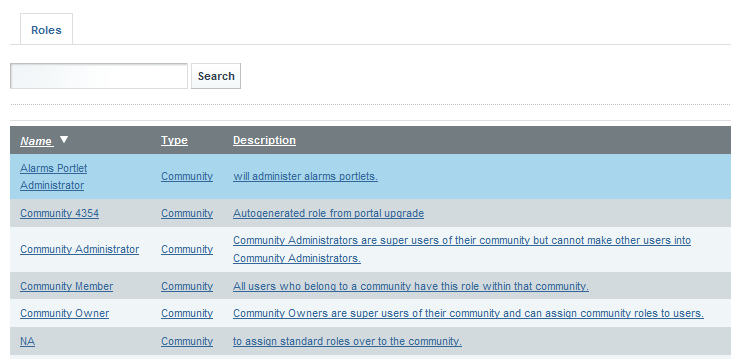
11.1.1 Community Roles
When a community or organization is created, there are three default roles that are created:
-
Administrator: are super users of their community and can assign community roles to users.
-
Owner: are super users of their community and can assign community roles to users.
-
Member: is the default role assigned to all users who belong the community or organization.
For information about assigning community users to these default roles, see Assigning Community Roles.
In addition, you might want to create additional roles that grant specific administrative capabilities for the community or allow access to perform an action within the community. For example, you can create a role that can assign users, or a “Journal” role that is in charge of updating journal entries.
In the beginning, setting up community roles is a three step process. However, after the roles are defined for a community, you will just be assigning users to the roles.
Creating Community Roles
Community-type roles allow you to define permissions for specific functionality that you’ll want to grant to a subset of community members.
To create a community role:
-
Click , and select .
-
Under , select .
-
Click .
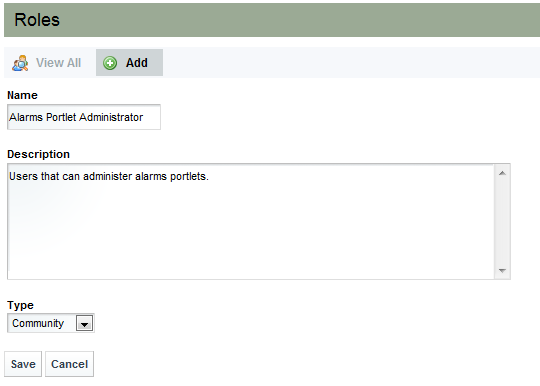
-
Specify the name of the role.
-
Specify a description for the role.
-
Select from the drop-down list.
-
Click .
-
Continue to Granting Portlet Permissions.
Granting Portlet Permissions
After a role is defined, the next step is to define portlet permissions which cover permissions that are defined within various portlets.
To grant portlet permissions to a role:
-
Click , and select .
-
Under , select .
-
Click next to the desired role and select .
-
Click . A list of portlets displays.
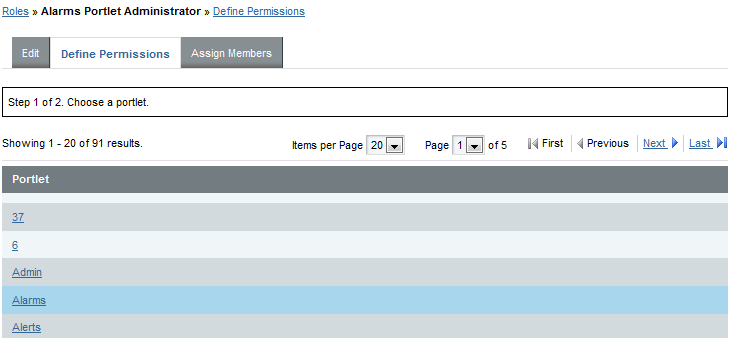
-
Click the desired portlet link to define permissions for that portlet type.
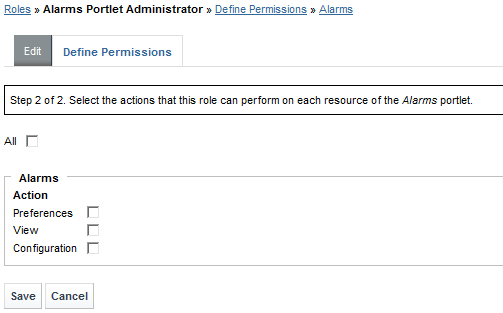
-
Select the check box to grant permissions to set preferences, view and configure the portlet, or select any of the following check boxes:
-
Preferences: grant access to update preferences of the portlet.
-
View: grant access to view the portlet.
-
Configuration: grant access to update configuration settings for the portlet.
-
-
Click .
-
Continue to Assigning Community Roles.
Assigning Community Roles
At a minimum, you’ll likely want to assign the Administrator and Owner roles to at least one community member. When more specialized community roles are defined, you’ll want to assign users to them.
For information about assigning default roles to users, see Section 4.4.2, Default Associations for User Accounts.
To assign community users to a role:
-
Click , and select .
-
Under , select .
-
Click next to the community and select .
-
Click the name of the desired role.
-
Click the tab.
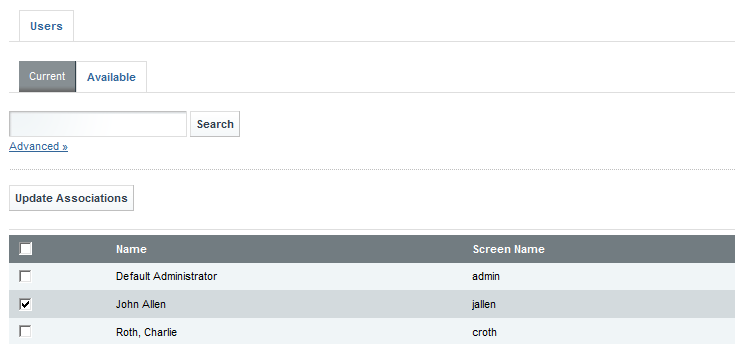
-
Select the check box of each user to assign to the role.
-
Click .
11.1.2 Portal Administration Roles
Portal scoped roles are related to portal administration. For example, these roles might have rights to create new communities and maintain their pages.
By default, there are four portal scoped roles:
-
Admin: has administrative privileges.
-
Power User: by default, all users are also assigned the Power User role. You can give this role certain permissions if you wish or disable it altogether
-
User: is the most basic user.
-
Guest(Visitor): is all non-logged in users.
Assign permissions for portal-wide activities that are in several categories, such as Community, Location, Organization, Password Policy, etc. This allows you to create a Role that, for example, can create new Communities in the portal. This would allow you to grant users that particular permission without making them overall portal administrators.
NOTE:Portal permissions can only be assigned to roles of type.
For information about assigning default roles to users, see Section 4.4.2, Default Associations for User Accounts.
To create a portal administration role:
-
Click , and select .
-
Under , select .
-
Click .
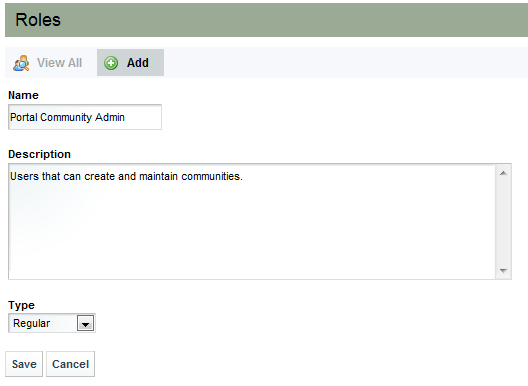
-
Specify the name of the role.
-
Specify a description for the role.
-
Select from the drop-down list.
-
Click . The role displays in the page.
-
To define permissions for the role, do the following:
-
Click next to the role and select .
-
Click .
-
Select for each action you wish to grant to the role.
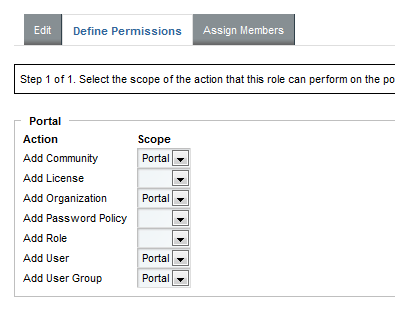
-
Click .
-
-
To assign members to the role, do the following:
-
Click .
-
Click the , , or tab.
-
Click the tab.
-
Select the check box for the desired user(s), user group(s), community/Communities or Organization(s) to assign to the role.
-
Click .
-
11.1.3 Configuring Roles
To configure or change a role:
-
Click and select .
-
Under , select .
-
Click next to role and select from the available options to update and configure the role, which include:
-
Edit: Edit the role by changing its name or description.
-
Permissions: Define which Roles (and thereby users and user groups) have permissions to edit the Role.
-
Define Permissions: Define the permissions for this roles.
-
Assign Members: Search and select users in the portal to be assigned to this role. These users inherit any permissions given to the role.
-
View Users: View the users who are in the Role.
-
Delete: Deletes the Role.
-
-
Click .
11.1.4 Understanding the Power Users Role
By default, many portlets in the Dashboard are configured so that Power Users have access to them, but regular users do not. If you decide to remove the Power Users role from the default user associations, you will need to modify the permissions on certain portlets.
11.1.5 Granting Role Permissions for Other Roles
For all roles, you can give permissions to other roles for the maintenance of that role.
To assign permissions to another role:
-
Click , and select . The Control Panel opens.
-
Under , select .
-
Click next a role of Community or Organization type, and select
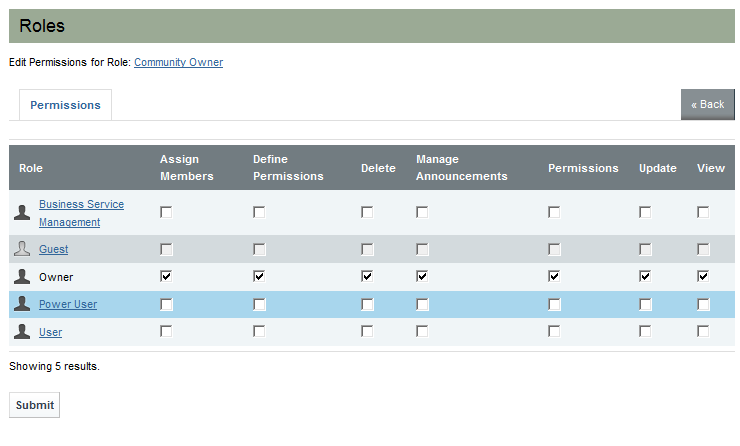
-
Grant permissions as necessary to the members of the selected role by selecting its associated check box.
-
Assign Members: Allows them to assign users as members of the role.
-
Define Permissions: Allows them to define permissions for the role.
-
Delete: Allows them to delete the role.
-
Manage Announcements: Allows them to maintain announcements.
-
Permissions: Allows them to view permissions on the role.
-
Update: Allows them to edit the role.
-
View: Allows them to view role attributes.
-
-
Click .