10.3 UniORB for CA Unicenter
UniORB is a Operations Center software component that wraps the Computer Associates Unicenter Enterprise Management System with a CORBA object interface, enabling access to many of Unicenter’s core functions and data over a network.
The CA Unicenter adapter in Operations Center software connects to the UniORB over the network (or locally, if Unicenter and Operations Center software are installed on the same machine) to provide real-time access to Unicenter managed objects and events from any Web browser, using the Operations Center console. It is also possible to use Operations Center software to automate and contain Unicenter managed objects in one centralized location.
For instructions on creating and configuring CA Unicenter adapters after the UniORB is installed, see Section 2.10, Computer Associates Unicenter.
10.3.1 System Requirements
Table 10-7 outlines the system requirements for installing the UniORB:
Table 10-7 System Requirements
|
OS |
Description |
|---|---|
|
Windows |
|
10.3.2 General Steps for Installation
This section provides a high-level overview of the installation procedure. Detailed installation procedures are provided in the remaining sections of this section. Click the hypertext links to directly access the relevant section.
To install UniORB:
-
Verify that you have the most current versions of the server and UniORB.
-
Uninstall previous versions of UniORB from the Unicenter server.
For instructions, see Section 10.3.3, Uninstalling a Prior UniORB Installation.
-
Verify the default port is available.
For instructions, see Section 10.3.4, Verifying that the Default Port is Available.
-
(Optional) Implement a modified copy of Unicenter common.cnf.
-
Install UniORB and the UniORB service using the Operations Center Installation CD.
For instructions, see Section 10.3.5, Installing UniORB.
-
Configure the UniORB service.
For instructions, see Section 10.3.7, Configuring the UniORB Service.
-
Start UniORB.
For instructions, see Section 10.3.13, Starting and Stopping the UniORB.
-
Define the Unicenter adapter.
For more information about defining and using the Unicenter adapter, see Section 2.10, Computer Associates Unicenter.
10.3.3 Uninstalling a Prior UniORB Installation
If a prior version of the UniORB is installed, use the following steps to uninstall it completely. This is a precautionary step to ensure that errors resulting from a prior installation do not occur during the new UniORB installation.
To uninstall a prior version of UniORB:
-
To remove registry entries that are currently set, from the desktop, click > > > > .
-
Double-click , then click and uninstall the UniORB.
10.3.4 Verifying that the Default Port is Available
The default port for UniORB is 1580. Prior to installing UniORB, verify that port 1580 is available.
To verify that port 1580 is available:
-
At a command prompt, enter:
netstat ‑an | find "LISTEN" | find "1580"
-
If the above command results in a line ending with the word LISTEN, then select a different port.
10.3.5 Installing UniORB
Install UniORB from the /ORBS directory on the Operations Center CD.
To install UniORB:
-
On the Operations Center CD, navigate to the /ORBS/Unicenter/NT directory.
-
Launch setup.exe.
10.3.6 Installation Considerations
Although the Installation Wizard does streamline the UniORB installation process, there are some options to consider when installing for the first time or when it is necessary to first uninstall an existing UniORB.
If the UniORB is already installed on the system, you must uninstall it before installing a new UniORB. If the Install Wizard finds an existing UniORB, the following screen displays:
Figure 10-2 Operations Center UniORB Installation Wizard – Removing previously installed UniORB
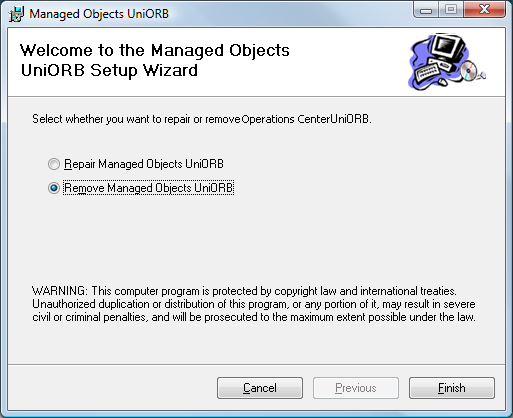
To remove the old UniORB, click , then click . Afterwards, follow the steps again to launch the installer.
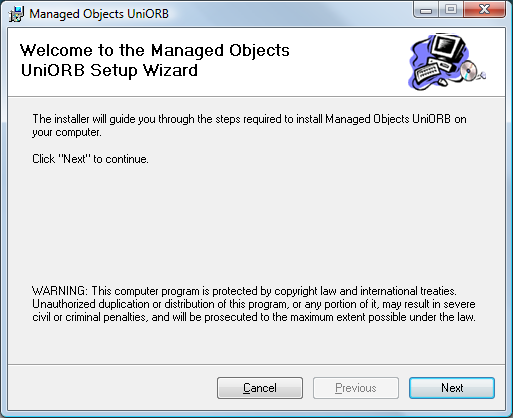
When UniORB is installed, either for the first time or after the removal process on an existing version is complete, the following screen displays:
Figure 10-3 Operations Center UniORB Installation Wizard
After you click , the following screen displays:
Figure 10-4 Operations Center UniORB Installation Wizard – Agree to License Agreement

Select to accept the license agreement., then click . The following screen displays:
Figure 10-5 Operations Center UniORB Installation Wizard – Selecting the Installation folder
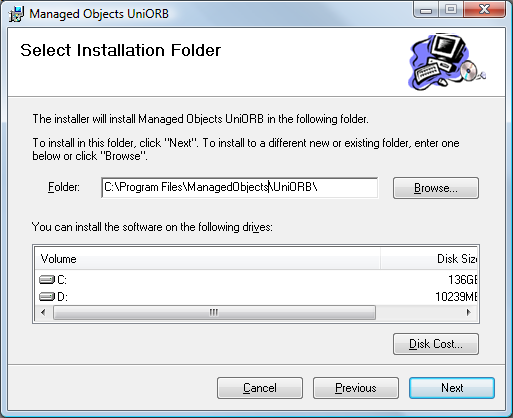
Specify the installation folder and follow the prompts to complete the installation process.
10.3.7 Configuring the UniORB Service
During the UniORB installation, a dialog box offers you the option of customizing the UniORB parameters. If this dialog box does not open, or if you want to manually reconfigure the UniORB, use the procedures in the following sections:
Manually Configuring the UniORB
To configure the UniORB:
-
From the desktop, click > > to open the Control Panel dialog box.
-
Double-click to open the UniORB Service Settings dialog box:
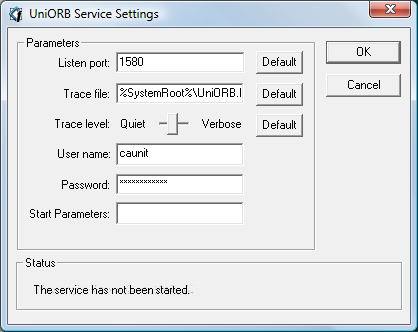
-
Specify the port (Listen port) on which to listen for network requests, the path to the UniORB.log (trace) file and the level of detail (trace level) in the UniORB log file.
If the TCP/IP port number 1580 is already in use on the Unicenter server, select a different port as described in Section 10.3.4, Verifying that the Default Port is Available.
-
In the field, specify the path to store the UniORB.log trace file.
The default location is c:/windows/UniORB.log.
If the Operations Center server is installed on the same machine as the UniORB, specify the /OperationsCenter_install_path/logs directory. This makes it easier to locate the log file later.
If the Operations Center server is not installed on the same machine, specify the /Program Files/OperationsCenter_install_path/UniORB directory (the directory where the UniORB is installed).
-
Adjust the Trace Level slider used to represent the trace level of the UniORB.log file.
When set completely to the right, the DEBUG level produces considerable trace data.
For best general results, set the slider to position 4 or 5 (there are a total of six positions, 1 being the quietest).
-
Specify the start parameters, which are listed in Section 10.3.14, Running UniORB from the Command Line.
-
In the and fields, specify the ID and password of a user who has access to the network shares that enable the UniORB to retrieve remote Unicenter Enterprise Manager events.
This user can be an account in the local domain or a full domain account, but the user ID must have the authority to access all UNISHARE$ netnames on the machines where the Unicenter Enterprise Managers are installed.
The UniORB uses the supplied information to perform a dynamic login after startup. After the login, the UniORB maps a Universal Naming Convention (UNC) share name to the directory on each Unicenter server where Unicenter logs are kept, so the user ID must have the necessary authorization to map that UNC name. To a Unicenter administrator, these servers are Enterprise Management servers or EM servers.
The user ID and password is not validated until the UniORB starts. Be careful when typing the password, as there is no password verification, and the password stored in the registry is masked. Also see Section 10.3.11, Additional Issues Regarding User IDs and Passwords.
-
Click to close the UniORB Service Settings dialog box.
Figure 10-3 shows a UniORB configuration with the required information. If the dialog box on the screen does not match what is shown in Figure 10-3, the most recent version of the UniORB is not installed.
Figure 10-6 UniORB Service Settings
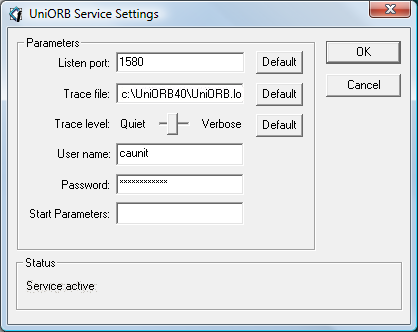
Note the information displayed in the Status area at the bottom of the dialog box. The message Service active indicates that the service was configured through the Control Panel applet, installed through the menu option, and that the UniORB service has started.
Other messages that can display in the Status area are:
Service has not been installed.
Service is not active.
Setting the Startup Options
To set the startup options on UniORB:
-
From the desktop, click > > to open the Control Panel dialog box.
-
Double-click to open the Services dialog box.
-
Select , then click to open the Service dialog box.
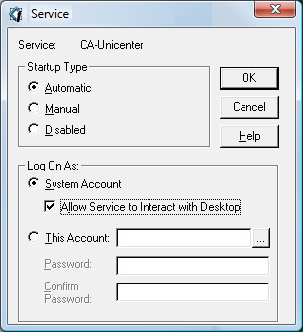
-
Select one of the following radio buttons:
Automatic: Starts UniORB automatically on system startup.
Manual: Start UniORB manually.
-
Verify that Log On As is set to System Account and that is selected.
This log on setting is different from the user ID specified in the UniORB configuration. Do not change it to any other value.
-
Click to close the CA Unicenter Service dialog box.
-
Click to close the Services dialog box.
The correct configuration of the UniORB service, when viewed from the Control Panel Services applet, is to Log on as Local System Account, with selected.
If this configuration is not used, the UniORB does not see event messages from Unicenter, and state (color) changes are not propagated from Unicenter to Operations Center software. State information and additions and deletions display in Operations Center software when the adapter stops and restarts, but additional changes do not display. Operations Center software also does not recognize the dynamic creation and deletion of objects.
The UniORB service uses the System Account to log on and start several processes which together support Operations Center software’s communication with Unicenter. Only one of these processes uses the real user ID and password supplied in the UniORB Control Panel applet.
10.3.8 Changing Registry Entries
Registry entries used by the UniORB service are set when the service is installed. Additional values are set when the Control Panel applet executes. If you are concerned that the registry values are not set correctly, simply perform again the steps listed in the previous section. It is not necessary to uninstall and reinstall the UniORB software to set these registry entries.
The registry entries used by the UniORB are located at: HKEY_LOCAL_Machine/SYSTEM/CurrentControlSet/Services/Operations Center UniORB
10.3.9 Repository Object Filtering
The UniORB class filtering feature provides the ability to subscribe to certain classes in Unicenter. Instead of bringing in all objects and hierarchies to Operations Center, you can exclude the object classes that are not of interest to you.
The UniORB command takes an optional parameter, ‑f=filename, where filename is a text file that lists TNG WorldView classes to omit. Optionally, identify superclasses by adding this suffix to the class name, such as ::ALLCHILDCLASSES. Another option is to place comments in the file using the # character.
The following code is an example filter file:
# Example Uniorb Repository Class Filter Definition File
# (c) Novell, Inc. 2006
#
# For use with UniORB 3.51 and above only
#
# To define the repository filter file to the uniorb the -f parameter
# must be used in the uniorb start-up parameters, configurable via the
# Control Panel applet. There is no restriction on the filename or
# location of the filter file.
#
#
# File Contents
# -------------
# Any line prefixed with the # character is considered a comment and ignored
# Class names TO BE FILTERED OUT are listed, one per line
# Optionally the suffix ::ALLCHILDCLASSES can be used to indicate that the
# specified class and any subclasses should be filtered out.
#
# For example, to filter out the Agent class and any sub-classes;
# Agent::ALLCHILDCLASSES
#
Workstation
WBEM
IPSubnet
Ping
This repository filter file is separate (for backwards compatibility) from the event log filter file.
10.3.10 Automatic Service Dependencies
There might be situations in which the UniORB should depend on specific services such as Unicenter or SQL Server. If either service is shut down, the UniORB should be shut down. Additionally, the UniORB should restart after Unicenter or SQL Server has restarted.
To accomplish this dynamic service dependency, the UniORB checks a Registry leaf (DependOnServices), which is a comma-separated list of service names on which the UniORB service is dependant. When UniORB starts up, the value is compared with the current service configuration and all changes are applied automatically to the service definition.
10.3.11 Additional Issues Regarding User IDs and Passwords
The user ID is stored exactly as it is entered. Therefore, it is possible to specify an NT domain account as well as a local account. If you are concerned that the user ID is not being handled properly, enter the user ID in the form:
NT_domain \user_ID
where NT_domain is the domain name of the Domain Controller that authenticates the logon, and user_ID is a user name that must also have certain advanced user rights that are common to programs that execute as a service.
In general, members of the Administrators group have most of the rights needed. Those shown in Table 10-8 are commonly necessary. Those shown in bold print have been observed to be missing in some cases:
Table 10-8 Rights Needed for Each Operating Platform
|
Operating Platform |
Advanced User Rights Needed to: |
|---|---|
|
Windows NT Server |
|
|
Windows 2000 Server |
|
In a few observed cases (on Windows 2000), it also might be necessary to ensure that the account used has the required privileges in the local domain, even if the account used is a domain account rather than a local domain account.
10.3.12 Configuration Notes
The UNC name mapped by the UniORB is the value defined by Unicenter during its installation. This UNC name must be the default value of UNISHARE$ for correct mapping to occur. This UNC name is mapped to the Unicenter root directory on the Unicenter server. Typically, this is: C:/NSM.
Scanning the log files in the /NSM/LOGS directory provides the information displayed by Operations Center software in the view. If the UniORB cannot map to the directory where the logs are located, Operations Center software does not display any alarms for Unicenter. In this situation, a message appears at the beginning of the UniORB log, possibly indicating a login failure, as well as a brief indication of the likely cause.
10.3.13 Starting and Stopping the UniORB
To start the UniORB:
-
From the desktop, click > > to open the Control Panel dialog box.
-
Double-click to open the Administrative Tools dialog box.
-
Double-click to open the Services dialog box.
-
Right-click , click , then click .
The service starts.
To manually stop the UniORB, use the mosstop command.
10.3.14 Running UniORB from the Command Line
To view the command line syntax supported by the UniORB, issue the uniorb command with the ‑h parameter, as shown (the output of the command also displays):
C:> uniorb ‑h

Usage:
uniorb [options]

Options:
‑h, ‑‑help             Show this message.
‑i, ‑‑install          Install the service.
‑u, ‑‑uninstall        Uninstall the service.
‑c, ‑‑console          Run in console mode.
Use the –c parameter to invoke the UniORB from the command line for diagnostic purposes.
When the UniORB runs from the command line, two additional command line parameters might be useful for diagnostics. These options have the same functionality within all ORBs.
Table 10-9 Command Line Parameters for Diagnostics
|
Parameter |
Meaning |
|---|---|
|
–OAhost hostname |
A valid hostname that the server can use to communicate with the ORB. A capital letter O, not a zero, follows the hyphen (–). This name instructs the ORB to always publish its references with the proper hostname, one that the server can correctly resolve and reach over the network. |
|
–OAport port_number |
A valid port number that the server can use to communicate with the ORB. Note that a capital letter O, not a zero, follows the –. |