2.2 Migrating Access Manager on Red Hat From Windows
2.2.1 Migrating Administration Consoles
Prerequisites for the Administration Console Migration
In addition to the following prerequisites, ensure that you also meet the hardware and software requirements for the Administration Console. For details, see Installation Requirements on Linux
in the NetIQ Access Manager 4.0 SP2 Installation Guide.
-
A new IP address, that will be temporarily used during the Primary Administration Console migration.
-
Timeout Per Protected Resource (TOPPR) is enabled and applied in the Access Gateway. In the Administration Console, click Devices > Access Gateways > Edit, then click Enable Timeout Per Protected Resource.
If the Enable Timeout Per Protected Resource option has already been applied, it will not be displayed on the screen.
-
The primary and secondary 3.1 SP4 or 3.1 SP5 Administration Console time is synchronized.
-
The new 4.0 Administration Console that you want to install should be on the same subnet as the existing 3.1 SP4 or 3.1 SP5 primary console.
-
The health statuses for all devices in the Administration Console are green in color.
For more information, see
Viewing Device Health
in the NetIQ Access Manager 4.0 SP1 Administration Console Guide. -
You have physical access to the server or server console (in case of VMWare setups) as a root user and you are familiar with iptables.
The required ports are opened in the firewall. For more information about ports, see Section 1.1.4, Port Details.
-
Note down the contracts selected under the Satisfies contract list of SAML2.0 and Liberty identity providers. These are under Devices > Identity Servers > Edit > [Protocol] > [IdentityProvider] > Authentication Card.
The application interface for this feature has changed in version 4.0. You must manually configure these contracts after migration. This configuration will be effective after the Identity Server migration is done.
(Optional) If federation is configured, see the contracts configured for 3.1 SP4 or 3.1 SP5, and navigate to Administration Console > Devices > Identity Servers > Edit > [Protocol] > [Identity Provider] > Authentication Card. The Satisfies Contract field lists all the configured contracts.
-
The host name of the new 4.0 Administration Console should be different from the existing 3.1 SP4 or 3.1 SP5 primary and secondary Administration Consoles.
-
Ensure that the \etc\hosts file of the system where you are installing Access Manager 4.0 has the host name and IP address for the new 4.0 Administration Console server. If the hostname of the Administration Console is not listed in DNS, the hosts file is used to resolve the hostname of the machine to a valid IP address.
-
Ensure that nc-1.84-22.el6.x86_64.rpm is installed on the Access Manager 4.0 setup.
WARNING:If three Administration Consoles are already installed and configured in the 3.1 SP4 or 3.1 SP5 setup, uninstall one secondary Administration Console before running the install_and_migrate.sh script.
For more information about deconfiguring and uninstalling the Administration Console, see Step 12 and Uninstalling the Linux Administration Console
in the NetIQ Access Manager 4.0 SP2 Installation Guide.
Migration Scenarios for the Administration Console
The following scenarios are supported for migrating NetIQ Access Manager from 3.1 SP4 or 3.1 SP5 to 4.0 on Red Hat.
IMPORTANT:Ensure you identify the scenario that best describes your migration environment and review the appropriate steps before you begin the process of migration.
Administration Console, Identity Server and 3.1 SP4 or 3.1 SP5 Access Gateway Appliance Are Installed on Different Servers
Workflow:
-
Migrate the Administration Consoles.
-
Migrate the Identity Server.
-
Migrate the 3.1 SP4 or 3.1 SP5 Access Gateway Appliance to the 4.0 Access Gateway Appliance.
Administration Console and Identity Server Are on the Same Server, and 3.1 SP4 or 3.1 SP5 Access Gateway Appliance Is on a Different Server
Workflow:
-
Migrate the primary Administration Console.
-
Migrate the Identity Server.
-
Migrate the 3.1 SP4 or 3.1 SP5 Access Gateway Appliance to the 4.0 Access Gateway Appliance.
Secondary Administration Console and Identity Server are on the Same Server
Workflow:
-
Migrate the primary Administration Console.
-
Migrate the secondary Administration Console.
-
Migrate the Identity Server.
The Administration Console and Identity Server Are on the Same Server
Workflow:
-
Migrate the Administration Consoles.
-
Migrate the Identity Server.
NOTE:If the device has multiple interfaces, manually configure the primary IP address on each NIC.
To do this, from the terminal run the system-config-network command. Use the Device Configuration option to configure the interfaces.
Migrating the Primary Administration Console
IMPORTANT:Before you proceed with the steps for migration, ensure that you have followed the instructions in the Prerequisites for the Administration Console Migration.
If you have multiple components installed on the same system, before starting migration of any component, ensure that you read the migration prerequisites of all the components.
Migration Process
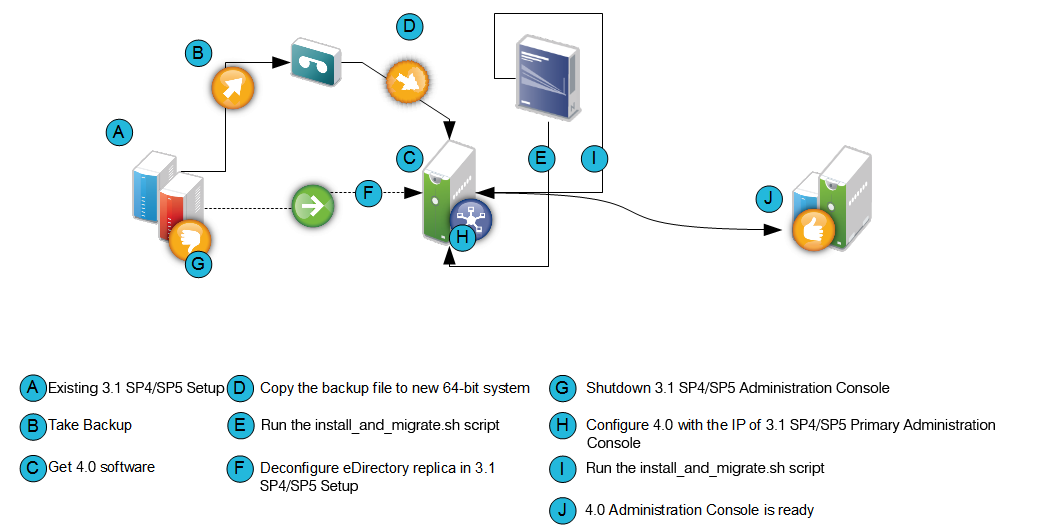
Figure 2-3 Process of Migration of the Primary Administration Console
-
Back up the 3.1 SP4 or 3.1 SP5 primary Administration Console configuration by using C:\Program Files(x86)\Novell\bin\ambkup.bat.
-
Copy the backup zip file to /tmp or any other folder on the new 64-bit server where you plan to install the 4.0 Administration Console.
Make a note of the location and file name in absolute format. You need to provide this information in the installation and migration script (for example, /tmp/idpq_20120111_1314.zip).
-
Ensure that you have downloaded the software or you have the CD available.
-
Do one of the following:
-
Insert the CD into the drive, then navigate to the device. Enter the following:
cd /media
Browse to your CD-ROM drive.
-
If you downloaded the AM_40_AccessManagerService_Linux64.tar.gz file, unpack the file using the following command:
tar -xzvf AM_40_AccessManagerService_Linux64.tar.gz
-
-
Browse to the novell-access-manager folder.
All the files are extracted to the novell-access-manager folder.
-
Run the install_and_migrate.sh script from the folder to migrate the primary Administration Console from 3.1 SP4 or 3.1 SP5 to 4.0.
-
Accept the license agreement by entering y when the system prompts you.
-
Type Y and press Enter when the installation confirmation message is displayed.
-
Provide the following details:
3.1 Primary Administration Console IP address: Enter the 3.1 SP4 or 3.1 SP5 primary IP address. Ensure that the IP address is static.
Access Manager Administration user ID: Enter the administrator user ID.
Access Manager Administration password: Enter the administrator password. Re-enter the password for verification.
Location of the backup file with absolute path: Enter the absolute path of the backup file that you created in Step 1.
Password for decrypting the data: Enter the private key encryption password of the backup file. Re-enter the password for verification.
NOTE:To view installation progress, refer to the log files in /tmp/novell_access_manager.
-
Verify if the 4.0 Access Manager server is functional. Perform one of the following steps from the 4.0 terminal:
-
Run /opt/novell/eDirectory/bin/ndsstat -r command. This lists all the replicas available. Verify that the status of the 4.0 replica is On.
-
Run /opt/novell/eDirectory/bin/ldapsearch -A -LLL -b "ou=accessManagerContainer,o=novell" -D "cn=<username>,o=novell" -w <password> command. This lists all the objects in the NAM container. You can run the same command on the 3.1 SP4 or 3.1 SP5 terminal to verify if the object list is complete and accurate.
-
-
From the 3.1 SP4 or 3.1 SP5 Access Manager setup, uninstall eDirectory by using the Add/Remove Programs option.
-
Shut down the 3.1 SP4 or 3.1 SP5 Administration Console.
-
From the 4.0 Administration Console terminal, run the system-config-network command. Select the Device Configuration option to change the IP address to the old primary Administration Console IP address.
For more information about configuring or changing the IP address, see http://www.linuxtopia.org/online_books/rhel6/rhel_6_deployment/rhel_6_deployment_ch-Network_Interfaces.html
-
Run the install_and_migrate.sh script from the novell-access-manager folder again to complete the installation.
A confirmation message is displayed.
-
Enter Y and the following message is displayed:
Installation will continue to finish the rest of the 4.0 migration tasks
Would you like to continue this installation (y/n)?
-
Enter Y and then provide the following details:
-
Enter the Access Manager Administration user ID.
-
Enter the Access Manager Administration password.
-
Re-enter the password for verification.
After migration is complete, the system displays the following message:
4.0 Administration Console migration completed successfully.
-
-
Log in to the 4.0 Administration Console and delete unusedobjects and certificates of the 3.1 SP4 or 3.1 SP5 Administration Console that you shutdown in Step 12.
-
In Administration Console, select View Objects. Delete the following unused objects and certificates:
Objects
-
HTTP Server
-
LDAP Server
-
LDAP Group
-
SNMP Group
-
SAS Service
-
PS object
Certificates
-
IP AG
-
SSL Certificate IP
-
DNS AG
-
SSL Certificate DNS
-
-
-
Migrating the Secondary Administration Console
To install the secondary Administration Console you can either use a new server that supports a 64-bit installer to install the secondary Administration Console or you can reuse the existing server for installation if it supports the 64-bit installer.
To migrate the secondary Administration Console to 4.0, use one of the following procedures:
Using a New Server for the Secondary Administration Console
IMPORTANT:Before you install the 4.0 secondary Administration Console on a 64-bit server, it is important to de-commission the 3.1 SP4 or 3.1 SP5 secondary Administration Console. This process helps ensure that the number of Administration Consoles do not exceed three instances.
-
Verify if the 4.0 Access Manager server is functional. Perform one of the following steps from the 4.0 terminal:
-
Run /opt/novell/eDirectory/bin/ndsstat -r command. This lists all the replicas available. Verify that the status of the 4.0 replica is On.
-
Run /opt/novell/eDirectory/bin/ldapsearch -A -LLL -b "ou=accessManagerContainer,o=novell" -D "cn=<username>,o=novell" -w <password> command. This lists all the objects in the NAM container. You can run the same command on the 3.1 SP4 or 3.1 SP5 terminal to verify if the object list is complete and accurate.
-
-
Log in to the 4.0 primary Administration Console.
-
Click Auditing > Troubleshooting> Other Known Device Manager Servers.
-
Click Remove for this server.
-
Install the 64-bit RHEL 6.4, 6.5 or 6.6 operating system on the new 64-bit server with a different host name.
-
On the terminal, run system-config-network command.
-
Select the Device Configuration option.
-
Specify a different host name.
For more information, see http://www.linuxtopia.org/online_books/rhel6/rhel_6_deployment/rhel_6_deployment_ch-Network_Interfaces.html
-
-
Ensure you have downloaded the software or you have the CD available.
-
Do one of the following:
-
Insert the CD into the drive, then navigate to the device. Enter the following:
cd /media
Browse to your CD-ROM drive.
-
If you downloaded the AM_40_AccessManagerService_Linux64.tar.gz file, unpack the file using the following command:
tar -xzvf AM_40_AccessManagerService_Linux64.tar.gz
-
-
Browse to the novell-access-manager folder.
All the files are extracted to the novell-access-manager folder.
Reusing the Existing Server or IP Address for the Secondary Administration Console
To use the existing server for installing the secondary Administration Console, ensure it is a 64-bit server.
-
Verify if the 4.0 Access Manager server is functional. Perform one of the following steps from the 4.0 terminal:
-
Run /opt/novell/eDirectory/bin/ndsstat -r command. This lists all the replicas available. Verify that the status of the 4.0 replica is On.
-
Run /opt/novell/eDirectory/bin/ldapsearch -A -LLL -b "ou=accessManagerContainer,o=novell" -D "cn=<username>,o=novell" -w <password> command. This lists all the objects in the NAM container. You can run the same command on the 3.1 SP4 or 3.1 SP5 terminal to verify if the object list is complete and accurate.
-
-
Enter the admin credentials in admin.novell format and proceed with deletion.
-
Log in to the 4.0 primary Administration Console.
-
Click Auditing > Troubleshooting> Other Known Device Manager Servers.
-
Click Remove for this server.
-
Format the server with the 64-bit Red Hat 6.4 or 6.5 and a different host name or configure the same IP address with a different host name.
-
Run the system-config-network command.
-
Select the Device Configuration option to make the changes.
For more information, see http://www.linuxtopia.org/online_books/rhel6/rhel_6_deployment/rhel_6_deployment_ch-Network_Interfaces.html
IMPORTANT:Even after formatting the server, old certificates are not cleaned up from the user store. If you are using an existing host name during Access Manager installation, it may lead to a conflict with the existing certificates. It is recommended to use a different host name during IP address configuration.
-
-
Ensure you have downloaded the software or you have the CD available.
-
Do one of the following:
-
Insert the CD into the drive, then navigate to the device. Enter the following:
cd /media
Browse to your CD-ROM drive.
-
If you downloaded the AM_40_AccessManagerService_Linux64.tar.gz file, unpack the file using the following command:
tar -xzvf AM_40_AccessManagerService_Linux64.tar.gz
-
-
Browse to the novell-access-manager folder.
All the files are extracted to the novell-access-manager folder.
-
Install the secondary Administration Console by using the install.sh script.
For more information about how to install the secondary Administration Console, see
Installing Secondary Versions of the Administration Console
in the NetIQ Access Manager 4.0 SP1 Setup Guide. -
From the 3.1 SP4 or 3.1 SP5 Access Manager setup, delete the objects of the unused eDirectory replica of the 3.1.4 Access Manager setup.
-
In Administration Console, select View Objects. Delete the following unused objects and certificates from the 3.1 SP4 or 3.1 SP5 Administration Console:
Objects
-
HTTP Server
-
LDAP Server
-
LDAP Group
-
SNMP Group
-
SAS Service
-
PS object
Certificates
-
IP AG
-
SSL Certificate IP
-
DNS AG
-
SSL Certificate DNS
-
-
NOTE:If the secondary Administration Console migration exits stating that the Server’s DIB does not contain replicas, see Section 5.4, Migration Exits Stating That the Server’s DIB Does Not Contain Replicas.
2.2.2 Migrating Identity Server
It is recommended that you replace the Identity Servers individually. The 3.1 SP4 or 3.1 SP5 and 4.0 Identity Servers can coexist until the migration is complete.
Prerequisites for the Identity Server Migration
In addition to the following prerequisites, ensure that you also meet the hardware and software requirements for the Identity Server. For details, see Installing the Identity Servers
in the NetIQ Access Manager 4.0 SP2 Installation Guide.
-
The Identity Server can perform a DNS resolution with the ESP (Embedded Service Provider) host name of the Access Gateway.
For more information, see
DNS Name Resolution
in the NetIQ Access Manager 4.0 SP1 Identity Server Guide. -
The Identity Server time is synchronized with the time of the Administration Console.
-
You have physical access to the server or server console (in case of VMWare setups) as a root user and are familiar with firewall configurations. The required ports also must be opened in the firewall. For more information about the ports, see Section 1.1.4, Port Details.
-
Determine if you want to reuse an existing IP address or use a new IP address for the migration process.
-
If the services are managed by an L4 switch, remove the device that you are migrating from the L4 switch. Add the device back to the L4 switch once the migration is done successfully. This is required so that no user requests are sent by L4 switch to that device during migration.
-
If you have customized any files use the ambkup.bat script to back up the files. This script is located in the novell-access-manager folder in the AM_40_AccessManagerService_Linux64.tar.gz file. Copy this script to the 3.1 SP4 or 3.1 SP5 server and run the script to do the back up. It is important to take the backup regardless of whether you are reusing the same machine or a new machine.
As part of the backup process, the files that get backed up are:
-
C:\Program Files (x86)\Novell\Tomcat\conf\server.xml
-
C:\ Program Files (x86)\Novell\Tomcat\conf\web.xml
-
C:\Program Files (x86)\Novell\Tomcat\server\classes
-
C:\Program Files (x86)\Novell\Tomcat\webapps\nidp\config
-
C:\Program Files (x86)\Novell\Tomcat\webapps\nidp\jsp
-
C:\Program Files (x86)\Novell\Tomcat\webapps\nidp\images
-
C:\Program Files (x86)\Novell\Tomcat\webapps\nidp\web.xml
-
C:\Program Files (x86)\Novell\Tomcat\webapps\nidp\images
-
C:\Program Files (x86)\Novell\jre\lib\security\bcslogin.conf
-
C:\Program Files (x86)\Novell\Tomcat\webapps\nidp\jsp
-
C:\Program Files (x86)\Novell\Tomcat\webapps\nidp\WEB-INF\classes
-
-
(Conditional) If the Identity Server cluster has been assigned to delegated administrators, remove them before migration and re-add them after the migration is complete.
If you do not perform this action, the delegated administrators will not be able to log in and configure devices assigned to them. You must manually re-create these administrators and assign the respective devices.
For more information about delegated users,
Managing Delegated Administrators
in the NetIQ Access Manager 4.0 SP1 Administration Console Guide. -
You have installed packages. For more information, see
Reusing an Existing IP Address
Identity Server Is the Only Component on the Server
Workflow:
-
Back up the files if they have been customized.
-
Stop and remove the 3.1 SP4 or 3.1 SP5 Identity Server.
-
Delete the 3.1 SP4 or 3.1 SP5 Identity Server which is removed from the Identity Servers cluster.
-
Uninstall the 3.1 SP4 or 3.1 SP5 Identity Server if you are going to use the current server to install 4.0 Identity Server.
-
Add the 4.0 Identity Server to the existing Identity Server cluster in the Administration Console.
-
Update the Identity Server and apply changes.
-
Restore any customized files from the backup taken earlier.
Using a New IP Address
Identity Server Is the Only Component on the Server
Workflow:
-
Back up the customized files.
-
Use the NetIQ Access Manager 4.0 installer to install the 4.0 Identity Server on a 64-bit Red Hat 6.4 or 6.5 operating system.
-
Add the 4.0 Identity Server to the existing Identity Server cluster in the Administration Console.
-
Update the Identity Server and apply changes.
-
Restore any customized files from the backup taken earlier.
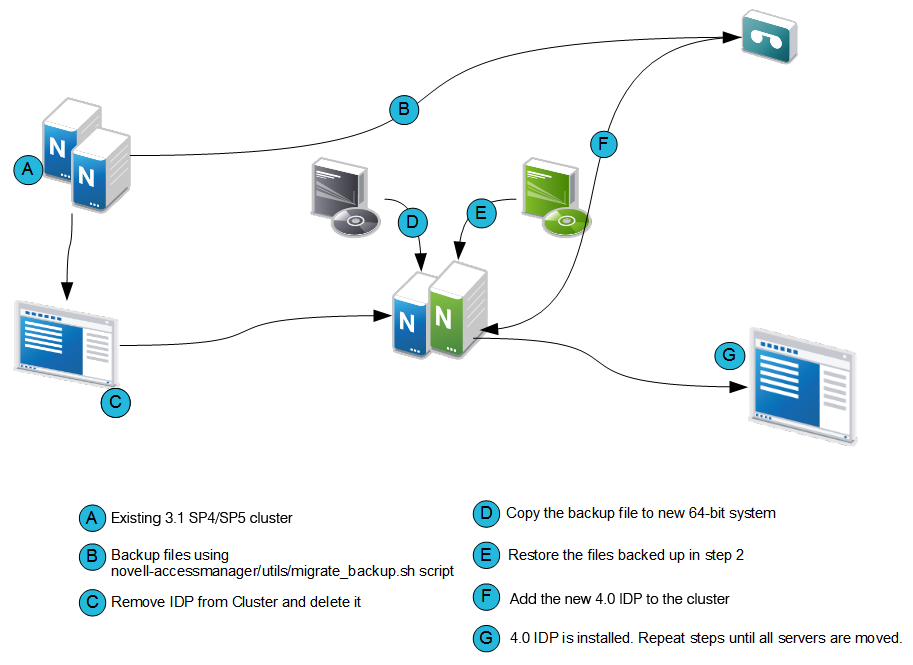
Process of Migration
Figure 2-4 Process of Migrating the Identity Server
IMPORTANT:Before you proceed with the steps for migration, ensure that you have followed the instructions in the Prerequisites for the Identity Server Migration.
-
Stop the Identity Server and remove the Identity Server from the cluster configuration.
-
In the Administration Console, click Devices > Identity Servers.
-
Select the server, then click Stop.
-
Select the server, then choose Actions > Remove from cluster.
-
Update the cluster configuration.
-
-
If you are using an existing machine, delete the existing Identity Server from the Administration Console before installing the new Identity Server.
-
In the Administration Console, click Devices > Identity Servers.
-
Select the server, then click Stop.
-
Click Actions > Delete.
-
-
If the operating system is already 64-bit Red Hat 6.4 or 6.5, uninstall the 3.1 SP4 or 3.1 SP5 version and install the 4.0 Identity Server.
-
Perform a new installation of 64-bit Red Hat 6.4 or 6.5 operating system.
For more information, see Red Hat Enterprise Linux Installation Guide..
-
Ensure you have downloaded the software or you have the CD available.
-
Insert the CD into the drive, then navigate to the device. Enter the following:
cd /media
Browse to your CD-ROM drive.
-
If you downloaded the AM_40_AccessManagerService_Linux64.tar.gz file, unpack the file using the following command:
tar -xzvf AM_40_AccessManagerService_Linux64.tar.gz
-
-
Browse to the novell-access-manager folder.
All the files are extracted to the novell-access-manager folder.
-
Run the install.sh script from the novell-access-manager folder on a 64-bit Red Hat 6.4 or 6.5 server and choose the option to install the Identity Server.
-
Enter the following details:
-
IP address of the 4.0 primary Administration Console as the primary Administration Console IP address
-
Access Manager Administration User ID
-
Access Manager Administration password
-
Re-enter the password for verification
-
-
If local NAT is available for the Identity Server, enter the NAT IP address. For more information about configuring Network Address Translation, see
Configuring Network Address Translation
in the NetIQ Access Manager 4.0 SP2 Installation Guide. -
Enter Y to proceed with installation.
After installation, this Identity Server device is displayed in the Administration Console.
-
Restore any customized files from the backup taken earlier as part of steps in Prerequisites for the Identity Server Migration.
To restore the files, copy the content of the following files to the corresponding file in the new location.
Table 2-4 Restoring Files During IDP Migration
Old File Location
New File Location
C:\Program Files (x86)\Novell\Tomcat\conf\server.xml
/opt/novell/nam/idp/conf/server.xml
C:\ Program Files (x86)\Novell\Tomcat\conf\web.xml
/opt/novell/nam/idp/webapps/nidp/WEBINF/web.xml
C:\Program Files (x86)\Novell\Tomcat\webapps\nidp\config
/opt/novell/nam/idp/webapps/nidp/config
C:\Program Files (x86)\Novell\Tomcat\webapps\nidp\images
/opt/novell/nam/idp/webapps/nidp/images
C:\Program Files (x86)\Novell\jre\lib\security\bcslogin.conf
/opt/novell/java/jre/lib/security/bcslogin.conf
C:\Program Files (x86)\Novell\Tomcat\webapps\nidp\jsp
/opt/novell/nam/idp/webapps/nidp/jsp
C:\Program Files (x86)\Novell\Tomcat\webapps\nidp\WEB-INF\classes
/opt/novell/nam/idp/webapps/nidp/WEBINF/classes
server.xml: If you have modified any elements or attributes in the 3.1 SP4 or 3.1 SP5 environment the corresponding changes will need to be applied to the 4.0 /opt/novell/nam/idp/conf/server.xml file.
Typical changes done to the server.xml in 3.1 SP4 or 3.1 SP5 include modifying the 'Address=' attribute to restrict the IP address the application will listen on, or 'maxThreads=' attribute to change the number of threads.
In the following example, 3.1 SP4 or 3.1 SP5 is customized to use the following ciphers.
<Connector NIDP_Name="connector" port="8443" address="" ciphers="SSL_RSA_WITH_RC4_128_MD5, SSL_RSA_WITH_RC4_128_SHA,, ... ../>
When migrating to 4.0, copy the cipher list from your 3.1 SP4 or 3.1 SP5 server.xml and replace it in the SSL connector section of the 4.0 server.xml file.
tomcat properties: Go to C:\Program Files\Novell\Tomcat\bin\tomcat5w. Double-click the tomcat5w file and make a note of any elements or attributes customized in 3.1 SP4 or 3.1 SP5.On the 4.0 server, go to C:\Program Files (x86)\Tomcat\bin\tomcat7w. Change the values and attributes as required.
For example, if you have modified the heap size in tomcat5w file, ensure you make the samechanges in the tomcat7w file too
-
Add the newly installed Identity Server to the existing Identity Servers cluster.
For more information, see
Clustering Identity Servers
in the NetIQ Access Manager 4.0 Setup Guide.The cluster object stores all the existing Identity Server configurations. The newly added Identity Servers inherit these configurations.
-
On the newly added Identity Server, restart Tomcat using the /etc/init.d/novell-idp restart or rcnovell-idp restart command.
-
Repeat Step 1 through Step 10 until all 3.1 SP4 or 3.1 SP5 Identity Servers are replaced with 4.0 Identity Servers.
2.2.3 Migrating 3.1 SP4 or 3.1 SP5 Access Gateway Appliance to 4.0 Access Gateway Appliance
Prerequisites for the Access Gateway Appliance Migration
In addition to the following prerequisites, ensure that you also meet the hardware and software requirements for the Access Gateway. For details, see Linux Requirements
in the NetIQ Access Manager 4.0 SP2 Installation Guide.
-
Timeout Per Protected Resource (TOPPR) is enabled and applied in the Access Gateway. In the Administration Console, click Devices > Access Gateways > Edit, then click Enable Timeout Per Protected Resource.
If the Enable Timeout Per Protected Resource option has already been applied, it will not be displayed on the screen.
-
Access Gateway should be in a cluster before migration. If the Access Gateway is on a single device, create an access gateway cluster with a single device before migration.
For more information, see
Managing a Cluster of Access Gateways
in the NetIQ Access Manager 4.0 SP1 Access Gateway Guide. -
You have physical access to the server or server console (in case of VMWare setups) as a root user and are familiar with firewall configurations. The required ports must be opened in the firewall. For more information about the ports, see Section 1.1.4, Port Details.
-
Ensure that you have migrated all the Administration Consoles and Identity Servers before migrating the 3.1 SP4 or 3.1 SP5 Access Gateway Appliance to the 4.0 Access Gateway Appliance.
-
Make a note of the IP addresses and host name of the 3.1 SP4 or 3.1 SP5 Access Gateway Appliance before installing the Access Gateway Appliance. The IP address used by 3.1 SP4 or 3.1 SP5 Access Gateway Appliance to communicate with the Administration Console will be used for installing the Access Gateway Appliance.
-
Determine if you want to reuse an existing IP address or use a new IP address for the migration process.
-
Ensure that you have the same number of network interfaces on the new 4.0 Access Gateway as in the 3.1 SP4 or 3.1 SP5 Access Gateway Appliance.
-
If the services are managed by an L4 switch, remove the device that you are migrating from the L4 switch. Add the device back to the L4 switch once the migration is done successfully. This is required so that no user requests are sent by the L4 switch to that device during migration.
-
If you have older versions prior to the 3.1 SP4 or 3.1 SP5 Access Gateway Appliance, first upgrade to 3.1 SP4 or 3.1 SP5 by using the instructions at Access Manager 3.1 Installation Guide.
-
If you have customized any files back them up using the migrate_backup.sh script. This script is located in the novell-access-manager folder in the AM_40_AccessManagerService_Linux64.tar.gz file.Copy this script to the 3.1 SP4 or 3.1 SP5 server and run the script to back up.
It is important to take the backup regardless of whether you are reusing the same machine or a new server.
The files that get backed up are:
-
/var/opt/novell/tomcat5/conf/server.xml
-
/var/opt/novell/tomcat5/conf/tomcat5.conf
-
/var/opt/novell/tomcat5/conf/web.xml
-
/var/opt/novell/tomcat5/webapps/nesp/WEB-INF/web.xml
-
/var/opt/novell/tomcat5/webapps/nesp/jsp
-
/var/opt/novell/tomcat5/webapps/nesp/html
-
/var/opt/novell/tomcat5/webapps/nesp/images
-
/var/opt/novell/tomcat5/webapps/nesp/config
-
/chroot/lag/opt/novell/bin/preapply.sh
-
/chroot/lag/opt/novell/bin/postapply.sh
-
/var/novell/errorpagesconfig/current/ErrorMessages.xml
-
/var/novell/ErrorPagesConfig.xml
-
-
If you have touch files configured in the 3.1 SP4 or 3.1 SP5 Access Gateway Appliance, copy the touch file migration utility files lag2mag_touchfiles.csv and migrate_touchfiles.sh to the 3.1 SP4 or 3.1 SP5 Access Gateway Appliance. These files are located in the novell-access-manager/utils folder in the AM_AccessManagerService_Linux64.tar.gz file.
Use the sh migrate_touchfiles.sh > touchfile_list command and back up the output file touchfile_list.
The touchfile_list file contains the options that needs to be mapped to the advanced options in Access Gateway Appliance.
Here is an example of sample output:
# Global Option example
NAGGlobalOptions InPlaceSilent=on

# Virtual Host/Server Option example
NAGGlobalOptions DebugHeaders=on
Reusing an Existing IP Address
3.1 SP4 or 3.1 SP5 Access Gateway Appliance Is the Only Component on the Server
Workflow:
-
Back up any files that you have customized and note down the IP address and host name of 3.1 SP4 or 3.1 SP5 Access Gateway Appliance.
-
Shut down the 3.1 SP4 or 3.1 SP5 Access Gateway Appliance.
-
Install the Access Gateway Appliance with the IP address and host name noted in Step 1.
-
Restore any customized files from the backup taken earlier.
Migration Process
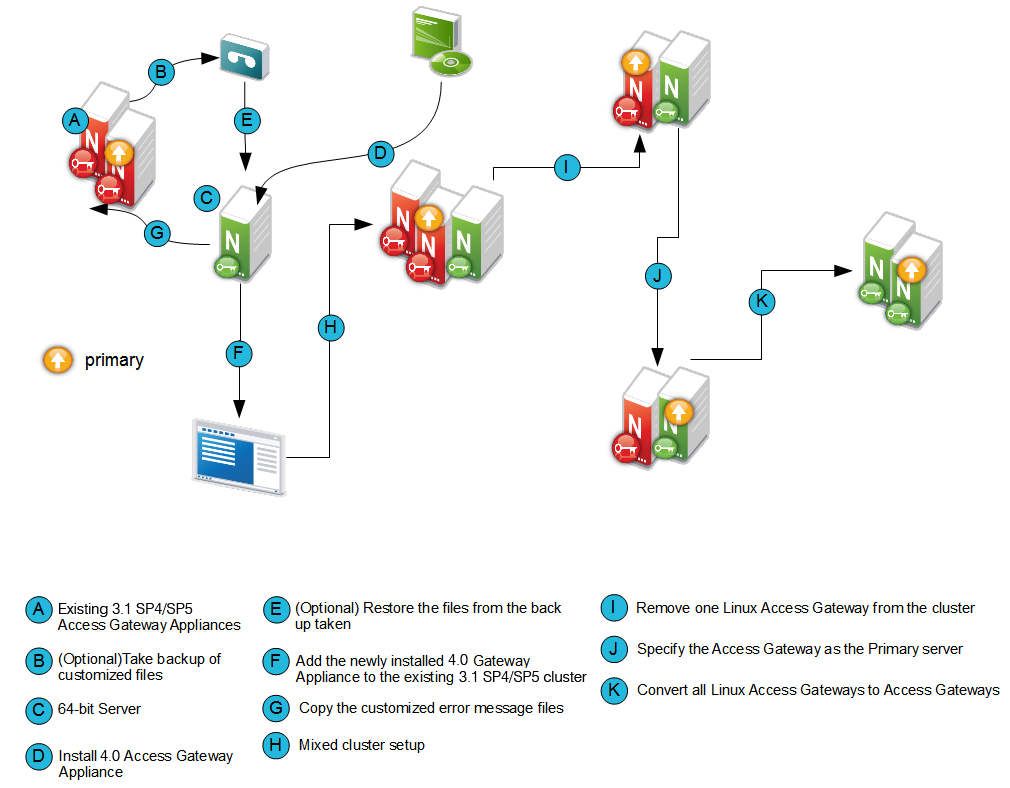
Migrating the 3.1 SP4 or 3.1 SP5 Access Gateway Appliance to 4.0 Access Gateway Appliance will not cause any disruption to the existing setup. You can add new Access Gateway Appliance nodes into the existing 3.1 SP4 or 3.1 SP5 Access Gateway Appliance cluster. They can co-exist together.
If you are using a different server with a different IP address, see Use case scenario 1: and if you are reusing the same IP address, see Use case scenario 2:.
Use case scenario 1:
This scenario assumes that you have a new 64‐bit server to install the 4.0 Access Gateway Appliance and explains how to migrate from 3.1 SP4 or 3.1 SP5 by using a different IP address.
Consider that the setup includes the following components:
-
Administration Console (AC 1)
-
Identity Server cluster (IDP 1 and IDP2)
-
3.1 SP4 or 3.1 SP5 Access Gateway Appliance cluster (LAG 1 and LAG 2).
Migration Process
-
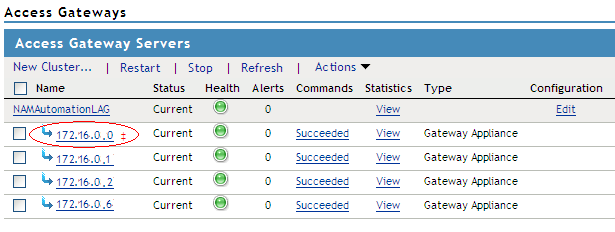
Determine which server in the 3.1 SP4 or 3.1 SP5 Access Gateway cluster is the primary server.
-
Login to Administration Console
-
Click Devices > Access Gateways > Select the device.
The list of servers are displayed. The primary server is indicated by a red mark beside the IP address.
-
-
Install the Access Gateway Appliance (AG 1). For more information, see
Installing the Access Gateway Appliance
in the NetIQ Access Manager 4.0 SP2 Installation Guide. While installing the Access Gateway Appliance, specify the Administration Console's (AC 1) IP address, user name and password in the Administration Console Configuration field on the Appliance Configuration page. -
Add the newly installed Access Gateway Appliance to the 3.1 SP4 or 3.1 SP5 Access Gateway Appliance cluster. For more information, see
Managing Access Gateways
. -
By default, all proxy services of newly added devices to the cluster are listening on the same IP address and port. To configure each reverse proxy service to a specific IP address and port, follow the steps below.
-
Configure a primary IP Address in YaST for the remaining interfaces.
-
Go to YaST > Network Devices > Network Settings > Overview.
-
Select the network card and click Edit.
-
Specify the IP address.
Repeat the steps for all the interfaces.
-
-
Click Devices > Access Gateways > Select the device > New IP > click OK.
-
Add the secondary IP address if applicable to the interfaces from Network Settings > Adapter List.
-
Configure the DNS from Network Settings > DNS.
-
Add the Host entries (if any) from Network Settings > Hosts.
-
Set up the routing (if any) from Network Settings > Gateways.
-
Under Services, click on Reverse Proxy/Authentication. In the Reverse Proxy List, click the proxy service name. Select the newly added cluster member and select the listening IP address for that service.
(Optional) If you want to specify the outbound connection to the Web server, click Web Servers, then click TCP Connect Options. Select the Cluster Member and select the IP address from the drop down list against Make Outbound Connection Using if you want to select the outbound IP address to communicate with the Web server.
For more information about configuring the network settings, see
Configuring Network Settings
in the NetIQ Access Manager 4.0 SP1 Access Gateway Guide. -
Restore any customized files backed up earlier as part of Prerequisites for the Access Gateway Appliance Migration.
Copy the content of the following files to the corresponding file in the new location.
Table 2-5 Restoring Files during 4.0 Access Gateway Appliance Migration - Scenario 1
Old File Location
New File Location
/var/opt/novell/tomcat5/conf/web.xml
/opt/novell/nam/mag/conf/web.xml
/var/opt/novell/tomcat5/webapps/nesp/WEB-INF/web.xml
/opt/novell/nam/mag/webapps/nesp/WEB-INF/web.xml
/var/opt/novell/tomcat5/webapps/nesp/jsp
/opt/novell/nam/mag/webapps/nesp/jsp
/var/opt/novell/tomcat5/webapps/nesp/html
/opt/novell/nam/mag/webapps/nesp/html
/var/opt/novell/tomcat5/webapps/nesp/images
/opt/novell/nam/mag/webapps/nesp/images
/var/novell/errorpagesconfig/current/ (Contains error messages and error pages configuration)
/opt/novell/nam/mag/webapps/agm/WEB-INF/config/current
/var/opt/novell/tomcat5/webapps/nesp/config
/opt/novell/nam/mag/webapps/nesp/config
/chroot/lag/opt/novell/bin/preapply.sh
/opt/novell/devman/jcc/scripts/presysconfig.sh
/chroot/lag/opt/novell/bin/postapply.sh
/opt/novell/devman/jcc/scripts/postsysconfig.sh
NOTE:The names of preapply.sh and postapply.sh files are different in the 4.0 environment. To restore these files, open the file and copy paste the entire content to the files in the 4.0 environment. Refer Table 2-2 for details of file locations.
server.xml: If you have modified any elements or attributes in the 3.1 SP4 or 3.1 SP5 environment the corresponding changes will need to be applied to the 4.0 /opt/novell/nam/mag/conf/server.xml file.
Typical changes done to the server.xml in 3.1 SP4 or 3.1 SP5 include modifying the 'Address=' attribute to restrict the IP address the application will listen on, or 'maxThreads=' attribute to modify the number of threads.
In the following example, 3.1 SP4 or 3.1 SP5 has customized maxThreads value.
<Connector port="9009" enableLookups="false" redirectPort="8443"protocol="AJP/1.3" address="127.0.0.1" minSpareThreads="25" maxThreads="300" backlog="0" connectionTimeout="20000", ... ../>
Make a note of the customizations and copy paste the changed values in the 4.0 server.xml file.
-
If you have customized the error pages for branding purposes, you will need to redo the changes in the 4.0 setup. For details on modifying messages and customizing pages, see
Customizing the Error Pages
. The customized error messages can be restored by copying over the files as indicated in Table 2-2. -
In the Administration Console, copy and paste the content of the previously referenced touchfile_list output file, under the following:
-
Global Option files to Access Gateways > Edit > Advanced Options.
Example of Global Options in the touchfile_list file.
# Global Option example
NAGGlobalOptions InPlaceSilent=on
-
Virtual Host/Server Option files to Servers > Configuration > Reverse Proxy > Proxy Service > Advanced Options.
Example of Virtual Host/Server Options in the touchfile_list file.
# Virtual Host/Server Option
NAGGlobalOptions DebugHeaders=on
-
Files under the Administration Console are already available in the Access Gateway Appliance.
NOTE:Ensure that you do not have blank lines between each advanced option and also do not alter the content of touchfile_list.
For information about the migration utility files, lag2mag_touchfiles.csv and migrate_touchfiles.sh see, Utility Scripts
-
-
-
Test the Access Gateway Appliance functionality by accessing Access Gateway protected resources and making sure that the pages are rendered successfully.
-
Specify AG 1 as the primary server and click Update. For more information, see
Changing the Primary Cluster Server
. -
Remove the 3.1 SP4 or 3.1 SP5 Access Gateway Appliance (LAG 1) from the cluster. For more information, see
Viewing and Modifying Gateway Settings
. -
Install 4.0 Access Gateway Appliance (AG 2) as in Step 2 and add it to the 3.1 SP4 or 3.1 SP5 Access Gateway Appliance cluster as in Step 3.
-
After you confirm that all the services are up and running remove LAG2 from the cluster.
-
Remove the 3.1 SP4 or 3.1 SP5 Access Gateway Appliance (LAG 2) from the cluster as in Step 7.
-
Click OK and Update all.
-
Repeat Step 2 to Step 8 (except step 4j) until you have completely migrated all the existing 3.1 SP4 or 3.1 SP5 Access Gateway Appliance to 4.0 Access Gateway Appliance.
After installing the Access Gateway Appliance, delete all the 3.1 SP4 or 3.1 SP5 Access Gateway Appliances from the Administration Console.
-
On the newly added Access Gateway server, restart Tomcat by using the /etc/init.d/novell-mag restart or rcnovell-mag restart command.
Use case scenario 2:
This scenario assumes that you have a new/existing 64‐bit server to install the 4.0 Access Gateway Appliance and explains how to migrate from 3.1 SP4 or 3.1 SP5 by using the existing IP address.
Consider that the setup includes the following components:
-
Administration Console (AC 1)
-
Identity Server cluster (IDP 1 and IDP 2)
-
3.1 SP4 or 3.1 SP5 Access Gateway Appliance cluster (LAG 1 and LAG 2)
Migration Process
-
If you have a new 64-bit server to install 4.0 Access Gateway Appliance, ensure you do the following:
-
Shut down LAG2 and
-
Have the same number of Network Interface Cards as on LAG 2 and then proceed to step 2.
If you are reusing the existing LAG hardware, proceed to step 2.
-
-
Install the Access Gateway Appliance (AG 2) with the same IP address as of the 3.1 SP4 or 3.1 SP5 Access Gateway Appliance (LAG 2). After the installation is complete, it will take some time to sync up the configuration. Ensure that you do not modify any configuration during this time.
When the configuration is synced up, the Access Gateway Appliance and the health of all the cluster members turns green.
-
Test the Access Gateway Appliance functionality by accessing Access Gateway protected resources and making sure pages are rendered successfully.
-
If you have customized the error pages for branding purposes, you will need to redo the changes in the 4.0 setup. For details on modifying messages and customizing pages, see
Customizing the Error Pages
. The customized error messages can be restored by copying over the files as indicated in Table 2-3. -
In the Administration Console, copy and paste the content of the previously referenced touchfile_list output file under the following:
-
Global Option files to Access Gateways > Edit > Advanced Options.
Example of Global Options in the touchfile_list file.
# Global Option example
NAGGlobalOptions InPlaceSilent=on
-
Virtual Host/Server Option files to Servers > Configuration > Reverse Proxy > Proxy Service > Advanced Options.
Example of Virtual Host/Server Options in the touchfile_list file.
# Virtual Host/Server Option
NAGGlobalOptions DebugHeaders=on
-
Files under the Administration Console are already available in the Access Gateway Appliance.
NOTE:Ensure that you do not have blank lines between each advanced option and also do not alter the content of the touchfile_list file.
For information about the migration utility files, lag2mag_touchfiles.csv and migrate_touchfiles.sh see, Utility Scripts
-
-
Click OK and Update.
-
Restore any customized files backed up earlier as part of Prerequisites for the Access Gateway Appliance Migration.
Copy the content of the following files to the corresponding file in the new location.
Table 2-6 Restoring Files during 4.0 Access Gateway Appliance Migration -Scenario 2
Old File Location
New File Location
/var/opt/novell/tomcat5/conf/web.xml
/opt/novell/nam/mag/conf/web.xml
/var/opt/novell/tomcat5/webapps/nesp/WEB-INF/web.xml
/opt/novell/nam/mag/webapps/nesp/WEB-INF/web.xml
/var/opt/novell/tomcat5/webapps/nesp/jsp
/opt/novell/nam/mag/webapps/nesp/jsp
/var/opt/novell/tomcat5/webapps/nesp/html
/opt/novell/nam/mag/webapps/nesp/html
/var/opt/novell/tomcat5/webapps/nesp/images
/opt/novell/nam/mag/webapps/nesp/images
/var/novell/errorpagesconfig/current/ (Contains error messages and error pages configuration)
/opt/novell/nam/mag/webapps/agm/WEB-INF/config/current
/var/opt/novell/tomcat5/webapps/nesp/config
/opt/novell/nam/mag/webapps/nesp/config
/chroot/lag/opt/novell/bin/preapply.sh
/opt/novell/devman/jcc/scripts/presysconfig.sh
/chroot/lag/opt/novell/bin/postapply.sh
/opt/novell/devman/jcc/scripts/postsysconfig.sh
NOTE:The names of preapply.sh and postapply.sh files are different in the 4.0 environment. To restore these files, open the file and copy paste the entire content to the files in the 4.0 environment. Refer Table 2-2 for details of file locations.
server.xml: If you have modified any elements or attributes in the 3.1 SP4 or 3.1 SP5 environment the corresponding changes will need to be applied to the 4.0 /opt/novell/nam/mag/conf/server.xml file.
Typical changes done to the server.xml in 3.1 SP4 or 3.1 SP5 include modifying the 'Address=' attribute to restrict the IP address the application will listen on, or 'maxThreads=' attribute to modify the number of threads.
In the following example, 3.1 SP4 or 3.1 SP5 has customized maxThreads value.
<Connector port="9029" enableLookups="false" protocol="AJP/1.3" address="127.0.0.1" minSpareThreads="25" maxThreads="300" backlog="0" connectionTimeout="20000", ... ../>
Make a note of the customizations and copy paste the changed values in the 4.0 server.xml file.
-
Repeat Step 1 through Step 6 except step 5 until you have completely migrated all the existing 3.1 SP4 or 3.1 SP5 Access Gateway Appliance to 4.0 Access Gateway Appliance.
-
On the newly added Access Gateway server, restart Tomcat by using the /etc/init.d/novell-mag restart or rcnovell- mag restart command.
NOTE:The Advanced options from the Administration Console are available only for the Access Gateway Appliance. For the 3.1 SP4 or 3.1 SP5 Access Gateway Appliance, you should have touch files configured.