5.2 Installing SSL VPN
Installation time: about 10 minutes.
|
What you need to know to install SSL VPN |
|
5.2.1 Installing ESP-Enabled SSL VPN
When SSL VPN is deployed without an Access Gateway, an Embedded Service Provider (ESP) component is installed along with SSL VPN. This deployment is called an ESP-enabled SSL VPN. This deployment requires the Administration Console and the Identity Server to be installed before you install SSL VPN.
Deployment Scenarios
ESP-enabled SSL VPN supports the following installation scenarios:
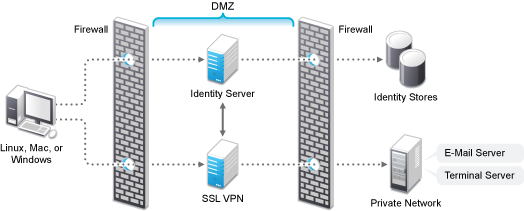
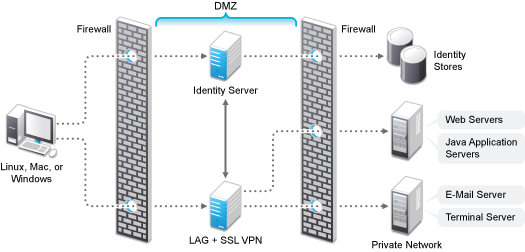
Deployment Scenario 1: Installing SSL VPN on a Separate Machine
This deployment scenario consists of a demilitarized zone where the Identity Server and SSL VPN are deployed separately, without the Access Gateway. For installation instructions for this scenario, see Installing ESP-Enabled SSL VPN. In this scenario, SSL VPN is accessible on port 8443. When it is accessed on port 8080, it will be redirected to port 8443.
Figure 5-1 Deployment Scenario 1
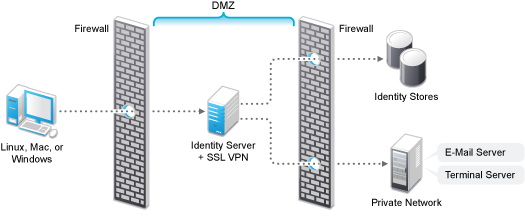
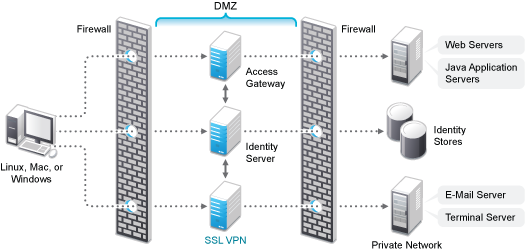
Deployment Scenario 2: Installing SSL VPN and the Identity Server on the Same Machine
This deployment scenario consists of a demilitarized zone where the Identity Server and SSL VPN are on a single machine. The Access Gateway is deployed separately. For installation instructions for this scenario, see Installing ESP-Enabled SSL VPN. In this scenario, SSL VPN will be accessible on secure port 3443. When this port is accessed on a non-secure port 3080, it will be redirected to port 3443.
Figure 5-2 Deployment Scenario 2
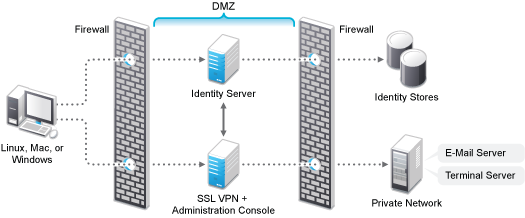
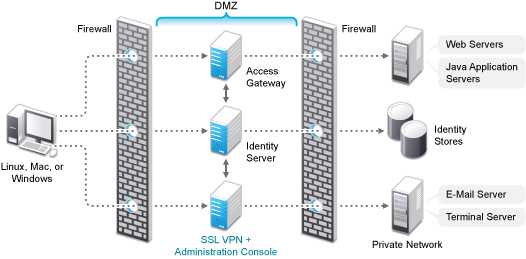
Deployment Scenario 3: Installing SSL VPN and the Administration Console on the Same Machine
This deployment scenario consists of a demilitarized zone where SSL VPN, and Administration Console are on the same machine and Access Gateway and the Identity servers are deployed separately. For installation instructions for this scenario, see Installing ESP-Enabled SSL VPN. In this scenario, SSL VPN will be accessible on secure port 8443. When this port is accessed on a non-secure port 8080, it will be redirected to port 8443.
Figure 5-3 Deployment Scenario 3
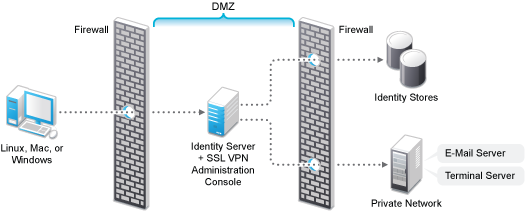
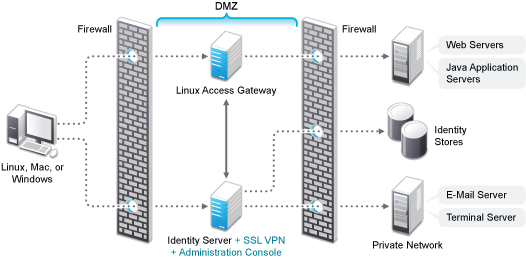
Deployment Scenario 4: Installing SSL VPN, the Administration Console, and the Identity Server on the Same Machine
This deployment scenario consists of a demilitarized zone where the Identity Server, SSL VPN, and Administration Console are on the same machine and Access Gateway is deployed separately. For installation instructions for this scenario, see Installing ESP-Enabled SSL VPN. In this scenario SSL VPN will be accessible on secure port 3443. When this port is accessed on a non-secure port 3080, it will be redirected to port 3443.
Figure 5-4 Deployment Scenario 4
Installing ESP-Enabled SSL VPN
The following installation steps are applicable to all deployment scenarios of ESP-enabled SSL VPN. The individual scenarios are explained in Deployment Scenarios.
-
Access the install script.
-
Ensure that you have downloaded the software or that you have the CD available.
For software download instructions, see the
Access Manager 4.0 Hotfix 1 Readme
. -
Do one of the following:
-
If you are installing from CD or DVD, insert the disc into the drive, then navigate to the device. The location might be /media/cdrom, /media/cdrecorder, or /media/dvdrecorder, depending on your hardware.
-
If you downloaded the tar.gz file, unzip the file by using the following command:
tar -xzvf <filename>
-
-
Change to the novell-access-manager directory.
-
-
Run the following command:
./install.sh
-
Specify 4 to install ESP-Enabled SSL VPN, then press Enter.
-
Review and accept the License Agreement.
The following warning is displayed:
An entry of 127.0.0.2 in the /etc/hosts file affects the Access Manager functionality. Do you want to proceed with removing it (y/n)
-
Specify Y to proceed.
-
(Conditional) If the SSL VPN machine has been configured with multiple IP addresses, select an IP address for SSL VPN.
-
Specify the IP address, user ID, and password of the primary Administration Console.
-
Select the IP address used for the NetIQ Access Manager Server Communications Local Listener. You can select an address, specify a new address, or press Enter to accept the default.
-
Select the IP address used for the SSL VPN listening IP address. You can select an address, specify a new address, or press Enter to accept the default.
-
If you are installing SSL VPN on the same machine as the Administration Console, you are not prompted for the IP address of the Administration Console. If the Administration Console is on a different machine, provide the IP address when you are prompted for it.
Wait while SSL VPN is installed on your system and imported into the Administration Console. This takes few minutes.
The installation ends with the following message: Installation complete.
-
To verify the installation of SSL VPN, continue with Section 7.3, Verifying the SSL VPN Installation.
-
Add an entry in /etc/hosts file to map the SSL VPN IP address with the domain name that the client will use to connect.
-
If the export law permits and you want to install high bandwidth version of SSL VPN, proceed with Section 5.2.3, Installing the Key for High-Bandwidth SSL VPN.
5.2.2 Installing Traditional SSL VPN
Traditional SSL VPN does not have an ESP and must be configured as a protected resource of an Access Gateway. You can install traditional SSL VPN with Access Gateway Appliance, Identity Server, Administration Console, or on a separate machine.
Deployment Scenarios
Traditional SSL VPN supports the following installation scenarios:
-
Deployment Scenario 1: Access Gateway and SSL VPN on the Same Server
-
Deployment Scenario 2: SSL VPN Server Installed on a Separate Machine
-
Deployment Scenario 3: Identity Server and SSL VPN on the Same Server
-
Deployment Scenario 4: Administration Console and SSL VPN on the Same Server
-
Deployment Scenario 5: Administration Console, Identity Server, and SSL VPN on the Same Server
Deployment Scenario 1: Access Gateway and SSL VPN on the Same Server
This deployment scenario consists of a demilitarized zone where the Access Gateway and SSL VPN are on the same server and the Identity Server is deployed separately. For installation instructions for this scenario, see Installing SSL VPN with Access Gateway Appliance. In this scenario, SSL VPN is accessible on port 8443. When it is accessed on port 8080, it will be redirected to port 8443.
Figure 5-5 Deployment Scenario 1
Deployment Scenario 2: SSL VPN Server Installed on a Separate Machine
This deployment scenario consists of a demilitarized zone where the Access Gateway, Identity Server, and SSL VPN are deployed separately. For installation instructions, see Installing Traditional SSL VPN. In this scenario, SSL VPN is accessible on secure port 8443. When this port is accessed on a non-secure port 8080, it will be redirected to port 8443.
Figure 5-6 Deployment Scenario 2
Deployment Scenario 3: Identity Server and SSL VPN on the Same Server
This deployment scenario consists of a demilitarized zone where the Identity Server and SSL VPN are on one machine and the Access Gateway is deployed separately. For installation instructions, see Installing SSL VPN on a Separate Server, with Identity Server, or with Administration Console. In this scenario, SSL VPN will be accessible on secure port 3443. When this port is accessed on a non-secure port 3080, it will be redirected to port 3443.

Deployment Scenario 4: Administration Console and SSL VPN on the Same Server
This deployment scenario consists of a demilitarized zone where the Administration Console and SSL VPN are on one machine and the Access Gateway and Identity Server are deployed separately on different machines. For installation instructions, see Installing SSL VPN on a Separate Server, with Identity Server, or with Administration Console. In this scenario SSL VPN will be accessible on secure port 8443. When this port is accessed on a non-secure port 8080, it will be redirected to port 8443.
Figure 5-7 Deployment Scenario 4
Deployment Scenario 5: Administration Console, Identity Server, and SSL VPN on the Same Server
This deployment scenario consists of a demilitarized zone where the Identity Server, Administration Console, and SSL VPN are on one machine and the Access Gateway is deployed separately. For installation instructions, see Installing SSL VPN on a Separate Server, with Identity Server, or with Administration Console.
In this scenario SSL VPN is accessible on secure port 3443. When this port is accessed on a non‐secure port 3080, it will be redirected to port 3443.
Figure 5-8 Deployment Scenario 5
Installing Traditional SSL VPN
This section describes the installation procedures for different SSL VPN deployments:
Installing SSL VPN with Access Gateway Appliance
When SSL VPN is installed along with Access Gateway Appliance, the Access Gateway installation process installs SSL VPN along with the Access Gateway.
-
Start the Access Gateway installation.
For more information about installing the Access Gateway, see Section 4.1.2, Installing the Access Gateway Appliance.
-
In the Access Administrator Configuration section, select the Install and Enable SSL VPN Server check box to install and configure SSL VPN with the Access Gateway.
-
Follow the on-screen instructions to continue with the Access Gateway installation.
-
If the export law permits and you want to install the high bandwidth version of SSL VPN, proceed with Section 5.2.3, Installing the Key for High-Bandwidth SSL VPN.
Installing SSL VPN on a Separate Server, with Identity Server, or with Administration Console
You can use an install script to install traditional SSL VPN on a separate machine, with the Identity Server, with the Administration Console, or with the Identity Server and the Administration Console.
-
Access the install script.
-
Ensure that you have downloaded the software or that you have the CD available.
For software download instructions, see the
Access Manager 4.0 Hotfix 1 Readme
. -
Do one of the following:
-
If you are installing from CD or DVD, insert the disc into the drive, then navigate to the device. The location might be /media/cdrom, /media/cdrecorder, or /media/dvdrecorder, depending on your hardware.
-
If you downloaded the tar.gz file, unpack the file by using the following command:
tar -xzvf <filename>
-
-
Change to the novell-access-manager directory.
-
-
At a command prompt, specify the following install script command:
./install.sh
You are prompted to select an installation.
-
Specify 3 to install traditional SSL VPN, then press Enter.
-
Review and accept the License Agreement.
-
(Optional) If SSL VPN is not installed on same machine as the Administration Console, specify the IP address of the Administration Console.
-
(Optional) This warning is displayed if an entry of 127.0.0.2 is found in the /etc/hosts file.
Warning: An entry of 127.0.0.2 in the /etc/hosts file affects the Access Manager functionality. Do you want to proceed with removing it (y/n) [y]?
Specify Y to proceed.
-
Specify the user ID and password of the Administration Console administrator.
-
Specify the SSL VPN Listening IP address. You can select an address, specify a new address, or press Enter to accept the default.
The following warning is displayed:
WARNING! SSL VPN will be accessible on ports 3080 (HTTP) and 3443 (HTTPs) when it is installed on the same machine as that of Identity Server.
-
If the SSL VPN machine has been configured with multiple IP addresses, select an IP address for SSL VPN when you are prompted to do so.
Wait while SSL VPN is installed on your system and imported into the Administration Console, which takes about 2 minutes.
The installation ends with the following message: Installation complete.
-
To verify the installation of SSL VPN, continue with Section 7.3, Verifying the SSL VPN Installation.
-
If the export law permits and you want to install the high bandwidth version of SSL VPN, proceed with Section 5.2.3, Installing the Key for High-Bandwidth SSL VPN