7.8 Importing the Configuration Data by Using Code Promotion
Import the configuration data only on the primary Administration Console.
Perform the following procedure to import configuration data:
-
Ensure that the ZIP file containing the configuration data that you want to import is accessible.
-
Log in to the Administration Console from where you want to import the configuration data.
-
In the Administration Console, click Access Manager > Code Promotion.
-
In the Code Promotion page, click Import Configuration.
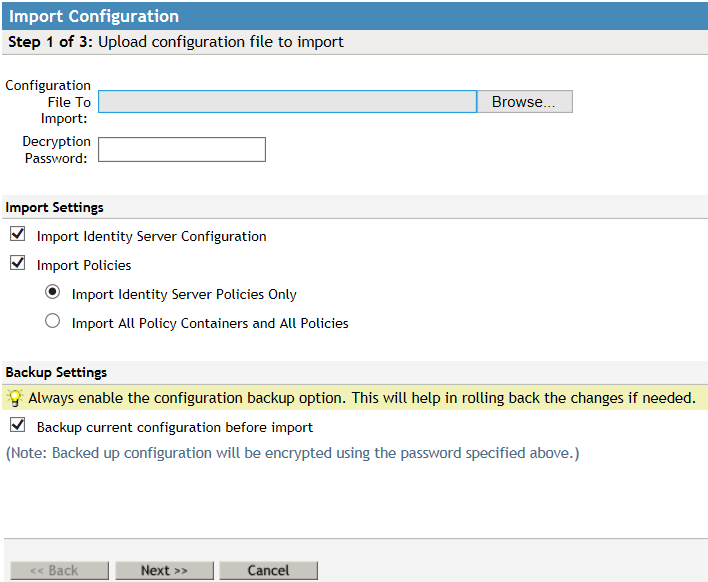
7.8.1 Upload Configuration File to Import
Perform the following steps to upload the configuration file to import.
-
Click Browse to import the configuration file.
-
In Decryption Password, specify the password that you used to encrypt the configuration data file. You need this password to extract the contents of the configuration file.
-
(Optional) Select Backup current configuration before import. This backup helps to roll back your changes if needed. The backup file is encrypted with the same password that is used for decryption in Step 2. You can download this backup file from the Code Promotion page.
-
Under Import Settings, select the desired options based on your requirements.
NOTE: Importing Identity Server Configuration overwrites the existing Shared Settings on the system with new Shared Settings. However, these will not be deleted.
The following table lists examples with Attribute Sets illustrating the import action:
Imported Attribute Sets
Existing Attribute Sets
Import Action
OIOSAML with five mappings
OIOSAML with two mappings
OIOSAML set is replaced with the imported one. Hence, it has five mappings.
AttrSet1
Not available
AttrSet1 is added.
No import
AttrSet2 is defined only in the target system
AttrSet2 remains unchanged.
-
Click Next. Go to Section 7.8.2, Configuring Identity Server Clusters to Import.
7.8.2 Configuring Identity Server Clusters to Import
If you selected Import Identity Provider Clusters in Step 4, the Import Identity Provider Clusters page allows you to specify the import action for each cluster found in the imported configuration.
Perform the following steps to configure the IDP clusters to import.
-
Select a cluster to configure import settings in Clusters To Import.
-
Select an action for the selected cluster from Import Action. The following options may be available:
Import As New Cluster: Select this option if you want to import the cluster as a new cluster. Specify New Cluster Name and New Cluster URL. Ensure that the new cluster name is different from the existing cluster names defined on that system.
Overwrite Existing Cluster: Select this option if you want to overwrite the existing cluster with the selected cluster. Specify which Cluster To Overwrite.
NOTE:You need to configure import action for each cluster separately. If the cluster you want to import has only one user store, it will be mapped to the default user store of the existing cluster. If the cluster you are importing has multiple user stores, then you must specify how to map them to the user stores of the existing cluster.
-
Click Next. Go to Section 7.8.3, Post-Import Configuration Tasks.
7.8.3 Post-Import Configuration Tasks
When import is done, the final page displays the status of the import operation. After importing the Identity Server configuration data, you must perform configurations that are specific to the target system and that are not part of the exported data.
-
After the import process is complete, the system displays a list of certificates that you need to create manually. Identity Server key stores are imported, but you must create the certificates referenced in them on the server where you have imported the configuration data. The new certificate name must exactly match with the names listed. For more information about how to create certificates, see
Creating Certificates
in the NetIQ Access Manager 4.0 SP1 Administration Console Guide. -
Configure user stores for the newly added clusters. After the import process is complete, the system displays a list of Identity Server clusters for which you need to configure user stores. A place holder user store entry will be created. You must enter the IP address, search context, and the password for the target system user stores. For more information, see
Configuring Identity User Stores
in the NetIQ Access Manager 4.0 SP1 Identity Server Guide. -
Distribute the policy extension JARs to devices in the Administration Console under Policy > Extensions. For more information, see
Distributing a Policy Extension
in the NetIQ Access Manager 4.0 SP1 Policy Guide. -
Update service providers with the new metadata. (Conditional) The identity provider certificate is different in the exported and imported systems. Hence, you must re-import the identity provider metadata to all service providers in that cluster for federation to work. For more information, see
Viewing and Reimporting a Trusted Provider’s Metadata
in the NetIQ Access Manager 4.0 SP1 Identity Server Guide. -
Copy customization files from the exported setup into the devices in this setup. This includes the Identity Server custom Authorization classes, custom JSP files, and so forth.
-
Persistent federation identities and shared secrets are not imported. These are to be shared between the Identity Servers in your exported setup and service providers only. They do not apply to the Identity Servers in the imported system. You must configure these on the server after you import the configuration data.
-
Update Identity Server devices in the modified clusters. Go to Auditing > Troubleshooting > Certificates and click Re-push certificates and then update all devices in the cluster.