6.3 Configuring Custom Cache Control Headers
(Access Gateway Appliance) In addition to fine-tuning cache freshness by using the HTTP timers, as explained in Section 6.1, Configuring Caching Options, you can configure each proxy service to recognize custom headers in HTTP packets. Your Web server can then use these headers for transmitting caching instructions that only the Access Gateway can recognize and follow.
6.3.1 Understanding How Custom Cache Control Headers Work
Only the proxy service containing the custom header definition follows the cache policies specified in the custom headers.
All other proxy services, requesting browsers, and external proxy caches such as transparent caches and client accelerators do not recognize the custom headers. They follow only the cache policies specified by the standard cache control headers.
This means that you have the following options for configuring your Web server:
-
You can specify that browsers and external caches cannot cache the objects, but the proxy service can.
This lets you off-load request processing from the origin Web server while still requiring that users return to the site each time they request an object.
-
You can also specify separate cache times for browsers, external caches, and the proxy service.
To implement custom cache control headers, you must do the following:
-
Configure a proxy service to use custom cache control headers by enabling the feature and specifying a header string such as MYCACHE (see Section 6.3.2, Enabling Custom Cache Control Headers).
-
Configure the Web servers of the proxy service to send an HTTP header containing the defined string and the time in seconds that the object should be retained in cache (for example, MYCACHE: 60).
If the number is non-zero, the Access Gateway treats the reply as if it has the following headers:
Cache-Control: public
Cache-Control: max-age=number
If the number is zero (0), the Access Gateway treats the reply as if it has the following header:
Cache-Control: no-cache
-
Ensure that the Web server continues to send standard HTTP cache-control headers so that browsers and external caches follow the caching policies you intend them to.
For example, you can configure the following:
-
Use an Expires or Cache-Control: Max-Age header to specify that browsers should cache an object for two minutes.
-
Use a Cache-Control: Private header to prevent external caches from caching the object at all.
-
Use a custom cache control header, such as MYCACHE: 1800, to indicate that the proxy service should cache the object for 30 minutes.
Custom Cache Control Headers override the following standard HTTP cache-control headers on the Access Gateway, but they do not affect how browsers and external caches respond to them:
Cache-Control: no-store
Cache-Control: no-cache
Cache-Control: max-age=number
Cache-Control: private
Cache-Control: public
Pragma: no-cache
Expires: date
6.3.2 Enabling Custom Cache Control Headers
-
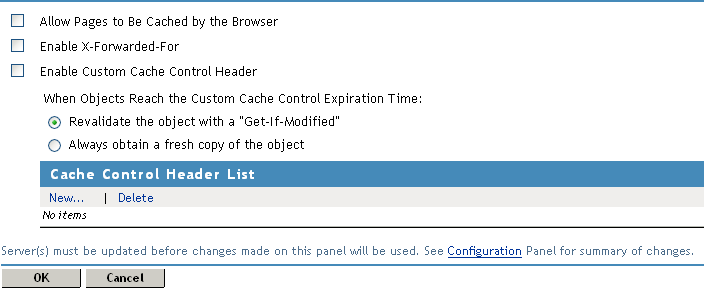
In the Administration Console, click Devices > Access Gateways > Edit > [Name of Reverse Proxy] > [Name of Proxy Service] > HTTP Options.

-
To enable the use of custom headers, select Enable Custom Cache Control Header.
With this option selected, the proxy service searches HTTP packets for custom cache control headers, and caches the objects according to its policies. The policy contains a timer, which specifies how long the object can be cached before checking with the Web server for updates.
-
Select one of the following options to specify what occurs when the custom cache control expiration time expires.
-
Revalidate the object with a “Get-If-Modified”: Causes the proxy service to update the object in cache only if the object has been modified.
-
Always obtain a fresh copy of the object: Causes the proxy service to update the object in cache, even if the object has not been modified.
-
-
In the Cache Control Header List, select New and specify a name for the header, for example MYCACHE.
-
To save your changes to browser cache, click OK.
-
To apply the changes, click the Access Gateways link, then click Update > OK.
-
Modify the pages on the Web server that you want to the set custom caching intervals for the Access Gateway. To the HTTP header, add a string similar to the following:
MYCACHE:600
The numeric value indicates the number of seconds the Access Gateway can retain the object in cache. A value of zero prevents the Access Gateway from caching the object. This cache interval can be different than the value set for browsers (see Section 6.3.1, Understanding How Custom Cache Control Headers Work).
-
Ensure that the Web server continues to send the following standard HTTP cache-control headers:
-
Cache-Control: Max-Age headers that cause browsers to cache object for no longer than two minutes.
-
Cache-Control: Private headers that cause external caches to not cache the objects.
-
When your Web server sends an object with the MYCACHE header in response to a request made through the Access Gateway, the proxy service recognizes the custom header and caches the object for 10 minutes. Requesting browsers cache the object for only two minutes, and external caches do not cache the object.
Thus, the Access Gateway off-loads a processing burden from the Web server by caching the frequently requested objects for 10 minutes (the value you specified in Step 7). Browsers, on the other hand, must always access the Access Gateway to get the objects if their previous requests are older than two minutes. And the objects in the cache of the Access Gateway are kept fresh because of their relatively brief time-to-live value.