17.3 Configuring a Specific IP Address for Proxied Requests
The default behavior for the Identity Server is to use the same IP address for incoming client requests, for proxied requests, and for management tasks. You can improve performance by separating this traffic into separate pools via IP addresses. You can also use the IP addresses to route the traffic so that it remains behind the firewall.
In version 3.1 SP2 IR1 and later, you can specify the IP address that an Identity Server uses for proxied requests to other members of the cluster. A proxied request is sent to another member of a cluster when the request is not sent to the authoritative server.
An authoritative server is the cluster member that holds the authentication information for a given user session. For a request associated with a given session to be processed, it must be routed or proxied to the authoritative cluster member. If an L4 switch sends a request to a non-authoritative cluster member, that cluster member proxies that request to the authoritative cluster member.
You can also specify the IP address for the communication that takes place between the Identity Server and the Administration Console for management tasks. This includes configuration updates, health checks, and statistics. To configure this IP address, log in to the Administration Console, then click Devices > Identity Servers > [Name of Identity Server].
Figure 17-1 illustrates a configuration with a two-member cluster. The L4 switch sends client traffic to the Identity Servers by using the IP addresses that start with 192. The IP addresses that start with 10 are used to route proxied requests to the cluster members. The IP addresses starting with 151 are used for the management traffic with the Administration Console.
Figure 17-1 Two-Member Identity Server Cluster
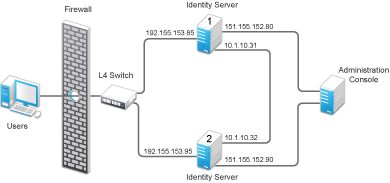
To specify the IP address for the proxied requests on the SOAP channel:
-
Gather the required information. For each Identity Server in the cluster, you need to know the following information:
-
Management IP address. (To get this value or modify the value, click Devices > Identity Servers > [Name of Identity Server].)
-
IP address or IP address with port that is available to use for proxied requests.
-
-
Log in to the Identity Server as the root user.
-
Change to the WEB-INF directory:
Linux: /opt/novell/nam/idp/webapps/nidp/WEB-INF/
Windows Server 2008: \Program Files (x86)\Novell\Tomcat\webapps\nps\WEB-INF/
-
Open the web.xml file for editing.
-
Add a proxyAddessMap parameter entry to the file.
<context-param>
    <param-name>proxyAddressMap</param-name>
    <param-value>Managament_IP, unused, Proxied_Request_IP
        </param-value>
</context-param>
The <param-value> element specifies the IP addresses that are used by the other members of the cluster. It is a comma separated list of IP addresses. You need a value entry for each member of the cluster, except the cluster member you are configuring. A member does not send proxied requests to itself, so you do not need to add it. Each value entry must contain three IP addresses:
-
Replace Management_IP with the management IP address of the Identity Server. You cannot specify a port with this entry.
-
Replace unused with just a space. If you have configured this feature for the Access Gateway, this IP address entry is used for the reverse proxy IP address. The Identity Server does not have a reverse proxy.
-
Replace Proxied_Request_IP with the address to use for the proxied requests (also called the SOAP back channel). You can specify a port with this entry, such as 151.155.152.90:445.
For Identity Server 1 in Figure 17-1, the entry should look similar to the following lines:
 <context-param>
    <param-name>proxyAddressMap</param-name>
    <param-value>151.155.152.90, ,10.1.10.32</param-value>
 </context-param>
If your cluster has three or more members, you need to add addresses for the other members. The following example shows an entry for Identity Server 1 in Figure 17-1 if the cluster contained a third member.
<context-param> <param-name>proxyAddressMap</param-name> <param-value>151.155.152.90, ,10.1.10.32, 151.155.152.100, ,10.1.10.33</param-value> </context-param> -
-
Save the file.
-
Restart Tomcat:
Linux: /etc/init.d/novell-idp restart
Windows: Enter the following commands:
net stop Tomcat7
net start Tomcat7
-
Repeat Step 2 through Step 7 for each cluster member, modifying the <param-value> element to contain the addresses for the other members of the cluster.