8.7 Solving Apache Restart Issues

When you make configuration changes and update the Access Gateway, the Administration Console uses the JCC channel to send the configuration changes to the Access Gateway. Figure 8-2 illustrates this flow.

Figure 8-2 Sending Configuration Updates to the Access Gateway

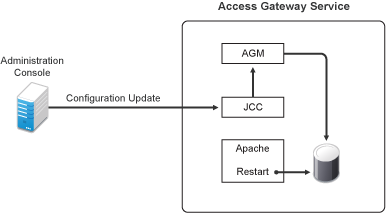
JCC sends the configuration changes to the Access Gateway Manager (AGM), which writes the Apache configuration to disk. Apache is sent a restart command, which causes Apache to read the new configuration, then Apache validates the configuration.

  • If the configuration is valid, Apache starts.

  • If the configuration is invalid, Apache fails to start.

If Apache fails to start after a configuration change, roll back to the previous configuration. Restore a backup if you have one, or use the Administration Console to manually remove the modifications that have caused the problem. If this does not solve the problem, try the following:

8.7.1 Removing Any Advanced Configuration Settings

Apache fails to start when it discovers a syntax error in any of the advanced options.

  1. Click Devices > Edit > Advanced Options.

  2. To reset all options to their default values, delete all options from the text box.

  3. Click OK.

    When you return to the Advanced Options page, all options are set to their default values.

  4. Click [Name of Reverse Proxy] > [Name of Proxy Service] > Advanced Options.

  5. To reset all options to their default value, delete all options from the text box.

  6. Click OK.

    When you return to the Advanced Options page, all options are set to their default values.

  7. Repeat these steps for each proxy service that has advanced options configured.

  8. Update the Access Gateway.

8.7.2 Viewing the Logged Apache Errors

Apache generates and logs errors when it fails to start. A summary is displayed on the health page.

  1. In the Administration Console, click Devices > Access Gateways > Health.

    The page displays a summary of the problem from the Apache error log file. For the Access Gateway Service, information from the rcnovell-apache2.out file might also be displayed.

  2. To view the entire contents of the Apache error log file, open a terminal window to the Access Gateway.

  3. Change to the following directory and open the Apache error log file.

    Linux: /var/log/novell-apache2

    Windows: \Program Files\Novell\Apache\logs

  4. On Linux, view the contents of the rcnovell-apache2.out file too.

  5. If you still do not have enough information to solve the configuration problem, continue with Section 8.7.3, Viewing the Errors as Apache Generates Them.

8.7.3 Viewing the Errors as Apache Generates Them

Apache allows only a few errors to be sent to log files. To view all the errors, use the following procedure to display the errors in a terminal window.

  1. Copy the config.xml file in the current directory to a temporary location. The Access Gateway allows only one XML file to reside in the current directory.

    Linux: /opt/novell/nam/mag/webapps/agm/WEB-INF/config/current

    Windows: \Program Files\Novell\Tomcat\webapps\agm\WEB-INF\config

  2. Copy the XML file from the pending directory to the current directory and rename it config.xml.

    The file in the pending directory has a long numeric name.

  3. (Linux) Change the ownership of the file from root to novlwww:novlwww.

  4. Use one of the following commands to restart Tomcat:

    Linux: /etc/init.d/novell-mag restart OR rcnovell-mag restart

    Windows: Use the following commands:

    net stop "Tomcat7"

    net start "Tomcat7"

  5. (Linux) Restart Apache by using the following command:

    /etc/init.d/novell-apache2 restart OR rcnovell-apache2 restart

    Apache uses the terminal window to write the errors it discovers as it tries to process the config.xml file.

  6. (Windows) Run Apache in debug mode:

    1. Use the following command to stop Apache:

      net stop apache2.2

    2. Change to the \Program Files\novell\apache\bin directory.

    3. Enter the following command:

      httpd -e Debug

      Apache writes to the terminal window the errors it discovers as it tries to processes the config.xml file.

  7. At the Administration Console, fix the configuration problems, then update the Access Gateway.

8.7.4 The ActiveMQ Module Fails to Start

The Active MQ module is used for real-time communication between the Administration Console and the Access Gateway Service. Real-time communication is needed for commands such as purging cache, gathering statistics, and updating health. Figure 8-3 illustrates this communication flow.

Figure 8-3 Real-Time Communication

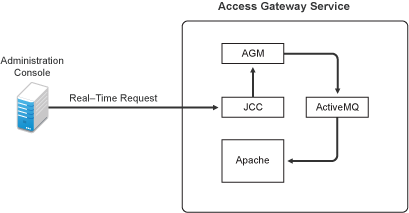
When the ActiveMQ module fails to start, you cannot apply any configuration changes, and the Access Gateway does not set a listener for the configured port.

To start the module, it must be able to resolve the listening IP address to a DNS name. To install an Access Gateway Service, the machine must have a DNS name and the IP address must resolve to this name.