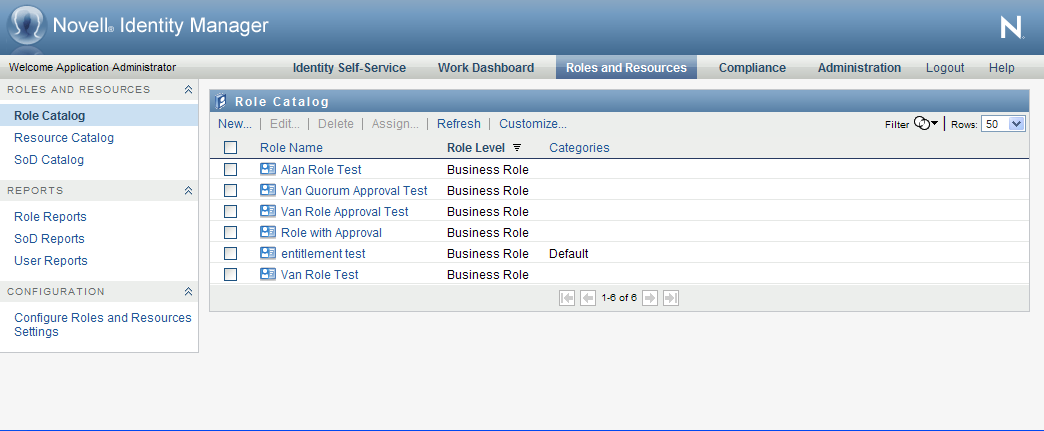
15.1 Browsing the Role Catalog
The action on the tab of the Identity Manager user interface allows you to view roles that have been previously defined in the catalog. It also lets you create new roles and modify, delete, and assign existing roles.
15.1.1 Viewing Roles
-
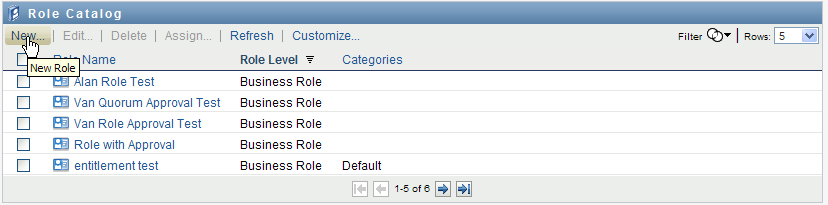
Click in the list of actions.
The User Application displays a list of roles currently defined in the catalog.
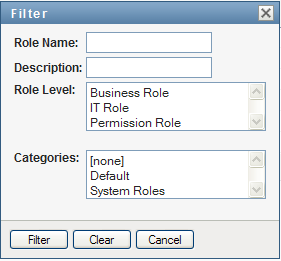
Filtering the Role List
-
Click the button in the upper right corner of the display.

-
Specify a filter string for the role name or description, or select one or more role levels or categories in the dialog.
-
Click to apply your selection criteria.
-
To remove the current filter, click .
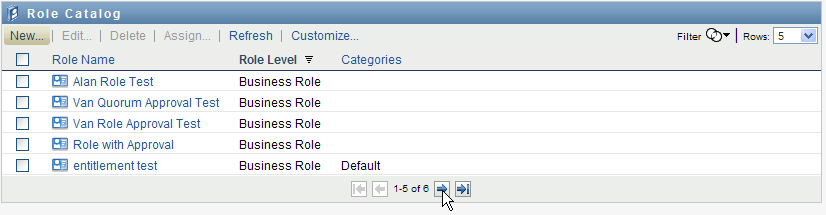
Setting the Maximum Number of Roles on a Page
-
Click on the dropdown list and select the number of rows you want to be displayed on each page:

Scrolling within the Role List
-
To scroll to another page in the role list, click on the Next, Previous, First or Last button at the bottom of the list:
Sorting the Role List
To sort the role list:
-
Click the header for the column you want to sort on.
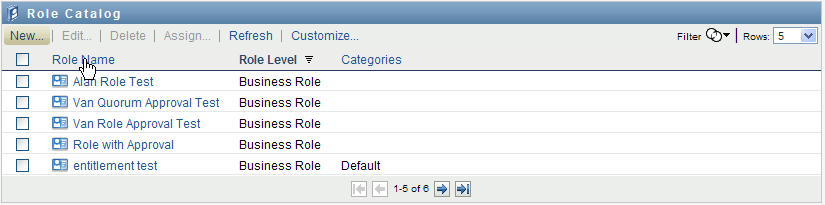
The pyramid-shaped sort indicator shows you which column is the new sort column. When the sort is ascending, the sort indicator is shown in its normal, upright position.
When the sort is descending, the sort indicator is upside down.
The initial sort column is determined by the administrator.
If you override the initial sort column, your sort column is added to the list of required columns. Required columns are indicated with an asterisk (*).
When you modify the sort order for the task list, your preference is saved in the Identity Vault along with your other user preferences.
15.1.2 Creating New Roles
-
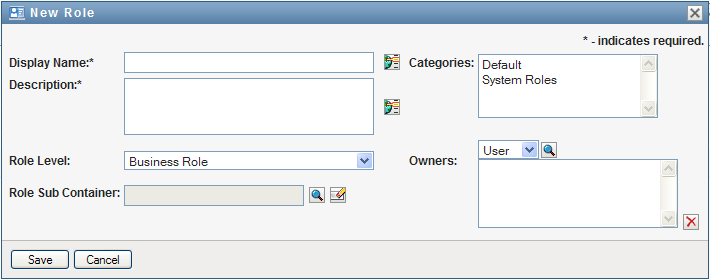
Click the button at the top of the display:
The User Application displays the New Role dialog:
-
Provide details for the role definition, as described below:
Table 15-1 Role Details
Field
Description
The text used when the role name displays in the User Application. You cannot include the following characters in the when you create a role:
< > , ; \ " + # = / | & *
You can translate this name in any of the User Application’s supported languages. For more information, see Table 1-1, Common Buttons.
The text used when the role description displays in the User Application. Like the Display Name, you can translate it to any of the User Application’s supported languages. For more information, see Table 1-1, Common Buttons.
(Read-only when modifying a role.) Choose a role level from the drop-down list.
Role levels are defined using the Designer for Identity Manager Role Configuration editor.
(Read-only when modifying a role.) The location for the role objects in the driver. Role containers reside under role levels. The User Application shows only the role containers that reside under the role level that you choose. You can create a role either directly in a role level, or in a container within the role level. Specifying the role container is optional.
Allow you to categorize roles for role organization. Categories are used for filtering lists of roles. Categories are multi-select.
Users who are designated as the owners of the role definition. When you generate reports against the Role Catalog, you can filter the report based on the role owner. The role owner does not automatically have the authorization to administer changes to a role definition.
-
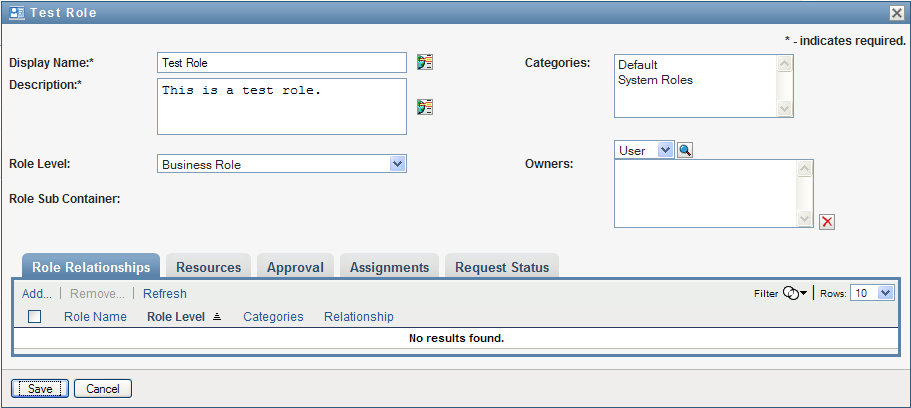
Click to save the role definition.
The User Application displays several additional tabs at the bottom of the window to allow to complete the role definition.

Defining the Role Relationships
The tab allows you to define how roles are related in a higher and lower role containment hierarchy. This hierarchy enables you to group permissions or resources contained by lower-level roles into a higher-level role that makes assignment of permissions easier. The allowed relationships are:
-
Top-level roles (business roles) can contain lower-level roles. They cannot be contained by other roles. If you select a top-level role, the Role Relationships page allows you to add a lower-level (child) role relationship only.
-
Mid-level roles (IT roles) can contain lower-level roles, and they can be contained by higher-level roles. The Role Relationship page allows you to add either lower-level (child) role or higher-level (parent) role.
-
Bottom-level roles (permission roles) can be contained by higher-level roles, but they cannot contain other bottom-level roles. The Role Relationship page allows you to add only a higher- level role.
To define a role relationship:
-
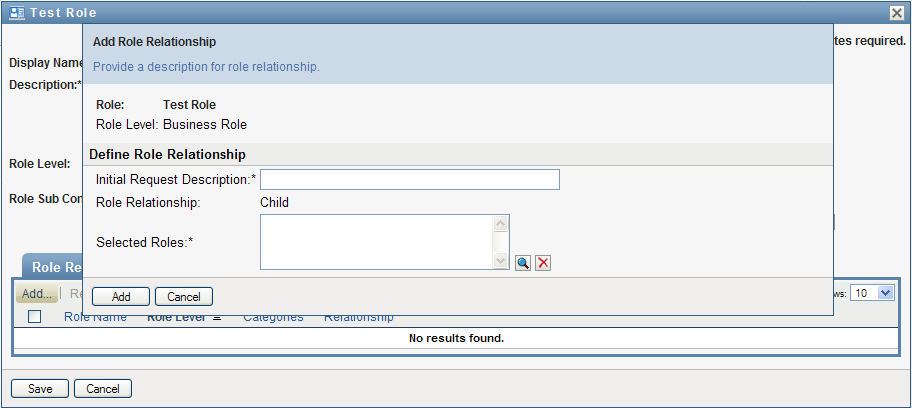
Click the tab.
-
Click .
The dialog is displayed.
-
Provide text describing the relationship in the field.
-
Specify the type of relationship you want to define by selecting the type in the dropdown.
If the new role is an IT role, the dropdown lets you define a or relationship. If the new role is a business role, the dropdown displays read-only text indicating that this is a relationship, since only lower-level roles can be related to a business role. If the new role is a permission role, the dropdown displays read-only text indicating that this is a relationship, since only higher-level roles can be related to a permission role.
The list of roles available for selection is filtered according to the type you selected.
-
Use the Object Selector to the right of the field to select the role(s) you want to associate with the new role.
-
Click .
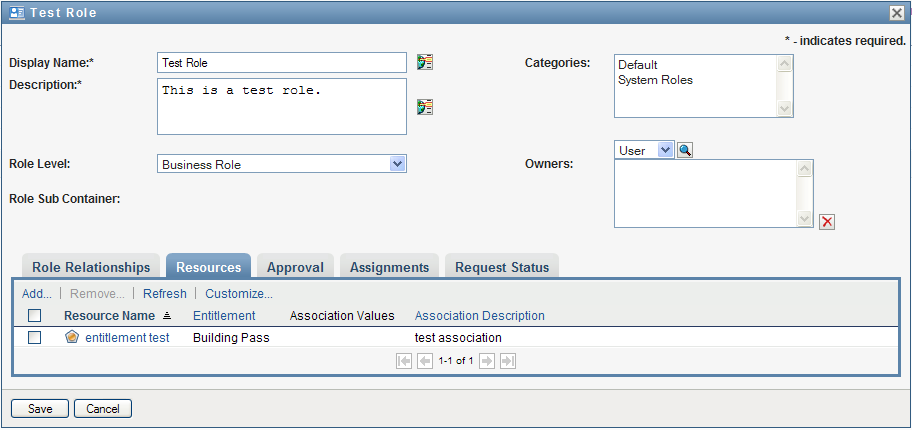
Associating Resources with the Role
To associate a resource with a role:
-
Click the tab.
-
Click .
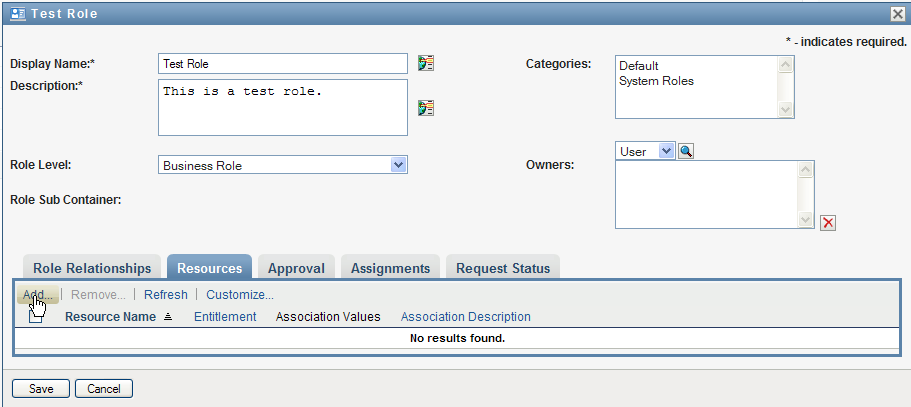
The User Application displays the dialog.
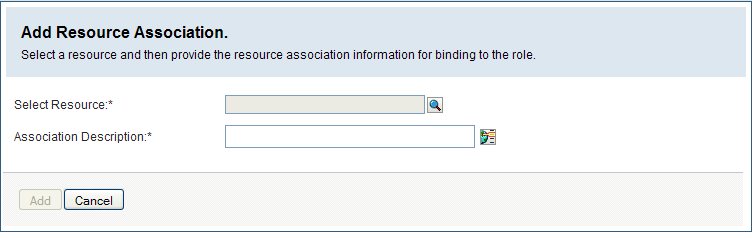
-
Use the Object Selector to select the resource you want and provide text that explains the reason for the association.
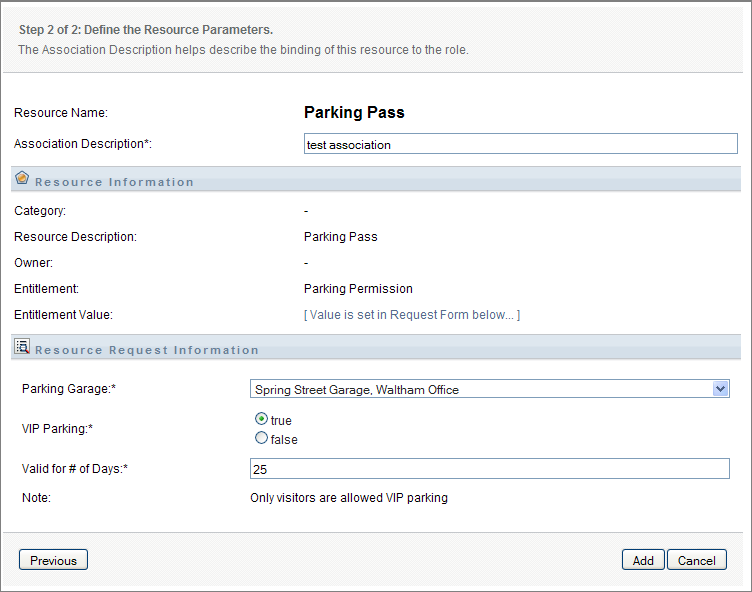
The wizard displays a page that provides information about the selected resource, such as the name of the resource categories, owner, entitlement, and entitlement values.
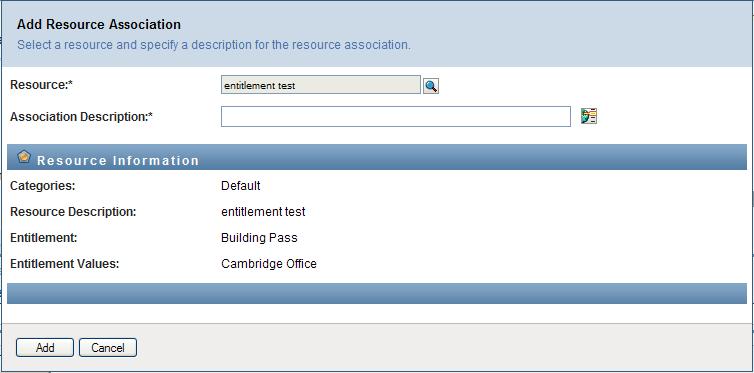
For entitlements that take static parameter values, which provide additional attributes or detailed information for the entitlement, the wizard displays the static values next to the label. For entitlements that take dynamic parameters, the wizard displays the resource request form, which includes fields for the dynamic parameters, as well as any decision support fields defined for the form.
-
In the field, type text that explains why the resource is associated with the role.
-
Click to associate the resource with the role.
The list shows the resource you added to the role definition:
What happens to existing role assignments When you add a new resource association to a role that already has identities assigned to it, the system initiates a new request to grant the resource to each of the identities.
To delete a resource association for a role:
-
Select the resource association in the list.
-
Click .
What happens to existing role assignments When you remove a resource association from a role that already has identities assigned to it, the system initiates a new request to revoke the resource from each of the identities.
Defining the Approval Process for a Role
To define the approval process for a role:
-
Click the tab.
-
Provide details for the approval process, as described below:
Table 15-2 Approval Details
Field
Description
Select this checkbox if the role requires approval when requested, and you want the approval process to execute the standard role assignment approval definition.
Deselect this checkbox if the role does not require approval when requested.
Custom Approval
Select this radio button if you want to use a custom approval definition (provisioning request definition). Use the to select the approval definition.
Select this radio button if this role uses the standard role assignment approval definition specified in the Role and Resource Subsystem configuration. The name of the approval definition displays as read-only in the below.
You must select the type of approval ( or ) and the valid approvers.
Select if you want the role to be approved by all of the users in the list. The approvers are processed sequentially in the order they appear in the list.
Select if you want the role to be approved by a percentage of the users in the list. The approval is complete when the percentage of users specified is reached.
For example, if you want one of four users in the list to approve the condition, you would specify Quorum and a percentage of 25. Alternatively, you can specify 100% if all four approvers must approve in parallel. The value must be an integer between 1 and 100.
HINT:The Serial and Quorum fields have hover text that explains their behavior.
Select if the role approval task should be assigned to one or more users. Select if the role approval task should be assigned to a group. Select if the role approval task should be assigned to a container. Select if the role approval task should be assigned to a role.
To locate a specific user, group, container, or role, use the .To change the order of the approvers in the list, or to remove an approver, see Section 1.4.4, Common User Actions.
Making Role Assignments
For details on making role assignments, see Section 15.1.5, Assigning Roles.
Checking the Status of Requests
The action allows you to see the status of your role assignment requests, including requests you’ve made directly as well as role assignment requests for groups or containers to which you belong. It lets you see the current state of each request. In addition, it gives you the option to retract a request that has not been completed or terminated if you have changed your mind and do not need to have the request fulfilled.
The action shows all role assignment requests, including those that are running, pending approval, approved, completed, denied, or terminated.
To view the status of role assignment requests:
-
Click the tab.
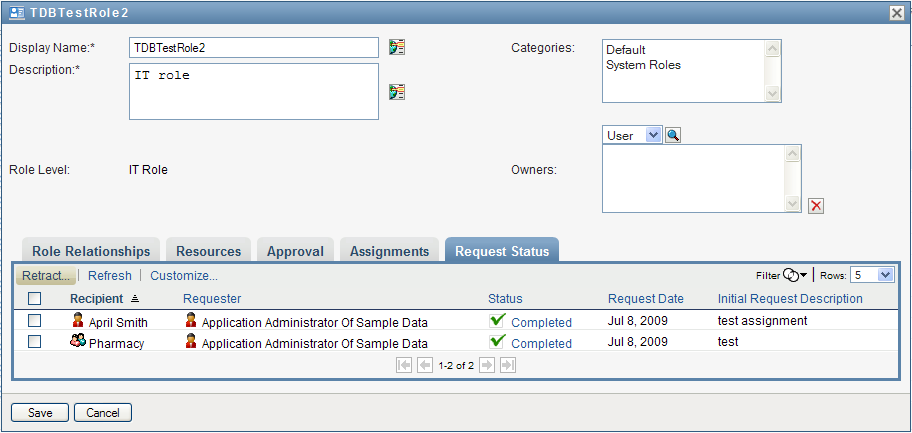
-
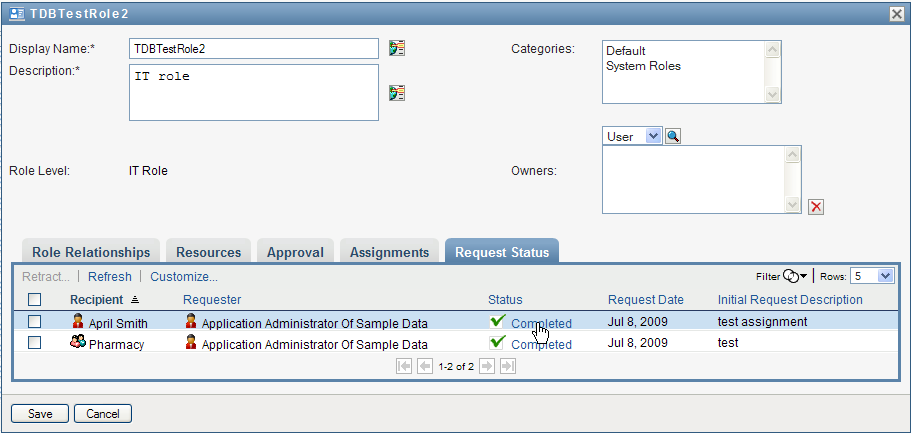
To see the detailed status information for a request, click the status:
The Assignment Details window is displayed:
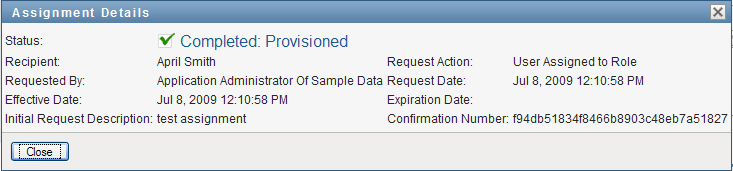
For details on what the status values mean, see Section 10.4, Viewing Your Request Status.
-
To retract a request, select the request and click .
You need to have permission to retract a request.
If the request has been completed or terminated, you will see an error message if you try to retract the request.
15.1.3 Editing an Existing Role
-
Select a previously defined role and click .

-
Make your changes to the role settings and click .
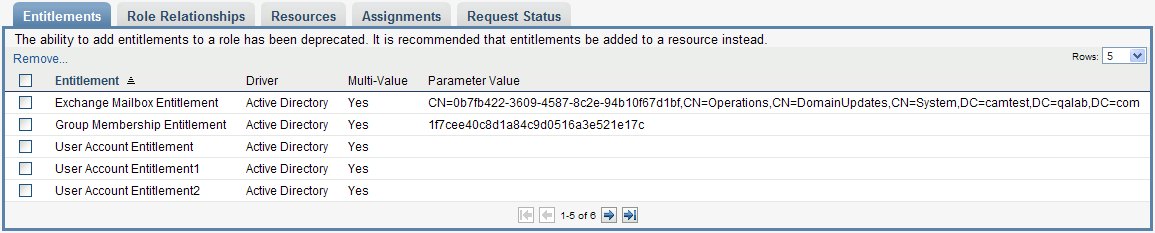
Entitlements associated with existing roles Roles defined in earlier releases of the Roles Based Provisioning Module may have associated entitlements. If a role has an entitlement associated with it, the user interface displays the tab, which allows you to see the entitlement mapping, and optionally remove it. Entitlement mappings for roles are deprecated in this release. They will continue to work in this release, but Novell now recommends that you associate entitlements with resources, rather than with roles.
15.1.4 Deleting Roles
-
Select a previously defined role and click .
What happens to existing role assignments If you delete a role that has an associated resource as well as one or more identities assigned to it, the system removes the resource assignment from each identity that has the associated resource.
NOTE:If you delete a role that has a resource assigned to it (or remove a user from the role), the system removes resource assignments for users in that role, even if those resources were first assigned directly. The reason for this is that the system assumes that the last authoritative source for a resource assignment is the controller of that resource, as illustrated by the following scenario:
-
A resource is created and mapped to an entitlement.
-
A user is assigned to the resource created above.
-
A role is created that is bound to the resource created in the first step above.
-
The same user is then assigned to the role created above.
-
The user is removed from the role.
In this situation, the user gets removed from the resource even though they had the resource assigned directly. Initially, the resource assignment is considered the authoritative source. However, when the user is assigned to a role that is associated with the same resource, the role becomes the authoritative source.
-
WARNING:A Role Manager who has been given the Delete Role permission for the system roles (or the container that contains these roles) can delete system roles. The system roles should not be deleted. If any of the system roles is deleted, the User Application will malfunction.
15.1.5 Assigning Roles
You can assign a role in either of two ways:
-
From the
-
From the dialog
Both of these methods are described below.
Assigning a Role From the Catalog
-
Select a previously defined role in the and click .
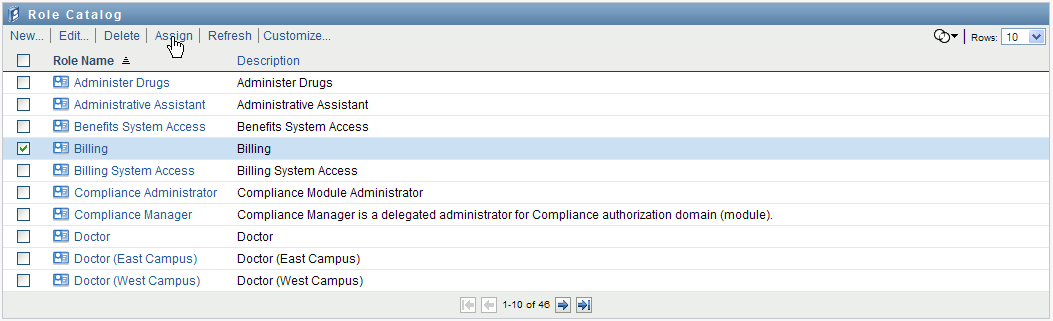
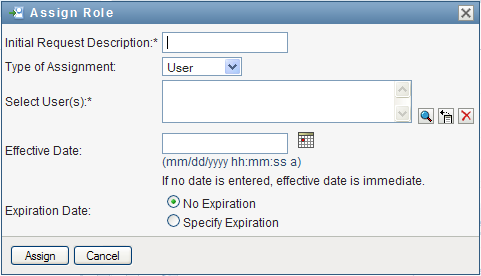
The User Application displays the dialog box:
-
Fill in the fields on the dialog:
-
Provide text describing the reason for the request in the field.
-
In the Type of Assignment field, select , , or to indicate what type of identities the role will be assigned to.
-
In the Object Selector, enter a search string and click Search.Select the users, groups, or containers you want to assign.
Assigning a role to multiple identities You can select one or more users (or groups or containers) for the role assignment. If you select multiple identities, all of the selected identities receive the same role assignment values.
-
Specify the start date for the role assignment in the field.
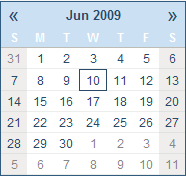
You can type in a date using the format mm/dd/yyyy hh:mm:ss a (where a specifies AM or PM). Alternatively, you can click the Calendar icon and select the date from the Calendar pop-up window:
-
Specify the expiration date for the role assignment in the field.
To specify an expiration, click . You can type in a date using the format mm/dd/yyyy hh:mm:ss a (where specifies AM or PM). Alternatively, you can click the Calendar icon and select the date from the Calendar pop-up window.
By default, the expiration date is set to , which indicates that this role assignment will remain in effect indefinitely.
-
-
Click .
Assigning a Role From the Edit Role Dialog
-
In the , select a role and click to open the dialog.
-
Click the tab.
The tab displays a list of assignments that have been granted for the selected role.
-
To add a new assignment, click .
The User Application displays the dialog box:
For details on working with the role assignment request form, see Assigning a Role From the Catalog.
15.1.6 Refreshing the Role List
-
Click .
15.1.7 Customizing the Role List Display
The allows you to select and deselect columns, and also reorder columns within the task list display. This behavior is controlled by a setting within the dialog. When you modify the column list or reorder the columns, your customizations are saved in the Identity Vault along with your other user preferences.
To customize the display of columns:
-
Click in the :
The User Application displays the list of columns currently selected for the display, and a list of additional columns that are available for selection.
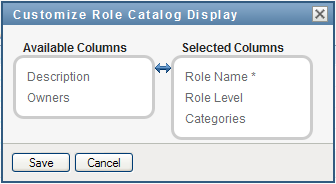
-
To include an additional column in the display, select the column in the list box, and drag it to the list box.
To select multiple columns in the list, hold down the Ctrl key and select the columns. To select a range of columns that appear together in the list, hold down the Shift key and select the columns.
You can reorder the columns in the display by moving them up or down in the list box.
-
To remove a column from the display, select the column in the list box, and drag it to the list box.
The column is a mandatory column and cannot be removed from the role list display.
-
To save your changes, click .