9.1 Working with Tasks
The action lets you check the workflow queue for tasks that have been assigned to you or to a user, group, container, or role whose tasks you are permitted to manage. When a task is in your queue, you need to perform one of the following actions:
-
Claim the task so you begin working on it
-
Reassign the task to another user, group, or role
NOTE:To reassign a task, you must be a Provisioning Administrator or Provisioning Manager (or Team Manager) who has the permission. If you do not have this permission, the button is not available.
The business user who does not have any administrative privileges can only see tasks for which he is the addressee. The business user does not see tasks for which he is the recipient. The list of tasks shown to the business user includes unclaimed tasks.
Alternatively the task may be delegated to the business user by the addressee, or be claimed by this user for a group.
NOTE:The business user does not need to have directory browse rights to the provisioning request definition that started the workflow in order to see a task for which he is the addressee.
The Provisioning Administrator and Provisioning Manager have the ability to manage tasks for other users, as described below:
-
When nothing is selected in the control, the task list shows the current user’s tasks. These tasks include those for which he is either recipient or addressee, as well as tasks for which the recipient or addressee is a group, container, or role to which the current user belongs. The Provisioning Administrator or Provisioning Manager can do anything with his own tasks, since no rights are required to work with one’s own tasks.
-
When a user is selected in the control, the list shows tasks that have the selected user as addressee, as well as those for which the user is the recipient. The Provisioning Administrator or Provisioning Manager can filter the task list to show only those tasks for which the managed user is addressee. Alternatively, the user can filter the list to show only those tasks for which the managed user is the recipient.
-
When a group is selected, the list shows tasks that have the selected group as addressee, as well as those for which the group is recipient. The Provisioning Administrator, Provisioning Manager, or Team Manager can filter the task list to show only those tasks for which the managed group is addressee. Alternatively, the user can filter the list to show only those tasks for which the managed group is the recipient.
-
When a role is selected, the list shows tasks that have the selected role as addressee. A role cannot be specified as the recipient for a task.
-
When a container is chosen, the list shows tasks that have the selected container as recipient. A container cannot be specified as the addressee for a task.
A Team Manager for the Provisioning domain has the ability to manage tasks for team members. Before selecting a team member, the Team Manager must select a team.
The action allows you to work on tasks associated with resource requests, role requests, process requests, and attestation requests. In some cases, the user interface may differ depending on which type of task you select to work on. For attestation requests, the action shows only those tasks for which the current user is designated as an attester.
When you claim a task associated with a resource, role, or process request, you have the ability to take an action that forwards the workitem to the next activity within the workflow. The actions you can perform are described below:
Table 9-1 Forward Actions
|
Forward Action |
Description |
|---|---|
|
Approve |
Allows you to give your approval to the task. When you approve the task, the workitem is forwarded to the next activity in the workflow. |
|
Deny |
Allows you to explicitly deny your approval to the task. When you deny the task, the workitem is forwarded to the next activity in the workflow and the request is denied. Typically, the workflow process terminates when a request is denied. |
|
Refuse |
Allows you to explicitly refuse the task. When you refuse the task, the workitem is forwarded to the next activity for the refused action in the workflow. The Refuse action applies to individual tasks. The user interface does not permit to you to perform this action on a set of tasks. |
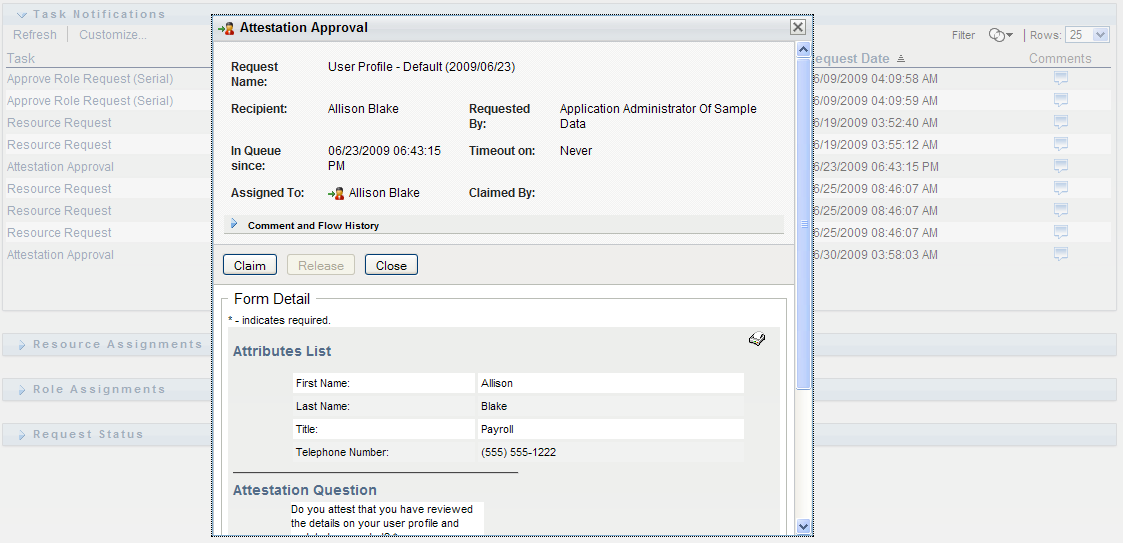
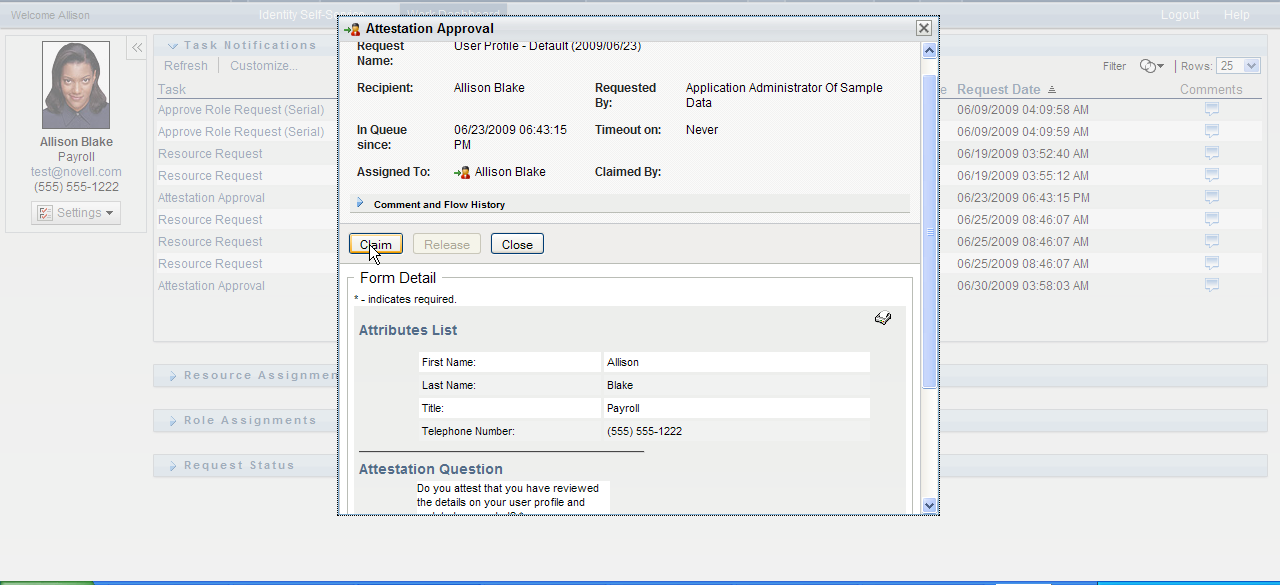
When you claim a task associated with an attestation request, you need to review the information displayed in the attestation form. In addition, you need to answer the required attestation question, which indicates whether you attest to the correctness of the data, and, in some cases, respond to one or more survey questions. For user profile attestation processes, the form includes your user attribute data, which you need to verify for accuracy. For role assignment, user assignment, and SoD attestation processes, the form includes a report that shows the role assignment, user assignment, or SoD data you need to verify.
9.1.3 Selecting a Task
To select a task in the queue list:
-
Click the name of the task in the queue.
The Task Detail form is displayed, either in a message window, or inline with the list of tasks. This behavior is controlled by a setting in the dialog. The image below shows the Task Detail form inline:
The image below shows the Task Detail form in a message window:
When a task is assigned to multiple approvers, the Task Detail form displays the icon next to the field, and displays text below the icon to indicate that multiple approvals are necessary.
-
To display more information about a task assigned to multiple approvers, click the text under the icon.
A pop-up window displays to indicate how many approvals are required, who the current addressees are, and what the approval status currently is.
The requirements for the task depend on how the task was configured by your administrator:
-
If the approval type is group, the task has been assigned to several users within a group, but only one is expected to claim and approve the task.
-
If the approval type is role, the task has been assigned to several users within a role, but only one is expected to claim and approve the task.
-
If the approval type is multiple approvers, the task has been assigned to several addressees, and all of the addressees must claim and approve the task.
-
If the approval type is quorum, the task has been assigned to several addressees, and a quorum of addressees is sufficient to approve the task. The definition of a quorum is configured by the administrator. To define the quorum, the administrator specifies an approval condition that specifies the precise number of approvals or the percentage of approvals needed.
The workflow system performs short circuit evaluation to optimize quorums. Whenever a quorum approval condition reaches the point where a quorum is not possible, the activity is denied and the task is removed from the queues of all addressees.
-
-
To claim a task, follow the instructions under Section 9.1.4, Claiming a Task.
-
To view the comment history for the task, click .
A pop-up window lets you see user and system comments. The order in which comments appear is determined by the time stamp associated with each comment. Comments entered first are displayed first. For parallel approval flows, the order of activities being processed concurrently can be unpredictable.
-
Click .
-
To display user comments, click .
User comments include the following kinds of information:
-
The date and time when each comment was added.
-
The name of the activity to which each comment applies. The list of activities displayed includes user and provisioning activities that have been processed or are currently being processed.
-
The name of the user who made the comment. If the comment is generated by the workflow system, the name of the application (for example, IDMProv) is the user name. Comments generated by the workflow system are localized automatically.
-
The comment text, which includes the name of the user who is the current assignee for each activity.
The workflow designer can disable the generation of user comments for a workflow. For more information, see the NetIQ User Application: Design Guide.
-
-
To display system comments, click .
System comments include the following kinds of information:
-
The date and time when each comment was added.
-
The name of the activity to which each comment applies. When you display system comments, all activities in the workflow are listed. The list of activities includes those that have been processed or are currently being processed.
-
The name of the user who made the comment. If the comment is generated by the workflow system, the name of the application (for example, IDMProv) is the user name. Comments generated by the workflow system are localized automatically.
-
The comment text, which indicates what action was taken for the activity.
System comments are intended primarily for debugging purposes. Most business users do not need to look at the system comments for a workflow.
-
-
To scroll through a long list of comments, click the arrows at the bottom of the screen. For example, to scroll to the next page, click the arrow.
-
Click to close the window.
-
-
To return to the task list, click .
9.1.4 Claiming a Task
To claim a task to work on:
-
Click .
For resource, role, and process requests, the section of the page is updated to include the and buttons, as well as any other action buttons included by the flow definition, and the appropriate fields become editable.
For attestation requests, the section of the page is updated to include the attestation form. The appearance of the form varies, depending on the attestation type. For user profile attestation processes, the form shows the user profile data you need to review.
For role assignment, user assignment, and SoD attestation processes, the form includes a report that shows the data you need to review.
For all attestation types, the form shows controls that allow you to answer the required attestation question, as well as any additional survey questions included in the attestation process.
If your administrator has configured your system for digital signatures, and the task requires a digital signature, the icon appears in the upper right corner of the page.

In addition, on Internet Explorer, a message appears indicating that you need to press the Spacebar or the Enter key to activate the digital signature applet.
-
If you are working on a task that requires a digital signature, perform these steps:
-
If you are using a smart card, insert the smart card into the smart card reader.
-
On Internet Explorer, press the Spacebar or the Enter key to activate the applet.
At this point, your browser might display a security warning message.
-
Click to proceed.
-
Fill in the fields in the approval form. The fields on the form vary depending on which resource you requested.
-
Click the checkbox next to the digital signature confirmation message to indicate that you are ready to sign.
The digital signature confirmation message varies depending on how the provisioning resource was configured by the administrator.
The applet then displays a pop-up window that allows you to select a certificate. The pop-up window lists certificates imported to the browser as well as certificates imported to the smart card (if one is currently connected).
-
Select the certificate you want to use and click .
-
If you select a certificate that has been imported into your browser, type the password for the certificate in the field on the request form.
-
If you select a certificate that has been imported to your smart card, type the PIN for your smart card and click .
You do not need to type the password for the certificate if you are using a smart card, because the certificate password has already been transmitted to the card.
If your administrator has enabled the ability to preview the user agreement, the button is enabled.
-
Click to see the user agreement.
If the digital signature type is set to Form, a PDF document is displayed.
If the digital signature type is set to data, an XML document is displayed.
-
-
To deny a resource or role request, click .
-
To approve a resource or role request, click .
The User Application displays a message indicating whether the action was successful.
NOTE:If you accessed the task through the task list on the Work Dashboard, the task completion window provides a close button () in the upper right corner. However, the close button on the task completion window is not available if you accessed and completed the task via an e-mail link, or through deep linking.
9.1.5 Reassigning a Task
To reassign a task:
-
Click in the Task Detail window.
NOTE:To reassign a task, you must be a Provisioning Administrator or Provisioning Manager (or Team Manager) who has the permission. If you do not have this permission, the button is not available.
-
Click the icon
 next to your chosen entry box.
-
In the drop-down list, select the user to whom you want to reassign the task.
-
(Optional) Type a comment in the field to explain the reason for the reassignment.
-
Click .
The User Application displays a message indicating whether the action was successful.