2.2 Security
2.2.1 Security Overview
Moving from pre-production to production usually involves hardening the security aspects of the system. In sandbox testing, you might use regular HTTP to connect the User Application driver to the application server, or you might use a self-signed certificate (as a temporary measure) for driver/app-server communication. In production, on the other hand, you probably use secure connections, with server authentication based on your company’s Verisign* (or other trusted provider) certificate.
It is typical for X.509 certificates to be used in a variety of places in the Identity Manager User Application environment, as shown in the following diagram.
Figure 2-2 Identity Manager User Application Environment
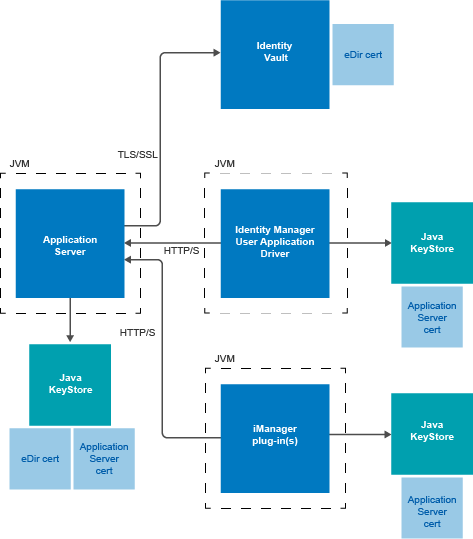
All communication between the User Application and the Identity Vault is secure, using Transport Layer Security, by default. The installation of the Identity Vault (eDirectory) certificate into the Tomcat application server keystore is done automatically at install time. Unless you specify otherwise, the User Application installer places a copy of the eDirectory certificate in the JRE’s default cacerts store. The installation and configuration process also handles the certificate for a JBoss application server. However, you must manually install the certificate into the WebSphere application server by using the IBM tools. For more information, see the NetIQ Identity Manager Setup Guide.
The server certificate needs to be in several places, if communications are to be secure, as shown in the diagram. Different setup steps might be needed depending on whether you intend to use a self-signed certificate in the various places in the diagram shown with a JBoss cert box, or you intend to use a certificate issued by a trusted certificate authority (CA) such as Verisign.
2.2.2 Enabling SSL
The User Application uses HTML forms for authentication. As a result, user credentials are exposed during login. We strongly recommend that you enable SSL to protect sensitive information.
The procedure for enabling SSL varies depending on whether on you are working in a test or production environment, as described below.
Enabling SSL in a Test Environment
If you are in a test environment, you might want to use a self-signed certificate. The procedure below explains how to do this.
To enable SSL in a test environment:
-
Export the Certificate Authority from your eDirectory server using iManager:
-
Go to iManager.
-
Login with the eDirectory administrator’s username and password.
-
Go to Administration > Modify Object.
-
Browse to the CA object in the Security container called TreeName CA.Security. For example, IDMTESTTREE CA.Security.
-
Click OK.
-
Click Certificates > Self Signed Certificate.
-
Select the self-signed certificate you want to use.
-
Click the Export button.
-
Clear Export private key.
-
Click Export format and select DER.
-
Click Next.
-
Click Save the exported certificate.
-
Click Save File. iManager saves the file as cert.der.
-
Click Close.
-
Move the saved file to a location where you want to store the exported certificate.
-
-
Create a keystore:
In a command prompt, cd to your .../tomcat/conf directory and create the keystore.
NOTE:The tomcat/conf path is the default path for a User Application installed on Tomcat. The path can vary, depending on how you installed the User Application and Tomcat.
To create the keystore, use the following command:
keytool -genkey -alias [keystore name] -keyalg RSA -keystore [your keystore name.keystore] -validity 3650
You will be prompted for your password, first and last name, and possibly other pieces of information.
Here are a few important points to keep in mind as you answer the prompts:
-
When asked for your first and last name, you should supply the fully qualified name of the server. For example:
MyJBossServer.NetIQ.com
-
Be sure your spelling is correct. If you spell any words incorrectly, you will see errors when you generate your signed certificate from the signing authority.
-
Save a copy of the information you provided in a simple text file. This will help to ensure that you supply the same information when you apply to the signing authority and when you import your certificate.
-
-
In your JBoss conf directory, create a simple text file to store your keystore .csr file. Once this file is created, return to a command prompt and create the .csr with the following command:
keytool -certreq -v -alias [Keystore name you used when you created your keystore] -file [your.csr] -keypass [password you created in keystore] -keystore [your.keystore] -storepass [your password]
-
Issue a certificate using iManager:
-
Go to Certificate Server > Issue Certificate.
-
Browse to the .csr file created earlier.
Click Next. Then click Next again.
-
Select Unspecified as the certificate type.
Click Next. Then click Next again.
-
Enabling SSL in a Production Environment
To install a signed certificate into the JBoss Application Server with the User Application:
-
Create a keystore using the keytool utility included in the JRE.
In a command prompt, cd to your .../tomcat/conf directory and create the keystore.
NOTE:The tomcat/conf path is the default path for a User Application installed on Tomcat. The path can vary, depending on how you installed the User Application and Tomcat.
keytool -genkey -alias [keystore name] -keyalg RSA -keystore [your keystore name.keystore] -validity 3650
You will be prompted for your password, first and last name, and possibly other pieces of information.
Here are a few important points to keep in mind as you answer the prompts:
-
When asked for your first and last name, you should supply the fully qualified name of the server (for example, MyJBossServer.NetIQ.com).
-
Be sure your spelling is correct. If you spell any words incorrectly, you will see errors when you generate your signed certificate from the signing authority.
-
Save a copy of the information you provided in a simple text file. This will help to ensure that you supply the same information when you apply to the signing authority and when you import your certificate.
-
-
In your JBoss conf directory, create a simple text file to store your keystore .csr file. Once this file is created, return to a command prompt and create the .csr with the following command:
keytool -certreq -v -alias [Keystore name you used when you created your keystore] -file [your.csr] -keypass [password you created in keystore] -keystore [your.keystore] -storepass [your password]
-
Submit your .csr file to your Certificate Authority (CA), such as VeriSign or Entrust.
Once you have received your signed certificate from your CA, you need to import it into your Tomcat Server.
To import your signed certificate:
-
Place a copy of your certificate in your Tomcat conf directory.
Be sure to create a backup copy of this certificate and store it in a safe location.
-
Convert the root CA to DER format:
-
Double-click on your certificate stored in the Tomcat conf directory.
This will open a pop-up Certificate dialog screen.
-
Click on the Certificate Path tab.
-
Highlight the root certificate (the certificated issue by the signing authority, such as Entrust or Verisign).
-
Click on View Certificate. This will open a new Certificate dialog for the root certificate.
-
Click on the Details tab.
-
Click copy to file. This will open the Export Certificate Wizard.
-
Click next when the Export Certificate Wizard opens.
-
Select DER encoded binary for X.509 (.CER) and click next.
-
Create a new file to store the newly formatted certificate and store it in your Tomcat conf directory.
Then click Finish.
-
-
Convert the signed certificate into DER format:
-
Double click on your certificate, which should be stored in the Tomcat conf directory.
This will open a pop-up Certificate dialog screen.
-
Click on the Details tab.
-
Click copy to file. This will open the Export Certificate Wizard.
-
Click next when the Export Certificate Wizard opens.
-
Select DER encoded binary for X.509 (.CER) and click next.
-
Create a new file to store the newly formatted certificate and store it in your Tomcat conf directory.
Then click Finish.
-
-
Open a command prompt and cd to your Tomcat conf directory.
-
Import your Root CA:
keytool -import -trustcacerts -alias root -keystore your.keystore -file yourRootCA.cer
Be sure to specify root as your alias in this step.
If all goes well, you should see a Certificate was added to keystore message.
-
Import your signed certificate.
keytool -import -alias [alias you used when creating the .csr] -keystore [your.keystore] -file [your DER converted Signed Cert.cer]
If all goes well, you should see a Certificate reply was installed in keystore message.
-
To verify that the signed certificate was imported correctly, you can run the following command in a command prompt from your Tomcat conf directory.
keytool -list -v -alias idm -keystore idm.keystore
You should see your self signed and signed certificates listed in the output.
-
Enable SSL in Tomcat.
Locate server.xml under .../tomcat/conf directory and open that file in a text editor. Enable SSL by uncommenting or adding the following section:
maxThreads="150" strategy="ms" maxHttpHeaderSize="8192" emptySessionPath="true" scheme="https" secure="true" clientAuth="false" keystoreFile="${tomcat.server.home.dir}/conf/tomcat.jks" keystorePass="changeit" sslProtocol ="TLS" />NOTE:Remember to point keystoreFile to the keystore you created. For example: ${tomcat.server.home.dir}/conf/server.keystore. Also, remember to change the keystorePass="changeit" to your keystore password.
You may also need to add SSLEnabled="true" protocol="HTTP/1.1", as shown below:
<Connector port="8443" protocol="HTTP/1.1" SSLEnabled="true" maxThreads="150" scheme="https" secure="true" clientAuth="false" sslProtocol="TLS" keystoreFile="/opt/certs/chap8.keystore" keystorePass="changeit" /> -
Restart your Tomcat server and test.
2.2.3 Turning on SOAP Security
-
In IDMProv.war, find the web.xml file and open it in a text editor.
-
At the bottom of the file, uncomment the following section:
<security-constraint> <web-resource-collection> <web-resource-name>IDMProv</web-resource-name> <description>IDM Provisioning Edition</description> <url-pattern>/*</url-pattern> <http-method>POST</http-method> <http-method>GET</http-method> </web-resource-collection> <user-data-constraint> <transport-guarantee>CONFIDENTIAL</transport-guarantee> </user-data-constraint> </security-constraint> -
Save the file and archive, then restart Tomcat.
2.2.4 Mutual Authentication
The Identity Manager User Application does not support client certificate-based authentication out of the box. That functionality can be obtained, however, by using NetIQ Access Manager. See your NetIQ representative for more information. See also Section 2.2.5, Third-Party Authentication and Single Sign-On.
2.2.5 Third-Party Authentication and Single Sign-On
You can configure Identity Manager to work with NetIQ Access Manager using SAML 2.0 authentication. This capability enables using a non-password-based technology to log in to the identity applications through Access Manager. For example, users can log in through a user (client) certificate, such as from a smart card.
Access Manager interacts with One SSO Provider (OSP) in Identity Manager to map the user to a DN in the Identity Vault. When a user logs in to the identity applications through Access Manager, Access Manager can inject a SAML assertion (with the user’s DN as the identifier) into an HTTP header and forwards the request to the identity applications. The identity applications uses the SAML assertion to establish the LDAP connection with the Identity Vault. For information on configuring Access Manager to support this capability, refer to the Access Manager documentation.
Accessory portlets that allow single sign-on authentication based on passwords do not support single sign-on when SAML assertions are used for identity application authentication.
For more information about configuring Identity Manager to work with Access Manager, see Using SAML Authentication with NetIQ Access Manager for Single Sign-on
.
2.2.6 Encryption of Sensitive User Application Data
Any sensitive information associated with the User Application that is stored persistently is encrypted by using the symmetric algorithm AES-128. The master key itself is protected by password-based cryptography using PBEWithSHA1AndDESede. The password is never persisted or stored out of memory.
Information that is encrypted includes (but is not limited to):
-
LDAP administrator user password
-
LDAP guest user password
-
DSS trusted CA keystore password
-
DSS signature key keystore password
-
DSS signature key entry password
However, in a cluster environment, if session failover is enabled, some sensitive data (for example, a login-password for single sign-on) in the user session can be transferred on the network during session replication. This can expose sensitive data to network sniffers. To protect this sensitive data, do one of the following:
-
Enable encryption for JGroups. Perform the following steps to enable encryption for JGroups:
-
Log in to the User Application GUI.
-
Click Application > Application Configuration > Cluster and Cache Configuration.
-
Under Cluster Configuration, navigate to Cluster Properties and add Global values from Default to JGroups encryption.
The default cache setting properties are:
UDP(mcast_addr=228.8.8.8;mcast_port=45654):PING(timeout=5000):FD(timeout=10000;max_tries=5):VERIFY_SUSPECT:pbcast.NAKACK:UNICAST:pbcast.STABLE:FRAG:pbcast.GMS
-
For UDP, change the default cache setting properties to:
UDP(mcast_addr=228.8.8.8;mcast_port=45654;tos=8;ucast_recv_buf_size=20000000;ucast_send_buf_size=640000;mcast_recv_buf_size=25000000;mcast_send_buf_size=640000;loopback=false;discard_incompatible_packets=true;enable_bundling=false;max_bundle_size=64000;max_bundle_timeout=30;use_incoming_packet_handler=true;use_outgoing_packet_handler=false;ip_ttl=2):PING(timeout=5000):FD(timeout=10000;max_tries=5):ENCRYPT(encrypt_entire_message=true;sym_init=128;sym_algorithm=AES/ECB/PKCS5Padding;asym_init=512;asym_algorithm=RSA):VERIFY_SUSPECT:pbcast.NAKACK:UNICAST:pbcast.STABLE:FRAG:pbcast.GMS
-
For TCP, change the default cache setting properties to:
TCP(bind_addr=<node1_ip_address>;start_port=7815;loopback=true):TCPPING(initial_hosts=<node1_ip_address>[7815],<node2_ip_address>[7815];port_range=3;timeout=3500;num_initial_members=3;up_thread=true;down_thread=true):MERGE2(min_interval=5000;max_interval=10000):FD(shun=true;timeout=2500;max_tries=5;up_thread=true;down_thread=true):ENCRYPT(encrypt_entire_message=true;sym_init=128;sym_algorithm=AES/ECB/PKCS5Padding;asym_init=512;asym_algorithm=RSA):VERIFY_SUSPECT(timeout=1500;down_thread=false;up_thread=false):pbcast.NAKACK(down_thread=true;up_thread=true;gc_lag=100;retransmit_timeout=3000):pbcast.STABLE(desired_avg_gossip=20000;down_thread=false;up_thread=false):pbcast.GMS(join_timeout=5000;join_retry_timeout=2000;shun=false;print_local_addr=true;down_thread=true;up_thread=true):pbcast.STATE_TRANSFER(up_thread=true;down_thread=true)
-
-
-
Make sure that the cluster is behind a firewall.
2.2.7 Preventing XSS Attacks
The User Application supports the concept of XSS (Cross-Site Scripting) blacklists to allow you to prevent scripting attacks. The XSS blacklists prevent XSS injection in the free text input fields within the Detail portlet, approval flow, and role assignments pages within the application.
The User Application provides default values for two blacklists, one for the Detail Portlet, and one for the workflow system (which handles the approval flow and role assignments pages). However, you can customize the blacklists to suit the requirements of your environment.
To customize the either of the blacklists, you need to enter the words or characters you want to block in the sys-configuration-xmldata.xml file. In Tomcat, you can find this file in the <tomcat_home>/conf folder. Open the file with a UTF-8 friendly editor.
To modify the blacklist for the Detail portlet, open <tomcat_home>/conf/ism-configuration.properties in a UTF-8 editor, and find the com.netiq.xss.blacklist.detailportlet property:
<property>
  <key>com.netiq.xss.blacklist.detailportlet</key>
  <value>...</value>
</property>
The text node of <value> is the blacklist for Detail portlet. The blocked words are separated by comma (for example, blocked_word1,blocked_word2,...). The default setting is:
",<
This means that double quote and < are disallowed.
To modify the blacklist for the approval flow and role assignments pages, locate the com.netiq.xss.blacklist.workflow property.
<property>
  <key>com.netiq.xss.blacklist.workflow</key>
  <value>...</value>
</property>
The syntax is the same. The default value is:
<
which means that < is disallowed.
If you decide to customize the blacklists, be careful not to remove the default values. If you remove these values, you will make the lists less restricted, and therefore increase the risk of XSS attacks.
2.2.8 Modifying the Trustee Rights for User Preferences
To allow user preferences to be saved, the administrator must ensure that the permissions on the srvprvUserPrefsPlus and srvprvQueryList attributes are set so that the user is able to write to these attributes. The necessary rights should be set for [This] at the tree root level, since [This] is a special alias to the object itself, causing only the user to have rights to modify its own preferences. To set the proper permissions, the administrator needs to modify the trustees for these attributes in iManager, as shown below:
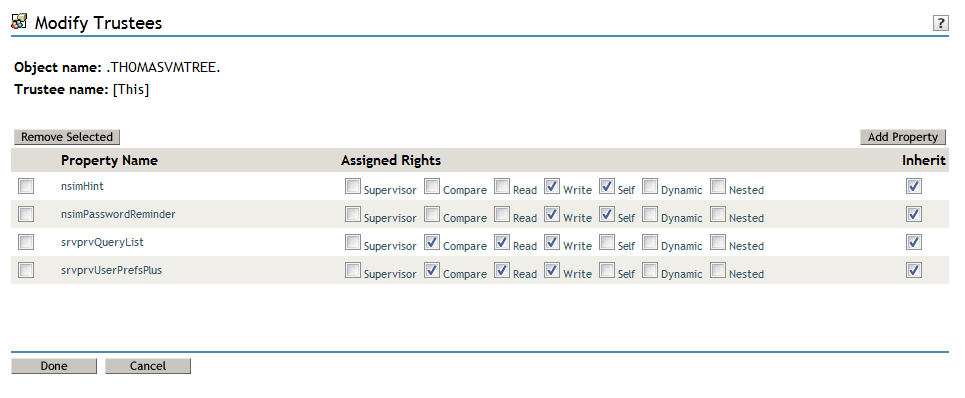
The srvprvUserPrefsPlus property has no space limitations, so it can save a large amount of user preference information. If you have used the srvprfUserPrefs property in a previous release, this property will be migrated to srvprvUserPrefsPlus the first time a user saves new preferences in the User Application.
2.2.9 Modifying the Trustee Rights for a Provisioning Request Definition
To view the details and comments associated with a task in the Task Notifications section of the Work Dashboard tab, the Domain Administrator or Delegated Administrator must have the proper rights to the provisioning request definition. In particular, the user must have the nrfAccessMgrTaskAddressee right to the provisioning request definition, with write access enabled. To set the proper permissions, the administrator needs to modify the trustees for the provisioning request definition, as described below:
-
Log into iManager as an administrator.
-
Select Modify Trustee from the Rights left-navigation menu.
-
Browse to the provisioning request definition.
-
If necessary, click Add Trustee to add the user.
-
Click on the Assign rights link.
Notice that nrfAccessMgrTaskAddressee is not listed with the write permission checked, which means that the user does not have the proper rights for the provisioning request definitiion.
-
Click the Add Property button.
-
Check the check box for Show all properties in schema.
-
Select nrfAccessMgrTaskAddresss.
-
Check the write checkbox for Assigned Rights.
-
Click Done.
-
Click OK.
2.2.10 Disabling the JMX Management Console on JBoss
The results from a Nessus scan show that the JBoss product installer does not secure the JMX management console by default. This creates a potential security hole. To solve this problem, you need to disable the JMX console by following your JBoss documentation.
2.2.11 Updating a Password for a Database User on Tomcat
Perform the following actions to update the database user's password in the database server.
-
Stop Tomcat.
-
Update the password in the database server.
-
With Java in your path, enter the following command:
idm/apps/tomcat/lib/idm-datasource-factory-1.2.0-uber.jar novell %newpassword%
-
Copy the encrypted output of the password to the server.xml file.
-
Save and close the file.
-
Start Tomcat.