4.1 Creating the Driver in Designer
You create the Loopback Service driver by installing the driver packages and then modifying the configuration to suit your environment. After you create and configure the driver, you need to deploy it to the Identity Vault and start it.
4.1.1 Importing the Current Driver Packages
You can update the driver packages at any time and store them in the Package Catalog. Packages are initially imported into the Package Catalog when you create a project, import a project, or convert a project. It is important to verify you have the latest packages imported into the Package Catalog before you install the driver.
To verify you have the most recent version of the driver packages in the Package Catalog:
-
Open Designer.
-
In the toolbar, click > .
-
Click if there are no package updates
or
Click to import the package updates.
-
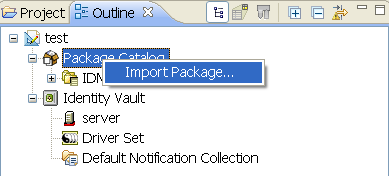
In the Outline view, right-click the Package Catalog.
-
Click.
-
Select any Loopback Service driver packages
or
Click to import all of the packages displayed.
By default, only the base packages are displayed. Deselect to display all packages.
IMPORTANT:If you want the driver to support the Permission Collection and Reconciliation Service functionality, ensure you import the following packages to the driver:
-
NOVLLBACKB_2.0.0 (Base Package)
-
NOVLLBACKENT_2.0.0 (Entitlements Package)
-
NOVLACOMSET_2.0.0 (Common Settings Advanced Edition Package)
For information about the Permission Collection and Reconciliation service, see
Understanding Permission Collection and Reconciliation Service
in the NetIQ Identity Manager 4.0.2 Common Driver Administration Guide. -
-
Click to import the selected packages, then click in the successfully imported packages message.
-
After the current packages are imported, continue with Section 3.1.2, Installing the Driver Packages.
4.1.2 Installing the Driver Packages
After you have imported the current driver packages into the Package Catalog, you can install the driver packages to create a new driver.
-
In Designer, open your project.
-
In the Modeler, right-click the driver set where you want to create the driver, then click > .
-
Select , then click .
-
Select the optional features to install for the Loopback Service driver.
There is only one option. It is selected by default.
-
Loopback Entitlements: This package contains policies that allow Identity Manager to consume CSV files containing Identity Vault permission information, dynamically create an entitlement and dynamic resource for each permission type, and load the permission data as entitlement values into Identity Manager Role-Based Provisioning Module. This package also contains GCVs to control the resource mapping. Select this package if you want the driver to support custom and administrator-defined entitlements. For more information about the Permission Collection and Reconciliation Service functionality, see
Understanding Permission Collection and Reconciliation Service
in the NetIQ Identity Manager 4.0.2 Common Driver Administration Guide. -
Loopback Managed System Information: This package contains the policies that enable the driver to collect data for reports.
NOTE:If you are enabling Permission Collection and Reconciliation service, ensure that you upgrade the Managed System Gateway driver version to 4.0.0.6.
-
-
Click .
-
(Conditional) If there are package dependencies for the packages you selected to install, you must install them to install the selected package. Click to install the package dependencies listed.
-
(Conditional) If not already configured, fill in the following fields on the Common Settings Advanced Edition page, then click :
NOTE:This page is only displayed if you installed the Common Settings Advanced Edition package.
-
User Application Provisioning Services URL: Specify the User Application IdentityManager Provisioning URL.
-
User Application Provisioning Services Administrator: Specify the DN of the User Application Administrator user. This user should have the rights for creating and assigning resources. For more information, see
Setting Up Administrative User Accounts
inUnderstanding Permission Collection and Reconciliation Service
in the NetIQ Identity Manager 4.0.2 Common Driver Administration Guide.
-
-
On the Install Loopback Service page, specify a name for the driver, then click .
-
(Conditional) On the Entitlements Name to CSV File Mappings page, click the
 icon to populate the page with the entitlement configuration options.
Identity Manager uses the CSV file to map Loopback entitlements into corresponding resources in the Identity Manager catalog.
NOTE:This page is only displayed if you selected to install the Entitlements package.
-
Entitlement Name: Specify a descriptive name for the entitlement to map it to the CSV file that contains entitlement details.
is the name of the entitlement. For example, you can define an entitlement called .
This parameter is used to create a resource in the User Application.
-
Entitlement Assignment Attribute: Specify a descriptive name for the assignment attribute for an entitlement.
holds the entitlement values in the Identity Vault. For example, this parameter can hold an attribute called .
You must add this parameter to in the Driver Parameters page or modify it in driver settings after creating the driver.
-
CSV File: Specify the location of the CSV file. This file must be located on the same server as the driver. This file contains the values for Identity Vault entitlements.
-
Multi-valued?: Set the value of this parameter to if you want to assign resources and entitlements multiple times with different values to the same user. Otherwise, set it to .
-
-
Click .
-
Review the settings and click to create the driver.
-
After the driver is created, if you want to change the configuration settings of the driver, continue to Section 4.1.3, Configuring the Driver Settings. If you do not want to change the configuration of the driver, continue to Section 4.1.5, Deploying the Driver.
4.1.3 Configuring the Driver Settings
After you have installed the driver packages, the Loopback Service driver will run. However, there are many configuration settings that you can use to customize and optimize the driver. The settings are divided into categories such as Driver Configuration, Engine Control Values, and Global Configuration Values (GCVs). The settings are described in Section A.0, Driver Properties.
To access the Driver Properties page in Designer:
-
Open your project.
-
In the Modeler, right-click the driver icon
 or the driver line, then select .
-
(Conditional) Click and review the following settings:
NOTE:These settings are only displayed if you installed the Entitlements package.
-
Enable Permission Collection and Reconciliation: Select the value of this parameter to for allowing permission collection and entitlement assignment. By default it is set to , which allows the driver to override any other conditions to reconcile custom entitlements.
-
Enable Permission Reconciliation for Group Entitlement: Ensure the value of this parameter is set to to enable the driver to assign group entitlements. By default, the value is set to .
-
Enable Permission Reconciliation for all Custom Entitlements: If the value of this parameter is set to , it allows you to select specific custom entitlements for reconciling them. By default, it is set to , which allows reconciling of all custom entitlements.
-
Add Custom Entitlements for Reconciliation: This parameter is presented if the value of is set to .
Click the
icon to add custom entitlements you want to selectively reconcile and specify for them.
NOTE:Ensure that values are added to the parameter in the driver configuration if they are not added initially during driver creation.
-
-
Click .
-
Modify any other settings as necessary.
-
Deploy the driver to the Identity Vault. Proceed to Section 4.1.5, Deploying the Driver.
4.1.4 Configuring the Driver Policies
The basic driver configuration does not include any policies. To have the driver perform any work, you need to create the appropriate policies. For information about creating policies, see the Policies in Designer 4.0.2 guide.
After you have created the appropriate policies, continue to Section 4.1.5, Deploying the Driver.
4.1.5 Deploying the Driver
After a driver is created in Designer, it must be deployed into the Identity Vault.
-
In Designer, open your project.
-
In the Modeler, right-click the driver icon
or the driver line, then select .
-
If you are authenticated to the Identity Vault, skip to Step 5; otherwise, specify the follow information:
-
Host: Specify the IP address or DNS name of the server hosting the Identity Vault.
-
Username: Specify the DN of the user object used to authenticate to the Identity Vault.
-
Password: Specify the user’s password.
-
-
Click .
-
Read the deployment summary, then click .
-
Read the successful message, then click .
-
Click to assign rights to the driver.
The driver requires rights to objects within the Identity Vault and to the input and output directories on the server. The Admin user object is most often used to supply these rights. However, you might want to create a DriversUser, for example, and assign security equivalence to that user. For more information about defining a Security Equivalent User in objects for drivers in the Identity Vault, see
Establishing a Security Equivalent User
in the Identity Manager 4.0.2 Security Guide.For receiving events from the Identity Vault, ensure that the driver’s Security Equals DN has the following rights in the Identity Vault:
-
Entry: Browse rights.
-
Attributes: Read rights.
-
Click , then browse to and select the object with the correct rights.
-
Click twice.
-
-
Click to exclude users that should not be synchronized.
You should exclude any administrative User objects (for example, Admin and DriversUser) from synchronization.
-
Click .
4.1.6 Starting the Driver
If you configured the driver with the Permission Collection and Reconciliation service, ensure the driver meets the following requirements before it is started for the first time:
-
The Entitlement value CSV files are available in the locations specified during driver configuration. You can check the location you specified by examining the mapping table under the driver in the Outline View of Designer.
-
The driver administrator and the User Application Resource Administrator are added to a Password Policy.
To start the driver, in the Modeler, right-click the driver icon ![]() or the driver line, then select .
or the driver line, then select .
For information about management tasks with the driver, see Section 6.0, Managing the Driver.