2.10 Localizing Provisioning Objects
Designer allows you to translate the names and descriptions of provisioning objects into multiple languages. Table 2-3 describes the types of provisioning objects that you can translate.
Table 2-3 Localizable Objects
|
Designer Tool |
Description |
|---|---|
|
Directory Abstraction Layer Editor |
|
|
Provisioning Request Definition Editor |
|
|
Provisioning Team Editor |
|
|
Roles Catalog |
|
To localize the provisioning objects listed in Table 2-3:
-
Verify that the locale (or language) is supported by the User Application driver. See Section 2.10.2, Supported Languages for the list of languages supported by default.
-
If necessary, add the new locale (or language) to the User Application driver and to the resource groups. For more information, see Section 2.9.2, Defining the User Application’s Supported Locales.
-
Translate the names and descriptions in one of the following ways:
-
Directly within Designer.
NOTE:You cannot edit the provisioning request definitions in the Attestation category. For this reason, you cannot use this method for localizing them. You must use the method described in Step 3.b.
For more information, see Section 2.10.1, Using Designer to Localize.
-
By exporting the set of localizable objects into an external properties or XML file, translating the contents of the file, then importing the data back into the project.
For more information, see Section 2.10.3, Exporting and Importing Data to Localize).
-
2.10.1 Using Designer to Localize
-
Click the localize button.

When you click this button, Designer displays a dialog box that lets you add the localized text. This is an example of the Localization dialog box.
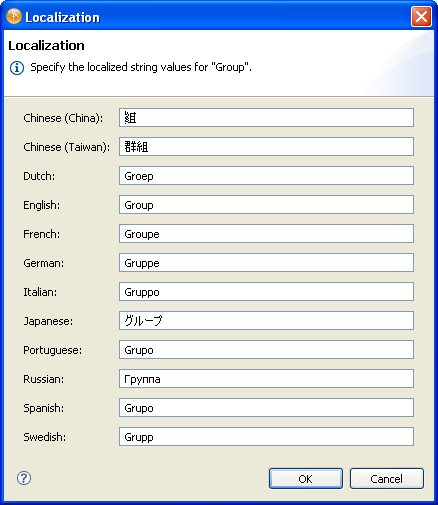
The languages displayed in this dialog box are the languages currently supported by the User Application driver. If your language is not shown in this dialog, you must add it. For more information, see Section 2.9.2, Defining the User Application’s Supported Locales.
The directory abstraction layer editor provides multiple ways to localize data. You can access the localization dialog boxes in these ways:
Table 2-4 Accessing the Localization Dialog Boxes
|
To define the localization text for... |
Perform this action... |
|---|---|
|
Every localizable item in the directory abstraction layer |
Select . or Click (from the editor’s toolbar), then select the before entering the localized text in thefield. |
|
A specific entity, relationship, or list |
From the tree view, right-click the object to localize, select , then select the before entering the localized text in the field. |
|
A single display label |
Select a specific entity or attribute, then click (beside the field in the Property pane). |
2.10.2 Supported Languages
You can localize the display labels, display names, and descriptions into the languages listed in the localization dialog box. This list represents the languages (locales) supported by the User Application driver. For information about adding new languages to this list, see Section 2.9, Specifying Locales and Localization Resource Groups.
The locale configuration is stored in the driver’s <default-locale> element in the AppConfig.AppDefs.locale-configuration XMLData attribute.
You must provide a display label for the User Application driver’s default language, or the User Application generates the following runtime error: The resource resolver com.novell.soa.common.i18n.LocalizedMapResolver did not return a resource for the default locale of <locale>. It is required that a resource exist for the default local.
2.10.3 Exporting and Importing Data to Localize
You can export the localizable data (such as display names and descriptions) in your project to an XML or properties file. After the data in that file is translated, you can import it back to the Designer project. You can export an entire driver, one object, or a subset of objects.
Exporting Data to Localize
-
Right-click a container node or an object in the Provisioning view.
-
Select .
-
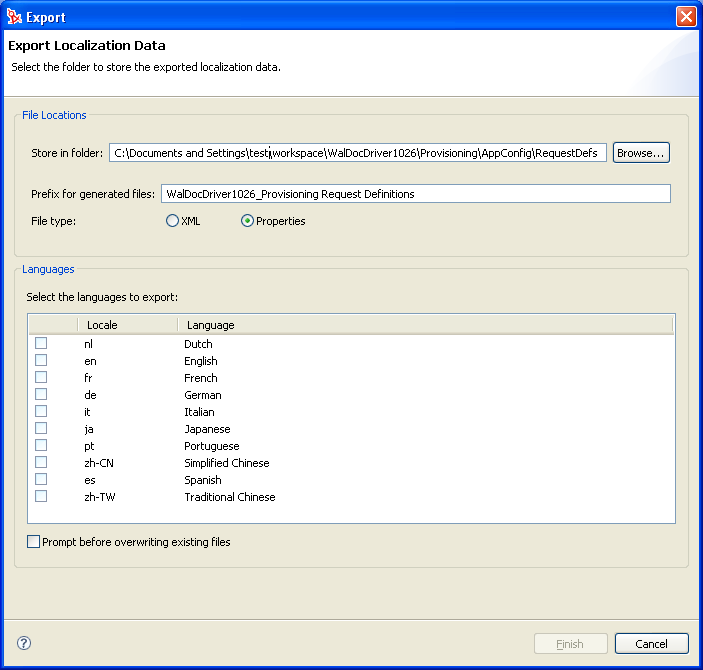
Fill in the fields as follows:
Field
Description
Specify the name of a local folder where the exported files should be written.
Specify a prefix for the generated files. Determine a naming strategy so you are able to identity the files for projects.
Select or depending on the encoding or format you prefer. XML files are UTF-8 encoded. Properties use Unicode*.
Select the languages you want localizations for. A file containing the display label key is generated for that language. The localizations need to be added to this file in the proper format so you can import them to the proper User Application driver objects.
If this option is selected, Designer prompts you before it overwrites any existing files of the same name in the target directory.
-
Click . Designer displays a message describing the result of the export operation and the location of the exported data.
Importing Localized Files
-
Right-click a container node or an object in the Provisioning view, then select .
-
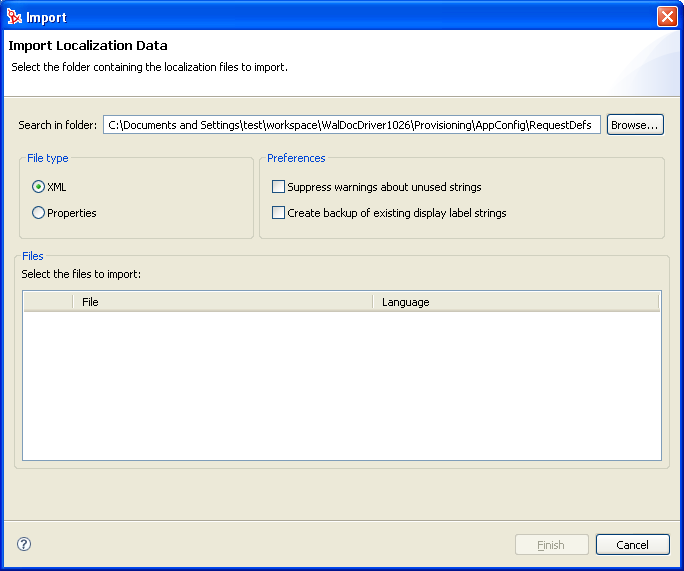
Fill in the fields as follows:
Field
Description
Specify the folder location where the files to import are located.
Select if the file you want to import is in XML format.
Select if the file you want to import is in the properties format.
Select if you want the wizard to suppress warning messages.
Select if you want the wizard to create a backup of the existing strings before the import. Useful in case you need to revert.
Select the files to import. This table is populated with the files from the folder location and file type specified above. If it is blank, no files of the specified type are located in the target folder. The wizard attempts to determine the language by looking at the filename. If the name cannot be determined, it defaults to English.
You can change the column if the wizard assumes the wrong language. The wizard changes the filename to reflect the language you specify and import the display labels to the corresponding language.
-
Click to complete the import. Designer displays a status dialog box that describes the results including any errors reading the files and any warnings about display label keys that are unused.