4.4 Managing Views
Views enable you to view or edit projects.
4.4.1 Available Views In Designer
Below is a list of all of the views that are available to you in Designer. The view names are followed by a brief description and a cross reference to more information. The views are broken into two groups: the views that appear in the option and the views that appear in the option. Some views are listed in both locations.
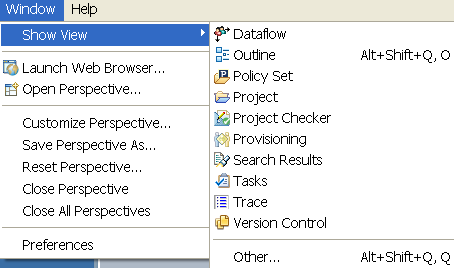
Figure 4-4 Selecting a View
Views in the Option
The views that appear in the option include:
-
Dataflow: Designer allows you to manage how the data flows between the Identity Vault and the connected systems. You can see how the data flows between all of the connected systems, make changes as needed, create reports about the data, and view the flow of passwords between the systems. For more information, see
Managing the Flow of Data
in the Designer 4.0.2 for Identity Manager 4.0.2 Administration Guide. -
Outline: The Outline view provides an outline of all of the objects you have open in an active editor. The Outline view’s contents vary, depending on the editor you have open at the time. For example, if you have a project open in the Modeler view, you see an outline of all of the objects that have been created for that project. See Section 4.6, The Outline View.
-
Policy Set: The Policy Set view lists policies and displays a toolbar. The list displays all policies contained in the selected policy set. During a transformation, the policies within the list are executed from top to bottom. For a description of the icons located on the Policy Set view toolbar, see Section 4.8, Policy Set View.
-
Project: The Project view lists all existing Designer projects. From the Project view, you can quickly find, open, view, navigate, manage, close, and delete any Designer project. See Section 4.5, The Project View.
-
Project Checker: Designer provides a Project Checker tool to check your project. The Project Checker checks for proper design, contexts, server associations, policies, missing user data, and dependency problems that would cause the project deployment into the Identity Vault to fail. The project can be checked at any time, but you should always run the Project Checker before deploying your project. See
Checking Your Projects
in the Designer 4.0.2 for Identity Manager 4.0.2 Administration Guide. -
Provisioning View: The Provisioning view provides persistent access to Designer’s provisioning features. Use the Provisioning view to access the editors that allow you to create and manipulate User Application components, manipulate object definitions, such as import or export object definitions, and define the User Application driver’s supported and default locales.
-
Search Results: You can use the Search Results view to search across an entire project. With the Modeler view active, press Ctrl+F, then select the object types for which you want to search. The results appear in the Search Results view, sorted by name, class, type, and notes. See Section 4.10, The Search Results View.
-
Tasks: The Tasks view enables you to make and prioritize notes while you manage identities. This view is for your convenience; it can contain whatever you want and won’t affect the functionality of your solution. See Section 4.11, The Tasks View.
-
Trace: The Error Log view can help you troubleshoot. If something isn’t working, messages written to the error log might help you. The log is named .log. It is a hidden file. To view the error log, you can use menus or browse the file system. See
Viewing the Error Log
in the Designer 4.0.2 for Identity Manager 4.0.2 Administration Guide. -
Version Control: Version control enables you to track revisions of your project, along with all the objects and files in that project, share those revisions with other members of your team, manage the history of your objects, and make sure that every member of your team is using the same version of your project. See
Version Control
in the Designer 4.0.2 for Identity Manager 4.0.2 Administration Guide.
Views in the Option
The option contains views under the following headings:
General
-
Bookmarks: The Bookmarks view enables you to see bookmarks that you have set in your text editors. To access the Bookmarks view, select and select the option under the heading.
-
Classic Search: The Classic Search view enables you to search files, Java, or plug-ins. This is a default Eclipse function.
-
Console: The Console view allows you to view any consoles you have open. To access the Console view, select and select the option under the heading.
-
Error Log: The Error Log view can help you troubleshoot. If something isn’t working, messages written to the error log might help you. The log is named .log. It is a hidden file. See
Viewing the Error Log
in the Designer 4.0.2 for Identity Manager 4.0.2 Administration Guide. -
Internal Web Browser: You can open the Internal Web Browser view by selecting and then selecting the option under the heading. You can also open a Web browser within the Designer utility. The Web browser button is available from the main toolbar. See
Opening a Web Browser
in the Designer 4.0.2 for Identity Manager 4.0.2 Administration Guide. -
Markers: A marker is associated with the Workbench, where it is used for tasks, problems, and bookmarks. The Markers view displays all markers in your project.
-
Navigator: The Navigator view enables you to manage and view the file resources that are in your workspace. You can see your projects and files as they actually exist in the file system. You can add files and folders, and append them to your projects or workspace. See Section 4.7, The Navigator View.
-
Outline: The Outline view provides an outline of all of the objects you have open in an active editor. The Outline view’s contents vary, depending on the editor you have open at the time. For example, if you have a project open in the Modeler view, you see an outline of all of the objects that have been created for that project. See Section 4.6, The Outline View.
-
Problems: You can validate your XML files by using the right-mouse menu in the Source editor. If any validation errors or warnings occur, they are displayed in the Problems view.
The Problems view shows you errors, warnings, and information on any problems relating to data source explorer failures, EMF problems, moduleCore validation markers, problems, or validation messages.
-
Progress: The Progress view displays the progress of an operation.
-
Project Explorer: The Project Explorer view allows you to view information about all of the objects found in a project. Pertinent information about a selected object is displayed in the Properties view.
-
Properties: The Properties view displays information on key-value pairs (for example, Max Log Entries 2). The information displayed depends on what is selected in the active view (for example, the Modeler or Outline view). Often, the Properties view lets you edit the information. You can also view and edit the Administrator settings in an Identity Vault. See Section 4.9, The Properties View.
-
Tasks: The Tasks view enables you to make and prioritize notes while you manage identities. This view is for your convenience; it can contain whatever you want and won’t affect the functionality of your solution. See Section 4.11, The Tasks View.
-
Templates: The Templates view allows you to work within the templates of the active editor. The content of this view is editor specific, and not all editors provide templates.
Designer for Identity Manager
-
Dataflow: Designer allows you to manage how the data flows between the Identity Vault and the connected systems. You can see how the data flows between all of the connected systems, make changes as needed, create reports about the data, and view the flow of passwords between the systems. For more information, see
Managing the Flow of Data
in the Designer 4.0.2 for Identity Manager 4.0.2 Administration Guide. -
Policy Set: The Policy Set view lists policies and displays a toolbar. The list displays all policies contained in the selected policy set. During a transformation, the policies within the list are executed from top to bottom. For a description of the icons located on the Policy Set view toolbar, see Section 4.8, Policy Set View.
-
Project: The Project view lists all existing Designer projects. From the Project view, you can quickly find, open, view, navigate, manage, close, and delete any Designer project. See Section 4.5, The Project View.
-
Project Checker: Designer provides a Project Checker tool to check your project. The Project Checker checks for proper design, contexts, server associations, policies, missing user data, and dependency problems that would cause the deployment of project into the Identity Vault to fail. The project can be checked at any time, but you should always run the Project Checker before deploying your project. See
Checking Your Projects
in the Designer 4.0.2 for Identity Manager 4.0.2 Administration Guide. -
Search Results: You can use the Search Results view to search across an entire project. With the Modeler view active, press Ctrl+F, then select the object types you want to search on. The results appear in the Search Results view, sorted by name, class, type, and notes. See Section 4.10, The Search Results View.
-
Trace: The Error Log view can help you troubleshoot. If something isn’t working, messages written to the error log might help you. The log is named .log. It is a hidden file. To view the error log, you can use menus or browse the file system. See
Viewing the Error Log
in the Designer 4.0.2 for Identity Manager 4.0.2 Administration Guide. -
Version Control: Designer for Identity Manager contains a new feature called version control. Version control enables you to track revisions of your project, along with all the objects and files in that project, share those revisions with other members of your team, manage the history of your objects, and make sure that every member of your team is using the same version of your project. See
Version Control
in the Designer 4.0.2 for Identity Manager 4.0.2 Administration Guide. -
eDirectory Browser: To locate or modify objects during your project development, use the eDirectory Object Manager to browse to and edit attributes of objects in the Identity Vault and other eDirectory trees. See
Managing Directory Objects
in the Designer 4.0.2 for Identity Manager 4.0.2 Administration Guide.
Help
-
Help: You can bring up the Help view by pressing F1 or by clicking a help button. You can also access help by clicking the Help menu at the top of Designer. See Section 2.0, Getting Help.
PDE Runtime
-
Plug-in Registry: A problem can occur if a plug-in fails to load. Use the Plug-in Registry view to see which plug-ins are loaded. See
Checking Loaded Plug-Ins
in the Designer 4.0.2 for Identity Manager 4.0.2 Administration Guide.
Provisioning
-
Data Item Mapping: Specifies how object attributes are mapped. See
Mapping Identity Vault to an LDAP Schema
in the Designer 4.0.2 for Identity Manager 4.0.2 Administration Guide. -
E-Mail Notification: Notification templates enable you to customize and send e-mail messages that users receive when triggers occur. The E-Mail Notification view allows you to view how notification templates are mapped to an e-mail server. See
Setting Up E-Mail Notification Templates
in the Designer 4.0.2 for Identity Manager 4.0.2 Administration Guide. -
Provisioning View: The Provisioning view provides persistent access to Designer’s provisioning features. Use the Provisioning view to access the editors that allow you to create and manipulate User Application components, manipulate object definitions such as import or export object definitions, and define the User Application driver’s supported and default locales.
XML
-
XPath Navigator: The XPath Navigator view supports context-sensitive editing of XPath expressions and syntax highlighting. It automatically attaches to the currently selected XML editor and uses its Document node as the evaluation context. The namespace context shows all namespaces in scope on its document element. See
XPath Navigator
in the Designer 4.0.2 for Identity Manager 4.0.2 Administration Guide.
4.4.2 Opening a View
Figure 4-5 Selecting a View to Open
To open a view, select > , then select an option. There are a number of available views that you can see when you select the option.
To narrow the list of views from the option, use the view filter:
-
Select > > .
-
In the edit box, type the name of the view that you want (for example, Trace).

You can open, maximize, and close these views. You can also arrange them however you want, or make Fast Views from them. See Section 4.4.7, Using Fast Views.
To quickly expand or contract a view, double-click the view’s tab.
When you minimize a view or an editor stack, a placeholder tray appears in the closest location along the left, bottom, or right edge of the workbench. Each view from the view stack acts as a fast view while it is in this location. You can restore the stack by clicking the tray's Restore icon. You can drag and drop minimized trays to new locations along the workbench edge. Maximizing any stack triggers minimization of all others.
Figure 4-6 A Placeholder Tray for the Project View
4.4.3 Moving a View
To move a view, drag the view’s tab to one of the following locations:
-
The left, bottom, top, or right of Designer
-
Stacked with other views
-
Outside of Designer, where it floats on your desktop
If two or more views are open, you can switch their order.
4.4.4 Minimizing and Maximizing Views
To minimize a view, do one of the following:
-
Click the button in the view’s title bar
 .
.
-
Press Ctrl+M.
To restore the view to its original size, click the button in the view’s title bar.
To maximize a view or editor, do one of the following
-
Double-click the view’s tab.
-
Click the button
.
-
Press Ctrl+M.
When it is expanded, the view or editor fills the entire application space. This feature provides maximum working space.
To restore the editor or view to its original dimensions, double-click the view’s tab.
4.4.5 Closing a View
To close a view or editor, do one of the following:
-
Click the on the view’s tab.
-
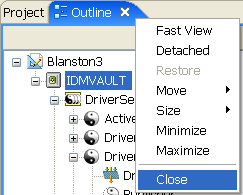
Right-click the view’s tab, then select .
Figure 4-7 Options to Close a View
4.4.6 Reopening a View Window
-
From the main menu, select > .
-
Select one of the views (for example, Outline).
You can also select > > , then select one of the views under (for example, Projects).
4.4.7 Using Fast Views
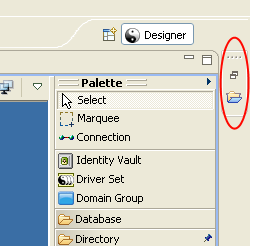
The Fast View toolbar provides an efficient way to manage certain types of views that you don’t want to clutter the desktop, but still want to have readily accessible. To add a view to the Fast View toolbar:
-
Click the icon
 in the bottom left corner of the Designer window (under the Properties view).
-
Select a view.
-
The view appears to the left of the Modeler view. Right-click the view’s tab and deselect to see the view’s default placement in Designer.
-
Reselect to have the view with its icon appear next to the icon.

After the icon appears next to the icon, do the following to restore a Fast View to a normal view:
-
Right-click the view icon in the Fast View toolbar.
-
Deselect .
You can also set the following:
-
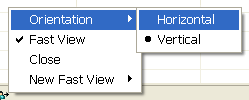
Whether you want the Fast View to appear horizontally or vertically (the option)
Figure 4-8 Options for Fast Views
-
Where you want to dock the Fast View
Views and selected items that appear by default in the Modeler view do not have the Fast View option.