20.4 Accessing the Version Control View
You access version control functionality by using the Version Control view.
Figure 20-2 The Version Control View
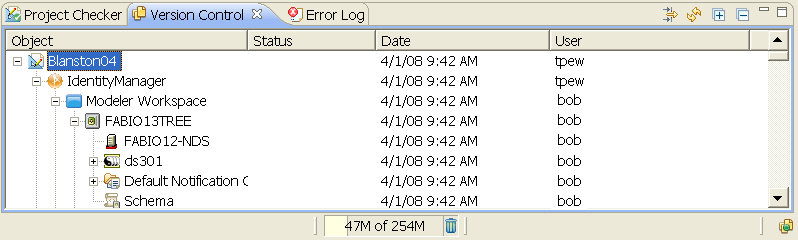
The Version Control view does the following:
-
Gives you a dashboard status of your interaction with version control
-
Lists the files that you are working on
-
Displays the changes that your teammates have made in real time
The Version Control view is the main interface with version control. You find most of the version control operations and information in this view. This view is empty until you import from or check in a project to the version control server.
The Version Control view automatically displays when you import an existing project from a version control server or check in a project to a version control server. To open the view manually, select .
20.4.1 Version Control Icons
The Version Control view contains seven icons that allow you to interact with version control. Six icons are to the right of the Version Control tab. They are the icon  , the icon
  , and
, and  , and the and icons
  . The seventh icon is the icon
  , which is located in the bottom right corner of Designer.
Figure 20-3 Details in the Version Control View
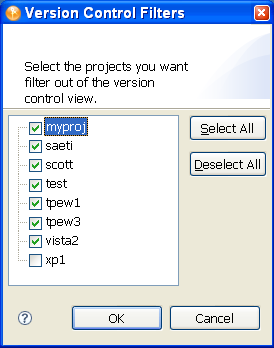
Filter Icon: Use the icon to limit the number of projects that are displayed in the Version Control view. Click the icon, then select the projects you want to filter out of the Version Control view.
Figure 20-4 Version Control Filter Page
Refresh Icon: Click the icon to refresh the Version Control view. Designer communicates with the Subversion server and refreshes the Version Control view with any updates performed by other users who are modifying the same projects.
Expand All/Collapes All Icons: Click the icon to expand all items in the Version Control view. Click the icon to collapse all items in the Version Control view.
Minimize/Maximize Icons: Click the icon to minimize the Version Control view. Click the icon to maximize the Version Control view.
Version Control Project Status Icon: Mouse over the icon to see the status of the objects in the Version Control view. The icon gives you a quick status for version control and works like a traffic light. You can move this icon to a different location in Designer to suit your preferences.
Table 20-1 Version Control Project Status Icon Colors and Description
|
Icon Status |
Status Description |
|---|---|
|
|
Green. Everything is up-to-date. |
|
|
Yellow. Updates are available from the version control server. |
|
|
Red. There are conflicts between the local version and the version control server. |
|
|
Grey. Designer is unable to contact the version control server. |


20.4.2 Version Control View Headings
The Version Control view has four headings: Object, Status, Date, and User.
Object: This column displays the objects that are connected to the project that is stored on the version control server. Right-click an object in the Version Control view to display the available options. These options are covered in Section 20.4.3, Version Control Options.
Status: This column displays the current state for objects in a project, as indicated by the following icons:
Table 20-2 Status Icons
|
Status Icon |
Description |
|---|---|
|
(none) |
This object is up-to-date, with no new revisions available. |
|
|
Unversioned. This object has not been added to the version control server. |
|
|
Deleted. This object has been deleted from the version control server. |
|
|
Updates with Merge. This object has updates that might conflict with the changes you have made (see Section 20.5, Comparing Revisions and Resolving Conflicts). |
|
|
The project object has been updated from an older version selected from the Revision History page. The object changes back to normal when you update (see History). |
|
|
This object has new child objects available. |
|
|
This object has new updates available. |
|
|
This object has been modified locally. |


Date: This column shows the date when the last changes to the objects in the Version Control view occurred. The date and time change when you modify an object and commit those changes to the version control server.
User: Displays the name of the last person who updated the object.
20.4.3 Version Control Options
Right-click an object in the Version Control view to display the available options.
Figure 20-5 Available Version Control Options

The options affect the object selected, as well as any child objects that correspond to the selected object. For example, performing a Revert on the project object affects the entire project, but performing a Revert on the Subscriber channel of a Lotus Notes driver only affects the Subscriber channel and any objects (such as policies) that depend on the Subscriber channel.
Clean Up
Use the option only when you are prompted to. Sometimes a project is in a “locked” state. At this point, version control requires you to run Clean Up before it lets you do anything else with the project, and you receive a message telling you to run the option.
Commit
Use the option to have your local changes checked into the version control server for the object you have selected.
Figure 20-6 Checking In an Object to the Version Control Server
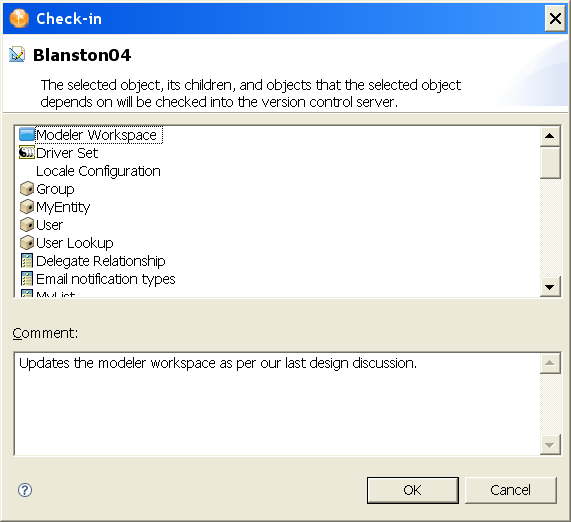
When you click , the check-in is committed to the version control server. Click to close the Commit screen.
There are also capabilities in the Project and the Outline view (right-click a project and select ), and an icon in the main toolbar  .
.
Get Updates
Use the option to get the latest version of the selected object from the version control server.
Figure 20-7 Receiving Updates from the Version Control Server
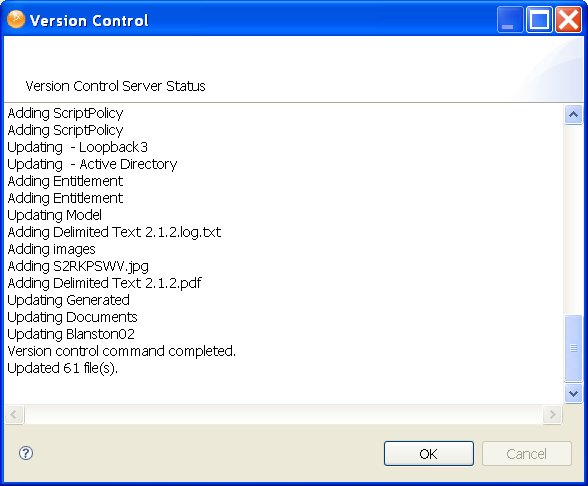
If you have more than one project open that is checked in to the version control server, select which project you want to update from the Update page, then click to begin the update. If there are conflicts between your local version and the version control server, you see the Conflict Resolution page, which includes a method to resolve those conflicts. For more details, see Section 20.5, Comparing Revisions and Resolving Conflicts.
There are also capabilities in the Project and the Outline view (right-click a project and select ), and an icon in the main toolbar  .
.
Revert
Use the option to return the selected object to the version you last checked out from the version control server. This allows you to cancel your recent changes; you see a message screen displayed, confirming your choice to revert. You can also use this option to restore files that you have deleted since the last time you checked in.
WARNING:By using this option, you lose any changes you have made since the last time you checked it in, including any files in your project that have not been checked into the version control server. Designer deletes all project files that are not in the version control server.
Delete
Use the option to delete a project from the version control server. This option is only available for project objects. Although you can delete objects within a project from other views in Designer, you can remove the entire project only through the Version Control view. Selecting the option immediately deletes the selected project, and you are prompted for a comment for your actions.
History
Use the option to view the revision history of an object and all the changes that have been made to that object. You can also use this option to select an earlier version of a project.
Figure 20-8 Revision History in the Version Control View
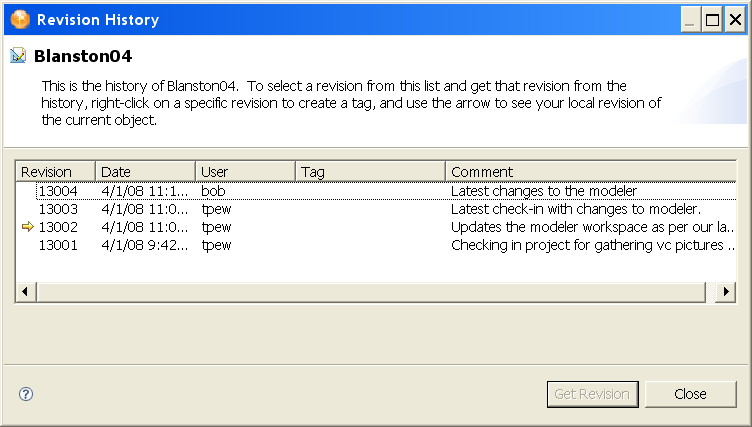
You can use Revision History page to see who made a change, when the change was made, the tag name (if it is filled out), and the comment provided for the change. The yellow arrow indicates your currently loaded version.
Version numbering of projects and how numbering works with the objects in a project is a very complex issue. For more information about how revision numbering works in Subversion, see Section E.1.1, How Revisions Work In Subversion.
The Revision History Page For a Project
You have more options when you right-click a project object in version control and then select .
Figure 20-9 Revision History of Projects
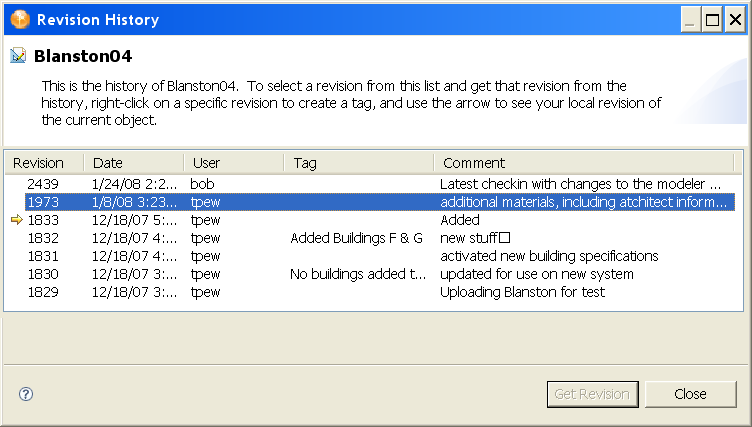
If you select for a project object, the Revision History page allows you to select a version of a project object from the list of revisions. You can then view the contents of earlier versions and bring those versions up-to-date with your latest revision.
Get Revision
Select the revision for the project you want to work with, then click . Answer to save all of the editors in this project. That version of the selected object is downloaded from the version control server and becomes the version of the project you are working on.
If you select an older version of a project, the project has a special status icon  in the Version Control view. This icon indicates that your project came from history instead of being out-of-date, but its status returns to normal after you select .
If you make changes to the historical version and select , you are presented with a Revert Local Changes page, allowing you to keep your local changes or to revert your local changes.
Figure 20-10 Reverting Local Changes
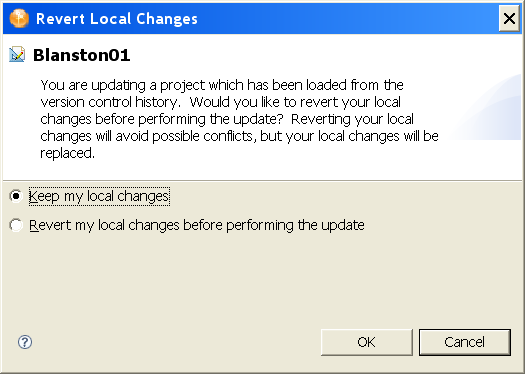
If you have made deliberate changes and want to now save those changes to the version control server, select (default). If you made inadvertent changes to the project, or if you just wanted to see what was in this historical version, select .
Creating a Tag for a Project
If you select a project object, you can create a tag for any of the revisions listed in the Revision History page. This allows you to give a revision project a more memorable name instead of a revision number. To create a tag, right-click a revision and select . This brings up the Tag for Revision page.
Figure 20-11 Adding a Tag To a Selected Revision
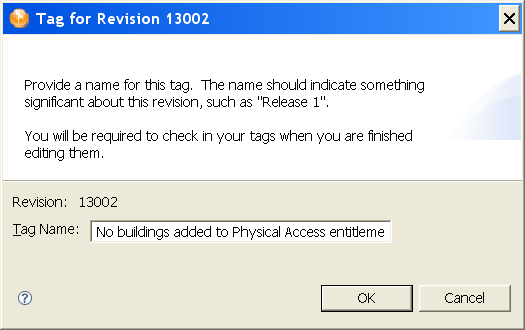
Provide a tag name that is significant to this version of the object and click . The tag name is added under the heading in the Revision History page. When you close the Revision History page, you are asked to add a comment to all of the tag names that you have added.
Comparing Versions
See Comparing Revisions.
Properties
Use the option to view the properties of an object that has been added to version control.
Figure 20-12 Object Properties Page
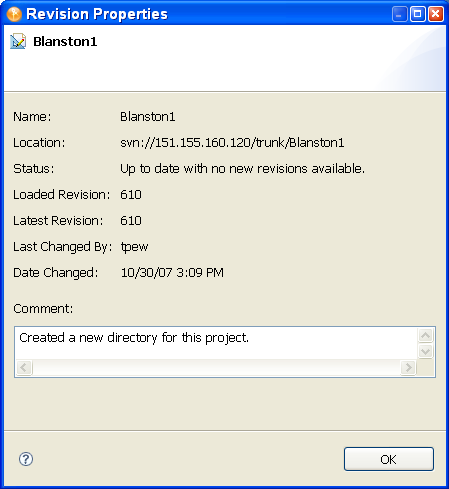
Important information includes the location of the object on the version control server, the loaded revision number, the latest revision number, and any comment concerning the most recent check-in. You cannot make changes to this information.