16.7 Using the Compare Feature When Deploying
Designer’s Compare feature allows you to see differences between driver sets, drivers, channels, and policies that are stored in projects and those that are running in deployed systems. Previous versions of Designer only provided conflict resolution when importing a driver. While importing, you could select which policies of the driver you wanted to update, but you could not view any differences between existing and new values.
Designer now provides conflict resolution on an object-by-object basis and allows you to view the differences between existing and new values when importing and deploying driver sets, drivers, channels and policies. For example, before deploying a driver object in Designer to a driver object that already exists in the Identity Vault, you can run Compare. Compare shows whether the driver objects are equal (no action is necessary) or unequal. If they are unequal, you can choose not to reconcile the driver objects, choose to update the driver object in Designer, or choose to update the driver object in eDirectory.
You can run the Compare feature at any time. If you choose to reconcile the differences between drivers objects in Designer and eDirectory while in Compare, you won’t need to separately run Import or Deploy to make the changes.
16.7.1 Using Compare when Deploying a Driver Object
Suppose you want to determine if you have deployed all of the changes you have made to a driver object in Designer to the same driver in the Identity Vault.
-
Right-click the driver object in either the Modeler view or in the Outline view. Select to bring up the Designer/eDirectory Object Compare window.

-
In the portion of the window, you see the listed objects and attributes. Select the attributes and child objects to see the actual differences displayed in the portion of the window.

The plus icon at the right side of the allows you to expand all elements in the parent object, and the minus icon collapses all of the elements. The ? icon displays the Summary/Compare dialog box help. Server-specific attributes, which are attributes that have a value for each server that is associated with a driver set, are displayed in the list with the server name in parentheses to the right of the attribute name.
-
By default, the Compare window only displays values that are different between eDirectory and Designer. To view all of the object values, select from the pull-down menu. Your choices are , , and .
-
Check to see the status of the values that are shown.
Values that are equal are shown as on the line in the Information portion of the Compare window.

The overlay image displayed in the entry identifies objects or attributes that need reconciliation. The following table describes what you see in the line and the overlays that you can see:
Compare Status
Description
Equal
The selected attribute’s value or all attributes of the selected object are the same in eDirectory and Designer.
Unequal

The value of the selected attribute, or one or more attributes of the selected object, are different in eDirectory and Designer.
Not Deployed

The selected object or the object containing the selected attribute is not deployed to eDirectory.
Not Imported

The selected object or object containing the selected attribute does not exist in Designer.
Renamed
Designer tracks objects that are deployed, then renamed in the Designer project. The Designer and eDirectory DNs are displayed in the value fields.
Unknown

The selected object or object containing the selected attribute cannot be compared, such as a password.
Deleted

Designer also tracks objects that are deployed, then deleted from the Designer project. To delete the object from eDirectory during deployment, select .
You can also see an if you select an attribute.
-
Under the Information portion of the Compare window, select how you want to reconcile the differences between the Source and Destination.
If shows , you have three choices:
-
To do nothing, keep the default value of .
-
To update the driver in Designer so that it contains the same information as the driver in eDirectory, select .
-
To update the driver in eDirectory to reflect the changes you have just made to the driver in Designer, select .
The green check box in the bottom corner of the icons shows all of the child objects that are being reconciled with the parent object. If you select the parent object to perform the update, then all of the child objects under the parent reflect that choice and you see the icon selected. If you do not choose a parent object, you can reconcile each child object individually. You can also see a small Designer icon and an eDirectory icon, showing how objects are being reconciled.
-
-
Check to see the values.
The values displayed in the bottom portion of the Designer/eDirectory Object Compare window vary, depending on the object being compared. For instance, Compare shows changes to policies or XML data. The Text Compare dialog box uses the Eclipse Compare editor to compare attributes that contain XML data, such as policy data, driver filters, or configuration data. The differences in the code are highlighted in blue.

-
After you view the differences, click to perform the reconciliation actions for each object in the tree, or click to close the Designer/eDirectory Object Compare window.
16.7.5 Comparing Driver Set and Driver Attributes
Use the Compare feature to compare the attributes of a driver set or a driver without comparing all of the child objects.
-
Right-click the driver set or driver, then select .

By default, the Compare windows shows only those attributes that are unequal, but you can select to show deletes, or show all attributes.
16.7.6 Renaming and Deleting Deployed Objects
Designer now tracks objects that are deployed, then renamed in the Designer project. The Designer and eDirectory DNs are displayed in the value fields. The renamed objects are displayed in the Deployment Summary window and the Compare Status entry displays .
Figure 16-1 Renamed Drivers and Driver Sets
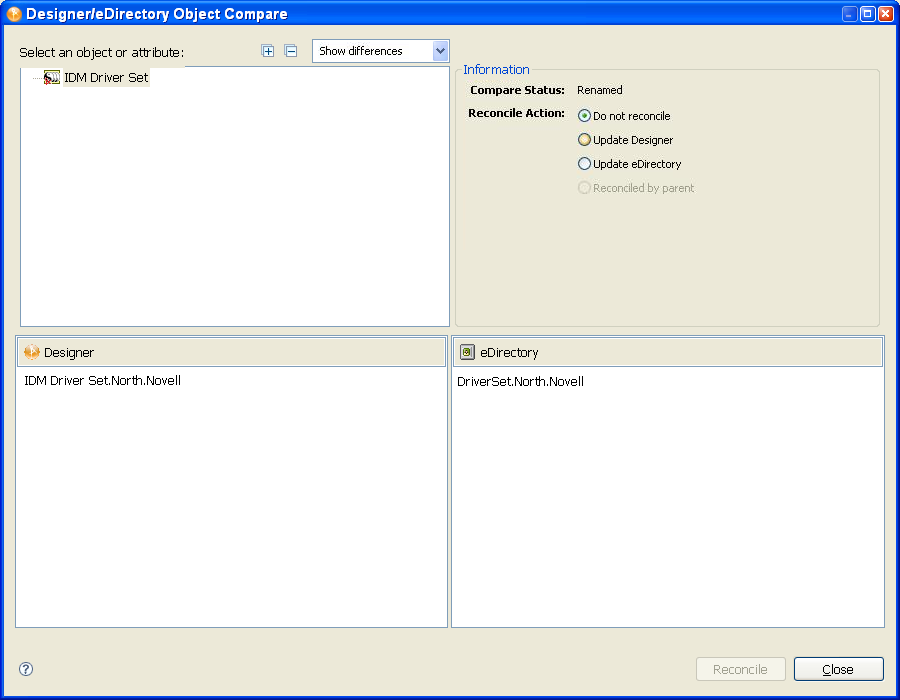
During the deploy operation, the renamed Designer object is renamed in eDirectory. When performing a compare operation, you can reconcile the object by updating either the Designer or eDirectory object name. Only objects that are renamed in Designer are tracked. If an object is renamed in eDirectory, Designer might not locate the associated eDirectory object when building the compare summary.
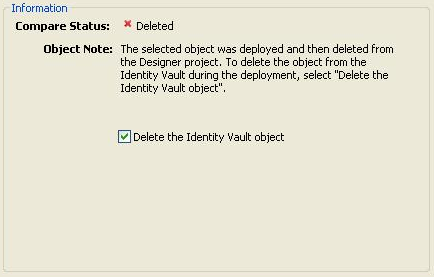
Designer also tracks objects that are deployed, then deleted from the Designer project. When you deploy the parent of the object that is deleted, you are given the option to delete the object from the Identity Vault. To delete the object from eDirectory during deployment, select . You can select from the drop-down menu.
Designer removes the object from the deleted object list if the parent is deployed and the object is not marked for deletion. In the following graphic, a driver was deleted from the driver set.
Figure 16-2 Deleting an Object in the Identity Vault
You can use the Compare feature to delete a deleted object from eDirectory or you can re-import the object into Designer.
Figure 16-3 Reconciling a Deleted Object

For example, to delete the object from eDirectory, select from the selection. To re-import the object into Designer, select . Only objects that are deleted in Designer are tracked. If an object is deleted in eDirectory, Designer shows the object as not deployed and creates a new object when you run Deploy or Compare.