3.7 Inspecting Data
After retrieving a data set, you use the Data Browser editor to examine its contents. To make this easier, the Data Browser lets you further refine the objects with which you are working by filtering the object list based on the criteria you select.
The Data Browser lets you perform three main tasks:
3.7.1 Filtering Data
The Data Browser’s filter tool lets you restrict your view of the data set to those records that share a particular characteristic, such as all records that include the value “David”.
There are two types of data set filters:
Quick Filter: The quick filter performs a global search across all attributes in the data set for those records that contain the filter string, and displays them in the Data Browser.
To specify a quick filter, simply type the desired value in the field, then press Enter.
Detailed Filter: The detailed filter lets you specify additional filter information to create a more targeted data set filter. To specify a detailed filter:
-
In the Data Browser editor, click

-
In the Filter dialog box, specify the filter attributes.
-
In the first field, select the attribute (column) on which you want to filter the data set.
-
In the second field, select the logical operator to use to filter the data set.
-
In the third field, specify the filter string.
-
-
Click .
To remove an applied filter, click the icon’s drop-down arrow and select .
3.7.2 Inspecting the Current Data Set
-
In the Data Browser editor, click

-
In the Inspector dialog box, select the preferred data format for each attribute that you want to analyze, then click .
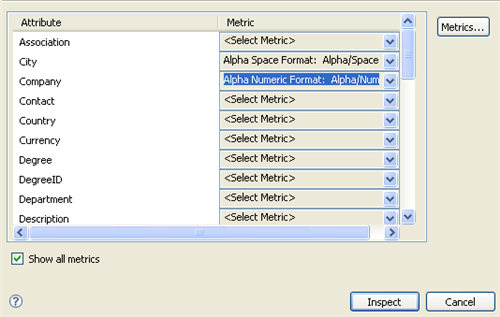
The drop-down menu for each attribute lists the appropriate metrics for the specified attribute. Select to display all the available metrics, even those that do not apply to the attribute’s syntax.
If necessary, you can click to open the Metric Manager dialog box, where you can create or modify the existing metric list. For more information, see Creating a New Test Metric.
The Data Browser uses red highlights for the attribute values that do not conform to the specified data format, allowing you to modify the data as needed.
The Data Browser does not highlight an object’s attribute if there is no defined value, or if the value already corresponds to the preferred data format.
To remove an applied filter, click the icon’s ![]() dropdown arrow and select .
dropdown arrow and select .
3.7.3 Modifying Data
The Data Browser lets you update data in a data set. For example, you might update a phone number so that it conforms to the desired phone number format, or add a phone number that is not currently in the data set.
-
In the Data Browser editor, select the data cell you want to edit, then press Enter.
If you are working with a large data set, you can filter the Data Browser editor down to a more relevant set of records. For more information, see Section 3.7.1, Filtering Data.
-
Modify the cell data as desired.
Single-value cell: Select a cell and press Enter, or double-click a cell to edit the cell value. Type your changes directly in the Data Browser editor. Press Delete to delete the value completely.
Press Enter to capture your changes. When you select a different cell, the Data Browser marks the modified data cell so you can easily see the modified data.
NOTE:To add a value to a single-value cell, press Insert to open the Multi-value Cell editor.
Multi-value cell: Press Insert, Enter, or Delete to open the Multi-value Cell editor. Type your changes, then press .
Click to add a value to the cell. Click the icon next to the value to delete it. Click the icon next to the value to return to its original, unmodified value.
-
(Optional) Select
 to export the data set instance.
This opens the Export to Flat File dialog box. For more information, see Section 3.6.2, Exporting Data.
-
(Optional) Select
 to generate a report about the data set instance.
-
(Optional) Select
 to send data modifications back to the source application.
This opens the Update to Application dialog box, where you can select the changes you want to write back to the application. Click to complete the data update process.
NOTE:Analyzer provides an audit trail for updates to application data. For more information, see Section 3.11.1, Data Browser Audit.