5.1 Portal Configuration Tasks
This section includes information about:
NOTE:The portal functionality within the User Application is being deprecated in Identity Manager 4.0.2.
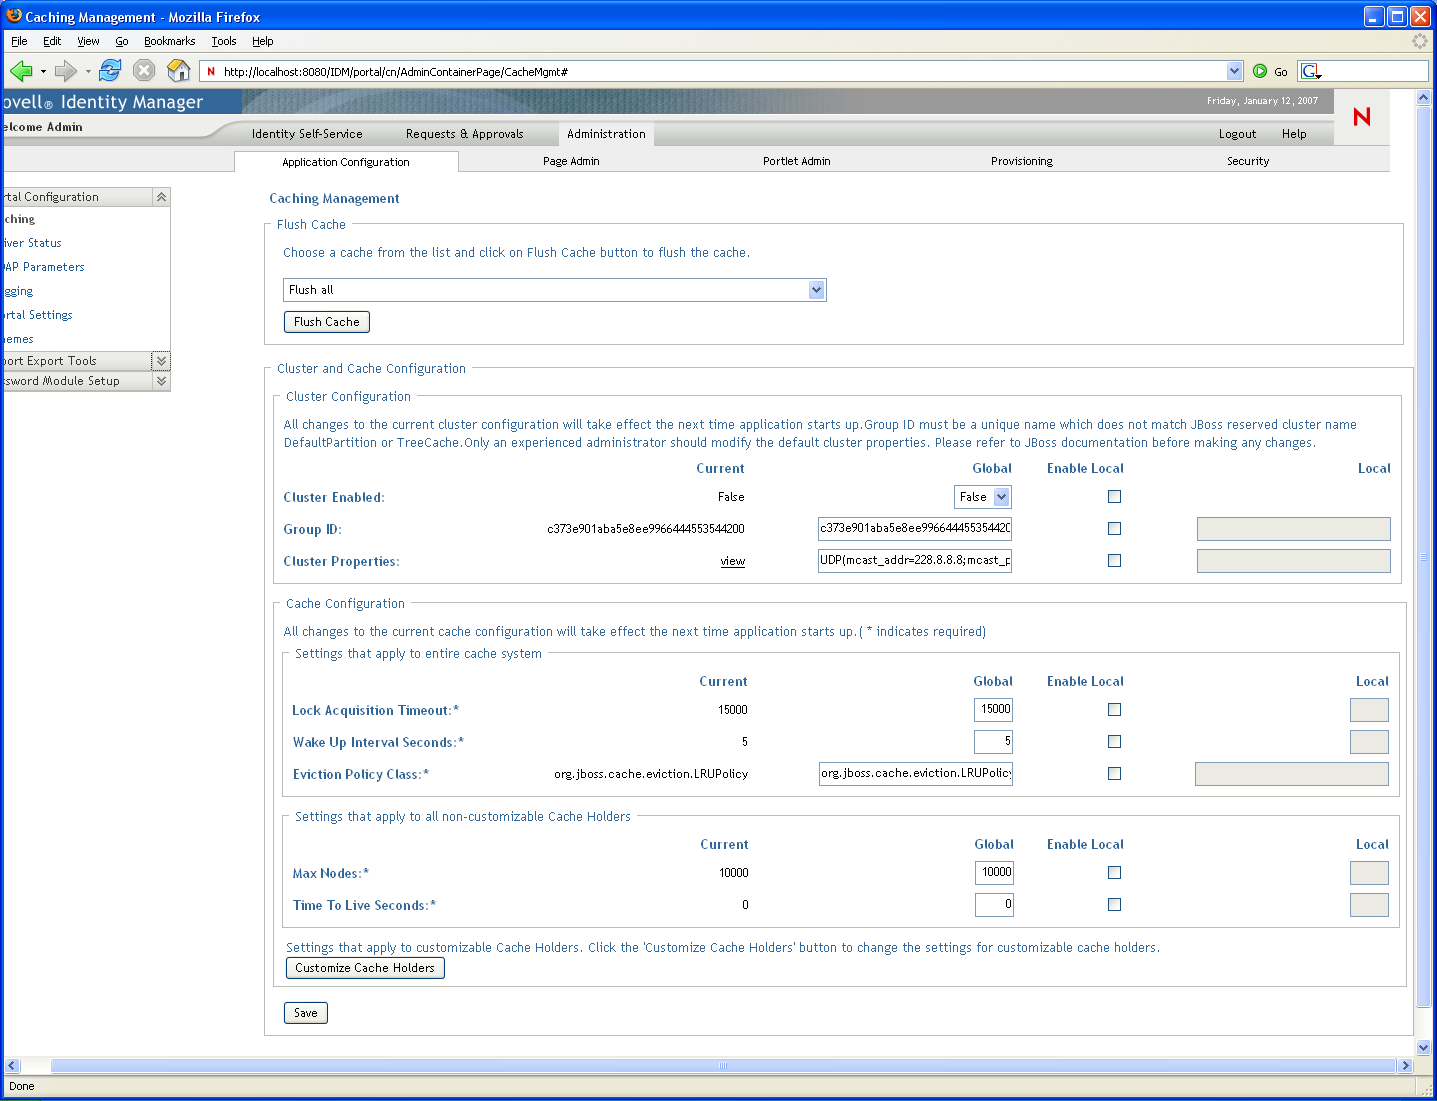
5.1.1 Caching Management
You can use the Caching page to manage various caches maintained by the Identity Manager User Application. The User Application employs these caches to store reusable, temporary data on the application server so it can optimize performance.
You have the ability to control these caches when necessary by flushing their contents and changing their configuration settings.
Flushing caches
The caches are named according to the subsystems that use them in the Identity Manager User Application. Normally, you don’t need to flush them yourself, because the User Application does that automatically based on how frequently their data is used or when the source data changes. However, if you have a specific need, you can manually flush selected caches or all caches.
-
Go to the Caching page:
-
In the section of the page, use the drop-down list to select a particular cache to flush (or select ):
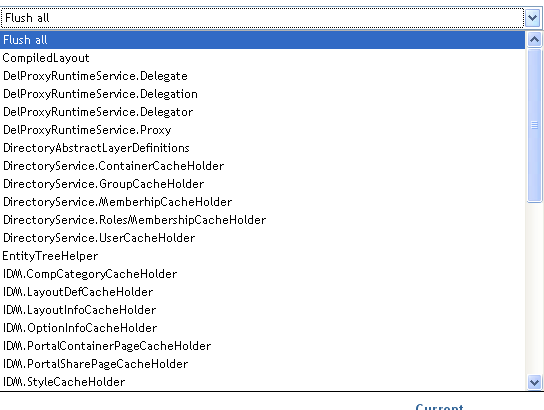
The list of available caches is dynamic; it changes depending on what data is cached at the moment.
-
Click .
Flushing the Directory Abstraction Layer Cache
The User Application’s directory abstraction layer also has a cache. The DirectoryAbstractLayerDefinitions cache stores abstraction layer definitions on the application server to optimize performance for all data model operations.
In a typical situation, the User Application automatically keeps the DirectoryAbstractLayerDefinitions cache synchronized with the abstraction layer definitions stored in the Identity Vault. But, if necessary, you can manually flush the DirectoryAbstractLayerDefinitions cache as described in Flushing caches to force the latest definitions to be loaded from the Identity Vault.
For more information on the User Application’s directory abstraction layer, see the Identity Manager User Application: Design Guide.
Flushing Caches in a Cluster
Cache flushing is supported in both clustered and non-clustered application server environments. If your application server is part of a cluster and you manually flush a cache, that cache is automatically flushed on every server in the cluster.
Configuring Cache Settings
You can use the Caching page to display and change cache configuration settings for a clustered or non-clustered application server environment. Your changes are saved immediately, but they don’t take effect until the next User Application restart.
HINT:To restart the User Application, you can reboot the application server; redeploy the application (if the WAR has been changed in some way); or force the application to restart (as described in your application server’s documentation).
How Caching Is Implemented
In the Identity Manager User Application, caching is implemented via JBoss Cache. JBoss Cache is an open source caching architecture that’s included with the JBoss Application Server but also runs on other application servers.
How Cache Settings Are Stored
Two levels of settings are available for controlling cache configuration: global, and local. Use these settings to customize the caching behavior of the Identity Manager User Application. Table 5-1 describes the cache configuration settings.
Table 5-1 Cache Configuration Settings
|
Level |
Description |
|---|---|
|
Global settings |
Global settings are stored in a central location (the Identity Vault) so that multiple application servers can use the same setting values. For example, someone with a cluster of application servers would typically use global settings for the cluster configuration values. To find the global settings in your Identity Vault, look for the following object under your Identity Manager User Application driver: configuration.AppDefs.AppConfig For example: configuration.AppDefs.AppConfig.MyUserApplicationDriver.MyDriverSet.MyOrg The XmlData attribute of the configuration object contains the global settings data. |
|
Local setting |
Local settings are stored separately on each application server so that an individual server can override the value of one or more global settings. For example, you might want to specify a local setting to remove an application server from the cluster specified in the global settings, or to reassign a server to a different cluster. To find the local settings on your JBoss application server, look for the following file under your JBoss server configuration’s conf directory: sys-configuration-xmldata.xml. For example: jboss/server/IDMProv/conf/sys-configuration-xmldata.xml. To find the local settings on your WebSphere application server, look for the sys-configuration-xmldata.xml file at the location you specified in the extend.local.config.dir property that you set at installation. If your server has local settings, that data is contained in this file. If no local settings have been specified, the file won’t exist. |
You should think of global settings as the default values for every application server that uses a particular instance of the User Application driver. When you change a global setting, you are affecting each of those servers (at the next User Application restart), except for those cases where an individual server specifies a local override.
How Cache Settings Are Displayed
The Caching page displays the current cache settings (from the latest User Application restart). It also displays the corresponding global and local values of those settings, and lets you change them (for use at the next User Application restart).
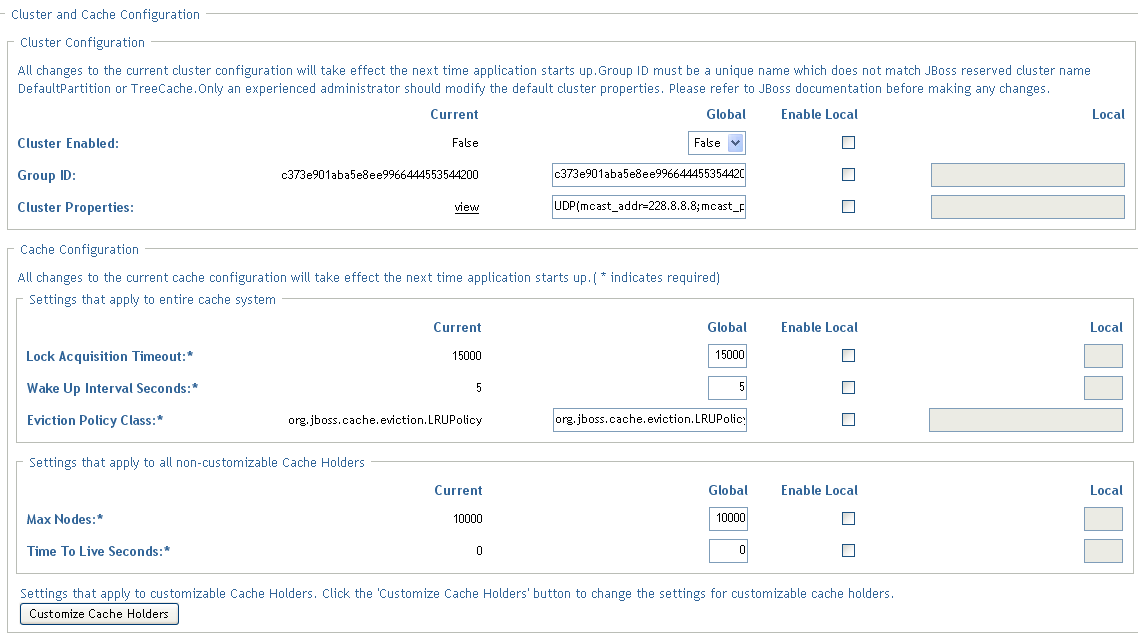
The global settings always have values. The local settings are optional.
Basic Cache Settings
These cache settings apply to both clustered and non-clustered application servers.
To configure basic cache settings:
-
Go to the Caching page.
-
In the section of the page, specify global or local values for the following settings, as appropriate:
Setting
What to do
t
Specify the time interval (in milliseconds) that the cache waits for a lock to be acquired on an object. You might want to increase this setting if the User Application gets a lot of lock timeout exceptions in the application log. The default is 15000 ms.
Specify the time interval (in seconds) that the cache eviction policy waits before waking up to do the following:
-
Process the evicted node events
-
Clean up the size limit and age-out nodes
Specify the classname for the cache eviction policy that you want to use. The default is the LRU eviction policy that JBoss Cache provides:
org.jboss.cache.eviction.LRUPolicy
If appropriate, you can change this to another eviction policy that JBoss Cache supports.
Specify the maximum number of nodes allowed in the cache. For no limit, specify:
0
You can customize this setting for some cache holders. See Customizable Cache Holders.
Specify the time to idle (in seconds) before the node is swept away. For no limit, specify:
0
You can customize this setting for some cache holders. See Customizable Cache Holders.
Specifies the number of seconds an entry should be allowed to stay in the cache holder since its creation time. For no time limit, specify:
0
This setting is only available for Customizable Cache Holders.
These settings are required, which means that there must be a global value for each, and optionally a local value too.
If you want to override the global value of a setting with a local value, select the check box for that setting. Then specify the local value. (Make sure that all of your local values are valid. Otherwise, you won’t be able to save your changes.)
NOTE:For those settings where is deselected, any existing local values are deleted when you save.
-
-
Click .
-
When you’re ready for your saved settings to take effect, restart the User Application on the applicable application servers.
Customizable Cache Holders
You can customize the , , and settings for some cache holders. The cache holders are listed in Table 5-2.
Table 5-2 Customizable Cache Holders
|
Cache Holder Name |
Description |
|---|---|
|
DirectoryAbstractionLayerDefinitions |
Caches the Directory Abstraction Layer definitions to optimize performance for all data model operations. See Flushing the Directory Abstraction Layer Cache. |
|
DirectoryService.ContainerCacheHolder |
Caches containers in the directory layer. Containers are shared by many users and groups, and reading them from the directory layer involves both network communication (with the LDAP server) and object creation. By default, the cache is limited to 50 containers, and the LRUs have a default Time To Live (TTL) of 10 minutes. Depending on the directory topography in your enterprise, you might need to adjust the maximum number of nodes or the TTL if you find the performance is suffering because of queries to the LDAP server for container objects. Making settings too high in combination with a large number of usable containers can cause unneeded memory consumption and net lower performance from the server. |
|
DirectoryService.DelProxyRuntimeServiceDelegate |
Caches delegate assignments. |
|
DirectoryService.DelProxyRuntimeService.Delegation |
Caches user availability settings. |
|
DirectoryService.DelProxyRuntimeService.Delegator |
Caches the delegator entities. |
|
DirectoryService.DelProxyRuntimeService.Proxy |
Caches proxy assignments. |
|
DirectoryService.GroupCacheHolder |
Caches groups in the directory layer. Groups are often shared by many users, and reading them from the directory layer involves both network communication (with LDAP server) and object creation. By default, the cache is limited to 500 groups, and the LRUs have a default TTL of 10 minutes. Depending on the user/group topography in your enterprise, you might need to adjust the maximum number of nodes or the TTL if you find the performance is suffering because of queries to the LDAP server for groups objects. Settings that are too high, in combination with a large number of usable groups, can cause unneeded memory consumption, and net lower performance from the server. |
|
DirectoryService.MemberhipCacheHolder |
Caches the relationship between a user and a set of groups. Querying the set of groups a user belongs to can be a network and CPU intensive operation on the LDAP server, especially if dynamic groups are enabled. For this reason, relationships are cached with an expiration interval so that changes in the criteria for inclusion/exclusion in a group (such as time-based dynamic groups) are reflected. The default Max Age is five minutes. However, if you use dynamic groups which have a requirement for finer grained time control, then you can adjust the Max Age on this cache holder to be just below the minimum time your finest grained time based dynamic group requires. The lower this value is, the more times the user's groups are queried during a session. Setting a value too high keeps the user/group relationships in memory perhaps longer than the user's session needlessly consuming memory. |
|
DirectoryService.RolesMembershipCacheHolder |
Caches the application role membership list by role. |
|
DirectoryService.TeamManagerRuntime.Team |
Caches the application team instances and team provisioning requests. |
|
DirectoryService.UserCacheHolder |
Caches users in the directory layer. Reading users from the directory layer involves both network communication (with LDAP server) and object creation. By default, the cache is limited to 1000 users, and the LRUs have a default TTL of 10 minutes. Depending on the user topography in your enterprise, you might need to adjust the maximum number of nodes or the TTL if you find the performance is suffering because of queries to the LDAP server for user objects. Making settings too high combined with a large number of different users logging in can cause unneeded memory consumption, and net lower performance from the server. |
|
GlobalCacheHolder |
The general purpose cache holder. This configuration applies to all caches that are not customizable (that is, all cache holders not listed in this table.) |
|
JUICE |
Caches the resource bundles used by the user interface controls and DN display expression lookup results. Changing the setting of the cache holder has a performance impact for the DN display expression lookups because they are frequently used in the User Application. The low value should be at least 300 seconds, but a higher value than 900 seconds is ok. A lower value should be used if the customer is frequently changing the attributes that are used in the DN display expression |
|
RoleManager.RolesCacheHolder |
Caches user role memberships listed by user. |
|
Workflow.Model.Process |
Caches the provisioning process XML object structure. |
|
Workflow.Model.Request |
Caches the provisioning request XML object structure. |
|
Workflow.Provisioning |
Caches provisioning request instances that have not completed. The default maximum capacity for the LRU cache is 500. The capacity can be modified by clicking the and choosing the Engine and Cluster settings. The Process Cache Maximum Capacity appears on this page. This cache reduces the memory footprint for workflow processing without compromising performance. |
Cache Settings for Clusters
This section discusses how to configure caching when you run the Identity Manager User Application across a cluster of application servers.
In the Identity Manager User Application, cluster support for caching is implemented via JGroups. JGroups is an open-source clustering architecture that’s included with the JBoss Application Server but also runs on other application servers.
The User Application’s cluster consists of nodes on a network that run JGroups and use a common Group ID. By default, the Group ID provided for the User Application’s cluster is a UUID that looks like this:
c373e901aba5e8ee9966444553544200
The UUID helps ensure uniqueness, so that the Group ID of the User Application’s cluster doesn’t conflict with the Group IDs of other clusters in your environment. For instance, the JBoss Application Server itself uses several JGroups clusters and reserves associated names including the Group IDs DefaultPartition and Tomcat-Cluster for them.
How Caching Works with a Cluster
When you start the User Application, the application’s cluster configuration settings on the page determine whether to participate in a cluster and invalidates cache changes in the other nodes in that cluster. If clustering is enabled, the User Application accomplishes this by sending cache entry invalidation messages to each node as changes occur.
Preparing to Use a Cluster
To use caching across a cluster:
-
Set up your JGroups cluster. This involves using the User Application installation program to install the Identity Manager User Application to each application server in the cluster (see Section 2.8, Clustering).
-
Enable the use of that cluster in the User Application’s cache configuration settings
Configuring Cache Settings for Clusters
After you have a cluster ready to use, you can specify settings for the support of caching across that cluster.
-
Go to the Caching page.
-
In the section of the page, specify global or local values for the following settings, as appropriate:
Setting
What to do
Select to invalidate cache changes to the other nodes in the cluster specified by Group ID. If you don’t want to participate in a cluster, select .
Specify the Group ID of the JGroups cluster in which you want to participate. There’s no need to change the default Group ID that’s provided for the User Application’s cluster, unless you want to use a different cluster.
The Group ID must be unique and must not match any of the known JBoss cluster names such as DefaultPartition and Tomcat-Cluster.
HINT:To see the Group ID in logging messages, make sure that the level of the caching log (com.sssw.fw.cachemgr) is set to Info or higher.
Specify the JGroups protocol stack for the cluster specified by Group ID. This setting is for experienced administrators who might need to adjust the cluster properties. Otherwise, you should not change the default protocol stack.
To see the current cluster properties, click .
For details on the JGroups protocol stack, go to www.jboss.org/wiki/Wiki.jsp?page=JGroups.
If you want to override the global value of a setting with a local value, select the check box for that setting. Then specify the local value.
For those settings where is unselected, any existing local values are deleted when you save.
Make sure that all nodes in your cluster specify the same Group ID and Cluster Properties. To see these settings for a particular node, you must access the Identity Manager user interface running on that node—by browsing to the URL of the user interface on that server—and then display the Caching page there.
If you need to use the TCP protocol instead of the default UDP protocol, see Specifying the User Application Cluster Group Caching Configuration.
-
Click .
-
When you’re ready for your saved settings to take effect, restart the User Application on the applicable application servers.
Configuring User Application Caching to use TCP
You can configure caching for the User Application to use TCP. The configuration process must be completed on each server in the cluster because the Local Settings are saved on the file system for each server.
To configure User Application caching to use TCP:
-
Log in as the User Application Administrator and go toAdministration->Application Configuration->Caching.
-
Enable the checkbox in the row and set Local=TRUE. And for each of the individual properties in the following steps enable the checkbox for that property and specify a value in the textfield in the column. The Local value for the property will then override the Global value.
-
Copy this string and paste it in to the field. It is very important to paste as a single string with no carriage returns embedded:
TCP(bind_addr=164.99.208.68;start_port=7815;loopback=true):TCPPING(initial_hosts=164.99.208.68[7815],164.99.208.36[7815];port_range=3;timeout=3500;num_initial_members=3;up_thread=true;down_thread=true):MERGE2(min_interval=5000;max_interval=10000):FD(shun=true;timeout=2500;max_tries=5;up_thread=true;down_thread=true):VERIFY_SUSPECT(timeout=1500;down_thread=false;up_thread=false):pbcast.NAKACK(down_thread=true;up_thread=true;gc_lag=100;retransmit_timeout=3000):pbcast.STABLE(desired_avg_gossip=20000;down_thread=false;up_thread=false):pbcast.GMS(join_timeout=5000;join_retry_timeout=2000;shun=false;print_local_addr=true;down_thread=true;up_thread=true):pbcast.STATE_TRANSFER(up_thread=true;down_thread=true)
The properties in this string are defined by JBoss. Refer to JBoss documentation for more information.
-
Set bind_addr to the local host IP address of the server you are logged into.
-
Next you need to set the start_port. This value must take into account ports already in use as well as the value for port_range in order to avoid port conflicts. Depending on your configuration you may need to troubleshoot to find an unused port.
-
Change the IP addresses for TCPPING to include the IP addresses of all the nodes in the cluster and their start_port values. The list should begin with the local IP address.
-
Save changes. These changes are written to the local file system for your server. Remember to make these changes for all servers in the cluster. Any server that does not have these changes will use the Global Settings values.
-
Restart the server.
5.1.2 Driver Status
You can use the Driver Status pane to determine the expiration status of your driver.
Figure 5-1 Sample Driver Status
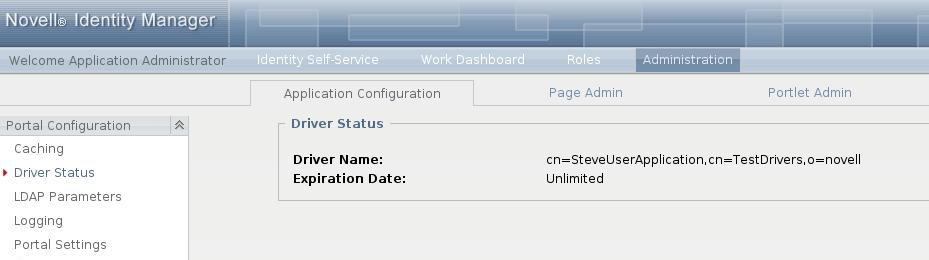
The Driver Status pane displays the following two entries:
-
Driver Name
-
Expiration Date
The Expiration Date displays one of the following values:
-
Unlimited (if the activation has occurred)
-
Expiration date of the driver (if the driver is a trial driver)
-
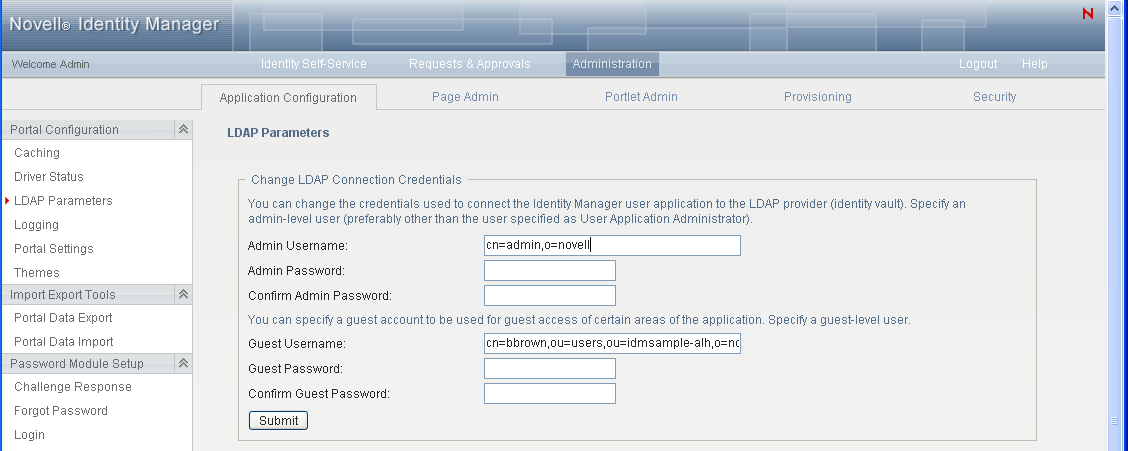
5.1.3 Identity Vault Settings
You can use the Identity Vault Settings pane to:
-
Change the credentials used by the Identity Manager User Application when connecting to the Identity Vault (LDAP provider)
-
Change the credentials for the guest account, if your system is configured to use a specific guest account, rather than LDAP anonymous account.
-
View other LDAP properties of the Identity Manager User Application. The values of these settings are determined when you install the User Application.
The user interface displays different fields depending on how you configured the guest account during installation. If you specified a guest account, the user interface includes fields that let you update the credentials for that account. If you have configured your system to use the LDAP Public Anonymous account, the user interface displays this message: The application is configured to use public anonymous account. To use a specific guest account, enable the guest account using the ldap configuration tool.
To administer Identity Vault settings:
-
On the Application Configuration page, select from the navigation menu on the left.
The Identity Vault Settings panel displays:
-
Examine and modify the settings, as appropriate. For details, see:LDAP Settings You Can Change.
-
If you make changes that you want to apply, click .
LDAP Settings You Can Change
On the Identity Vault Connection Settings panel, you can modify settings for the credentials for:
-
The Identity Manager User Application whenever it connects to the Identity Vault (LDAP provider).
-
The guest account (if configured).
The initial values for the credentials are specified during installation. These installation values are written to the sys-configuration-xmldata file. If you make changes to these credentials via the Administration tab, your changes are saved to the User Application’s database; they are not saved to the sys-configuration-xmldata file. After values are written to the database, the User Application no longer checks the values written to the sys-configuration-xmldata file. This means that you cannot use the configupdate utility to change the credentials because they are ignored. However, you can use configupdate to change the type of guest user (LDAP Guest or Public Anonymous Account).
Table 5-3 LDAP Parameters
|
Setting |
What to do |
|---|---|
|
Identity Vault Administrator |
Type the name of a user who has full administrator rights in the Identity Vault. The Identity Manager User Application needs to access the Identity Vault as an administrator in order to function. It is typical to specify the Identity Vault’s root administrator as the LDAP connection username. The root administrator has full control over the tree, so you need not assign any special trustee rights. For example: cn=admin,o=myorg If you specify some other user, you need to assign inheritable trustee rights to the properties [All Attributes Rights] and [Entry Rights] on your User Application driver. NOTE:To avoid confusion, it is recommended that you do not specify the User Application’s User Application Administrator as the LDAP connection username. It is best to use separate accounts for these two different purposes. |
|
Identity Vault Administrator Password and Confirm Identity Vault Administrator Password |
Type the password that is currently set for that username in the Identity Vault. |
|
Guest Username |
Type the guest user’s distinguished name |
|
Confirm Guest Password |
Type the password for the guest user. |
If TLS is enabled for your LDAP server, you might encounter the following error when you update the Admin username and password: Unable to authenticate to LDAP Provider. Disable this error by disabling TLS via iManager.
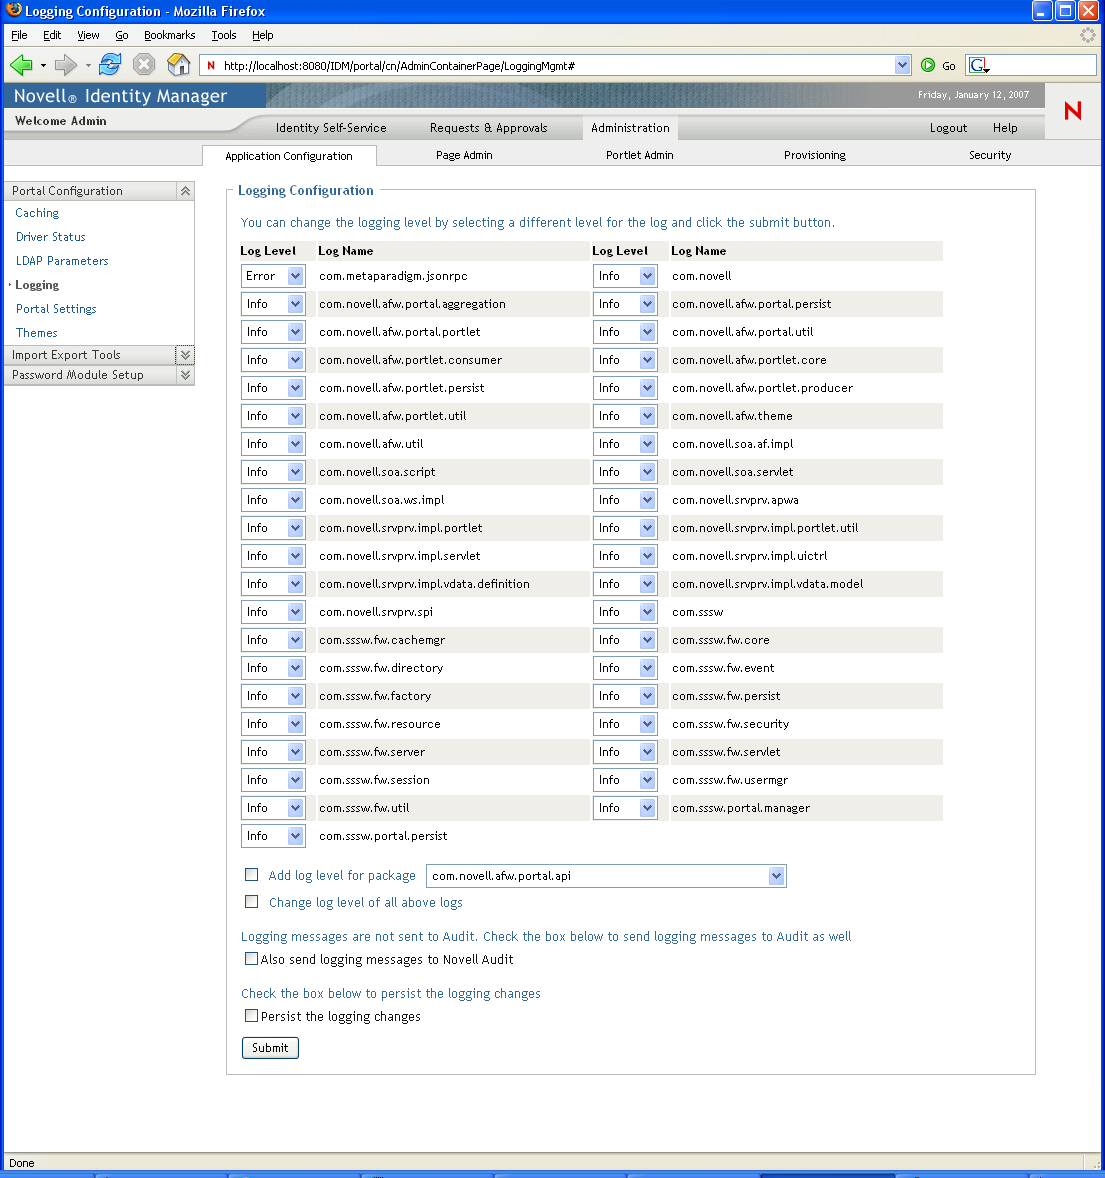
5.1.4 Logging Configuration
You can use the Logging page to control the levels of logging messages you want the Identity Manager User Application to generate and specify whether those messages are sent to Novell Identity Audit.
The Identity Manager User Application implements logging by using a custom-developed logging framework that integrates with log4j, an open-source logging package distributed by The Apache Software Foundation. By default, event messages are logged to both of the following:
-
The system console of the application server where the Identity Manager User Application is deployed
-
A log file on that application server. For example:
jboss/server/IDMProv/log/server.log
This is a rolling log file; after it reaches a certain size, it rolls over to another file. If you have configured your environment to include Novell Identity Audit, you have the option of logging event messages there as well. For details on configuring your logging environment and Novell Identity Audit, see Section 3.0, Setting Up Logging.
About the Logs
The Logging page lists a variety of logs, each outputting event messages from a different part of the Identity Manager User Application. Each log has its own independent output level.
The log names are based on log4j conventions. You’ll see these log names in the event messages that are generated, indicating the context of the message output.
Table 5-4 lists and describes the logs.
Table 5-4 Identity Manager User Application Logs
|
Log Name |
Description |
|---|---|
|
com.novell |
Parent of other Identity Manager User Application logs |
|
com.novell.afw.portal.aggregation |
Messages related to portal page processing |
|
com.novell.afw.portal.persist |
Messages related to the persistence of portal data (including portal pages and portlet registrations) |
|
com.novell.afw.portal.portlet |
Messages from the portal core portlets and accessory portlets |
|
com.novell.afw.portal.util |
Messages from the portal import/export and navigation portlets |
|
com.novell.afw.portlet.consumer |
Messages related to portlet rendering |
|
com.novell.afw.portlet.core |
Messages related to the core portlet API |
|
com.novell.afw.portlet.persist |
Messages related to the persistence of portlet data (including portlet preferences and setting values) |
|
com.novell.afw.portlet.producer |
Messages related to the registration and configuration of portlets within the portal |
|
com.novell.afw.portlet.util |
Messages related to utility code used by portlets |
|
com.novell.afw.theme |
Messages from the theme subsystem |
|
com.novell.afw.util |
Messages related to portal utility classes |
|
com.novell.soa.af.impl |
Messages from the approval flow (provisioning workflow) subsystem |
|
com.novell.srvprv.apwa |
Messages from the Web application (actions and tags) |
|
com.novell.srvprv.impl.portlet.core |
Messages from the core identity portlets and password portlets |
|
com.novell.srvprv.impl.portlet.util |
Messages from the identity-related utility portlets |
|
com.novell.srvprv.impl.servlet |
Messages from the UI control framework’s ajax servlet and ajax services |
|
com.novell.srvprv.impl.uictrl |
Messages from the UI control registry API and approval form rendering |
|
com.novell.srvprv.impl.vdata |
Messages from the directory abstraction layer |
|
com.novell.srvprv.spi |
Messages from the UI control registry API |
|
com.sssw.fw.cachemgr |
Messages related to the framework cache subsystem |
|
com.sssw.fw.core |
Messages related to the framework core subsystem |
|
com.sssw.fw.directory |
Messages related to the framework directory subsystem |
|
com.sssw.fw.event |
Messages related to the framework event subsystem |
|
com.sssw.fw.factory |
Messages related to the framework factory subsystem |
|
com.sssw.fw.persist |
Messages related to the framework persistence subsystem |
|
com.sssw.fw.resource |
Messages related to the framework resource subsystem |
|
com.sssw.fw.security |
Messages related to the framework security subsystem |
|
com.sssw.fw.server |
Messages related to the framework server subsystem |
|
com.sssw.fw.servlet |
Messages related to the framework servlet subsystem |
|
com.sssw.fw.session |
Messages related to the framework session subsystem |
|
com.sssw.fw.usermgr |
Messages related to the framework user subsystem |
|
com.sssw.fw.util |
Messages related to the framework utility subsystem |
|
com.sssw.portal.manager |
Messages related to the Portal Manager |
|
com.sssw.portal.persist |
Messages related to portal persistence |
The User Application logs are hierarchical. For example, com.novell is the parent of other logs underneath it. Any additional logs inherit its properties.
Changing Log Levels
You can control the amount of information that is written to a particular log by changing the level that is set for it. By default, all logs are set to Info, which is an intermediate level.
-
Go to the Logging page:
-
At the top of the page, find a log whose level you want to change.
-
Use the drop-down list to select one of the following levels:
Level
Description
Fatal
The least detail. Writes fatal errors to the log.
Error
Writes errors (plus all of the above) to the log.
Warn
Writes warnings (plus all of the above) to the log.
Info
Writes informational messages (plus all of the above) to the log.
Debug
Writes debugging information (plus all of the above) to the log.
Trace
The most detail. Writes tracing information (plus all of the above) to the log.
-
Click .
You can change the log level for all of the logs to one setting by selecting of all above logs and using the drop-down list to select the level.
Adding Logs for Other Packages
You can add logs for other packages used by the User Application.
-
Go to the Logging page:
-
At the bottom of the page, select , then use the drop-down list to select the package.
-
Choose a log level from the drop-down, then click .
Sending Log Messages to an Auditing Service
You can use the Logging page to control whether the Identity Manager User Application sends event message output to an auditing service. Logging is off by default, unless you turn it on when installing the User Application.
To toggle logging on/off:
-
Go to the Logging page.
-
Select or deselect the following settings, as appropriate:
-
-
Click .
Persisting Your Log Settings
By default, changes you make on the Logging page stay in effect until the next application-server restart or User Application redeployment. After that, the log settings revert to their default values.
However, the Logging page does offer you the option of persisting your changes to its settings. If you turn on this feature, values for the log settings are stored in a logging configuration file on the application server where the Identity Manager User Application is deployed. For example:
-
On JBoss, this file is in the following location by default:
jboss/server/IDMProv/conf/idmuserapp_logging.xml
-
On WebSphere, the location of this file is specified according to the custom property named idmuserapp.logging.config.dir.
To toggle persistence of settings on or off:
-
Go to the Logging page.
-
Select or deselect the following setting, as appropriate:
-
Click .
5.1.5 Portal Settings
You can use the Portal page to view characteristics of the Identity Manager User Application.The settings are for informational purposes and cannot be changed.The values of these settings are set in the User Application WAR. ( reflects your current theme choice from the Themes page.)
5.1.6 Single Sign-On (SSO) Configuration
The section within the tab now provides a left navigation choice that allows administrators to configure the User Application to support single sign-on. The page looks like this:
Figure 5-2 Single Sign On (SSO) Page
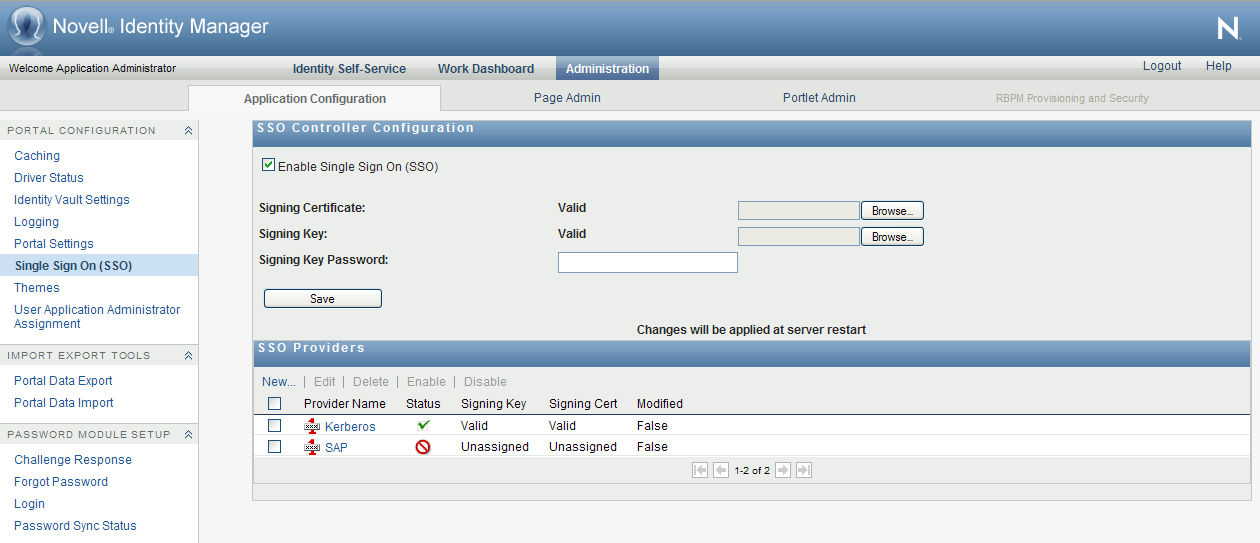
You must be a User Application Administrator to access this page.
This section provides details on SSO configuration. Topics include:
About SSO Configuration
RBPM includes an enhanced SSO architecture that provides an easy way to integrate single sign-on functionality into the User Application. This architecture works with a variety of system environments and is very secure.
The architecture for single sign-on consists of the following key components:
-
SSO Providers
-
SSO Controller
Each SSO Provider handles a specific SSO user scenario. The SSO Provider recognizes the login identity, then transfers the information to the SSO Controller. The SSO Controller then verifies the information and converts the login identity to an eDirectory identity. Next, it issues a SAML authentication token and passes it to the login module to finish the login process.
NOTE:After you configure and enable single sign-on in your environment, users can no longer access the User Application as a guest or anonymous user. Users are instead prompted to log into the user interface.
The SSO Providers and the SSO Controller are loosely coupled. They communicate through an HTTP header that is digitally signed.
The Roles Based Provisioning Module ships with Kerberos and SAP SSO Providers. However, you can also implement your own custom SSO Provider to suit the requirements of your organization.
The SSO Providers are stackable, which means that you can enable multiple providers at the same time for a single User Application.
Preparing for Single Sign-On
This section provides general setup procedures that must be performed to prepare your environment for single sign-on. These procedures are required for all single sign-on environments, including Kerberos and SAP configurations. Topics include:
Creating the Certificates
The single sign-on environment requires that you have a set of certificates and private keys. A minimum of one set of certificates and private keys is necessary. For a more secure environment, there should be one set for each SSO Provider being used, in addition to the set for the SSO Controller.
Currently SSO configuration only supports X509 PEM format for a X509 certificate and PKCS8 DER format for a private key. To generate key pairs, you can use openSSL:
openssl req -newkey rsa:1024 -x509 -keyout name.key -out name.cert -days expiration
For example:
openssl req -newkey rsa:1024 -x509 -keyout rbpm.key -out rbpm.cert -days 365
NOTE:The openSSL tool is acceptable for test environments. However, for production environments, you should use a Truster Signer, such as Verisign.
When asked for a password phrase, provide a phrase, such as novell.This generates the key pair and self-signed certificate: rbpm.key is the DES encrypted raw RSA private key. rbpm.cert is the PEM format X509 certificate.
Now, perform the following command to convert private key file to PKCS8 with encryption (you will be prompted to enter a password):
openssl pkcs8 -in name.key -topk8 -out name.pkcs8 -outform DER
For example:
openssl pkcs8 -in rbpm.key -topk8 -out rbpm.pkcs8 -outform DER
Now you have two files: rbpm.pkcs8 and rbpm.cert that you can use in the next steps. rbpm.cert needs to be imported to eDirectory as well (see eDirectory preparation).
Configuring eDirectory
SAML and NMAS methods must be installed to the eDirectory Server that the User Application is configured to use. Currently, Novell provides SAML methods for the following 32 bit operating systems:
-
Windows
-
Linux
In addition, 64-bit SAML methods are available for Windows and Linux.
The SAML methods are included with the Roles Based Provisioning Module and with Access Manager.
To install the SAML and NMAS authentication methods on eDirectory:
-
Unzip nmassaml.zip (in the /products/RBPM/SAML directory).
-
Install the SAML and NMAS methods into your eDirectory tree:
-
Extend the schema stored in authsaml.sch. Refer to
Post-Installation Tasks,
in the Identity Manager Roles Based Provisioning Module 4.0.2 User Application: Installation Guide, for more information. If eDirectory is installed on Linux, you can use the following command to extend the schema:ndssch -h edir_ip edir_admin authsaml.sch
-
Install the methods. Refer to “How to Install NMAS Method” , in the Novell Modular Authentication Services Administration Guide, for more information. If eDirectory is installed on Linux, you can use the following command to install the methods:
nmasinst -addmethod edir_admin tree ./config.txt
-
To create the Trusted Root Container:
-
In iManager, select > > .
-
Enter a for the Trusted Root Container (for example, RBPMTrustedRootContainer).
-
For the , press the button and select the Security Container.
-
Press .
-
Press .
To create a Trusted Root for the certificate that your affiliate will use to sign assertions:
-
In iManager, select > > .
-
Enter a for the Trusted Root (for example, RBPMTrustedRoot).
-
For the , press the button and select the Trusted Root Container you created earlier.
-
For the , press the button and select the certificate that will be used for the SSO Controller.
-
Click , then click .
To create the SAML Authorization Object:
-
In iManager, select > > .
-
Select the checkbox for .
-
Scroll down and select .
-
Press .
-
Enter a for the authsamlAffiliate (for example, RBPMSAML).
-
For the , press the button and follow these steps:
-
Select the down arrow next to .
-
Select the down arrow next to .
-
Select .
-
-
Press .
-
Press .
-
Under :
-
Select and press the left arrow.
-
Enter the following attribute:
rbpm.idm.novell.com
NOTE:This attribute is used to match an assertion with its affiliate. The contents of this attribute must be an exact match with the attribute in assertions sent by this affiliate. It must be rbpm.idm.novell.com for RBPM.
-
Click .
-
Select and press the left arrow.
-
Enter an appropriate amount of time in seconds. The and attributes define a window of time around the in an assertion in which the assertion will be considered valid.
-
Click .
-
Select and press the left arrow.
-
Enter an appropriate amount of time in seconds.
-
Click .
-
Select and press the left arrow.
-
Press the button and select the Trusted Root Container created earlier. This attribute is used to verify the certificate chain of the signing certificate.
-
Click .
-
Select and press the left arrow.
-
Press the button and select the Trusted Root created earlier. This will be located inside of the Trusted Root Container that was created earlier. All assertions for the affiliate must be signed by certificates pointed to by this attribute, or they will be rejected.
-
Click , then click again.
-
-
Press .
-
Click .
-
Restart eDirectory.
Configuring the SSO Controller
This section provides instructions on configuring the SSO controller. To configure the controller, you use the page on the tab of the User Application.
To configure the SSO Controller:
-
Login to the User Application as a User Application Administrator.
-
On the tab, select the tab.
-
Select from the left navigation menu.
-
Select .
-
Browse to the file used to create the Trusted Root in eDirectory and upload it to the User Application.
-
Browse to the file that was created with the certificate above and upload it to the User Application.
NOTE:The signing key should be a PKCS8 format key.
-
Type the .
-
Click .
-
Restart the application server.
Configuring a Kerberos Provider
This section provides instructions on preparing and configuring a Kerberos provider.
IMPORTANT:The Active Directory domain name and computer name should be configured in upper case. In addition, keytab and krb5.conf must use all upper case for the Active Directory Domain and fully-qualified-name-AD-Server. If lower case names are used, the RBPM SSO configuration will fail.
Preparing to Use Microsoft Active Directory Kerberos
To prepare the Key Distribution Center (KDC):
-
Prepare RBPM's Service Principal Name (SPN) and Keytab:
-
Create a user account for RBPM in a Microsoft Active Directory.
On the Microsoft Active Directory server, click >>>. Then click >, specifying any name, such as rbpm. Provide a password you will remember. This account should only be used for the Roles Based Provisioning Module.Select and . Do not select .
-
Map the user account to SPN.
setspn -A HTTP/dns-name-for-UA userID
For example:
setspn -A HTTP/myRBPM.novell.com rbpm
Type setspn -L userID to confirm the mapping. For example:
setspn -L rbpm
-
Create key tab for SPN.
If Active Directory is installed on Windows 2008, execute this command:
ktpass -out keytab-name.keytab -princ HTTP/dns-name-for-UA@WINDOWS-DOMAIN -mapUser userid -mapOp set -pass password -crypto All -pType KRB5_NT_PRINCIPAL
For example:
ktpass -out rbpm.keytab -princ HTTP/rbpm.novell.com@MYDOMAIN.NOVELL.COM -mapUser rbpm -mapOp set -pass N0v3ll -crypto All -pType KRB5_NT_PRINCIPAL
NOTE:The encryption types and algorithms you can specify for Windows 2008 depend upon the domain functional level at which the domain is set, as well as domain-specific configurations.
If Active Directory is installed on Windows 2003, execute this command:
ktpass -out keytab-name.keytab -princ HTTP/dns-name-for-UA@WINDOWS-DOMAIN -mapUser userid -mapOp set -pass password -pType KRB5_NT_PRINCIPAL
For example:
ktpass -out rbpm.keytab -princ HTTP/rbpm.novell.com@MYDOMAIN.NOVELL.COM -mapUser rbpm -mapOp set -pass N0v3ll -pType KRB5_NT_PRINCIPAL
Note that for Windows 2003, by not specifying a crypto algorithm, you are defaulting the algorithm to RC4-HMAC.
-
-
Prepare end user accounts for SSO.
The end user account name has to match some attribute value of an eDirectory user in order to support single sign-on.
Create an end user in Active Directory, as follows:
-
On a Microsoft Active Directory server, click >>>. Then click >, specifying the user name, such as cnano. Provide a password you will remember.Do not select .
-
To prepare the Application Server environment:
-
Define the OS settings for the Kerberos configuration.
Open and edit the krb5 file to include the following information:
[libdefaults]
    default_realm = WINDOWS-DOMAIN
    kdc_timesync = 0
    forwardable = true
    proxiable = false
[realms]
    WINDOWS-DOMAIN = {
        kdc = fully-qualified-name-AD-Server
  admin_server = fully-qualified-name-AD-Server
    }
[domain_realm]
    .your.domain = WINDOWS-DOMAIN
    your.domain = WINDOWS-DOMAIN
For example:
[libdefaults]
    default_realm = MYDOMAIN.NOVELL.COM
    kdc_timesync = 0
    forwardable = true
    proxiable = false
[realms]
    MYDOMAIN.NOVELL.COM = {
        kdc = myadserver.cam.novell.com
  admin_server = myadserver.cam.novell.com
    }
[domain_realm]
    .novell.com = MYDOMAIN.NOVELL.COM
    novell.com = MYDOMAIN.NOVELL.COM
The krb5 file is located in one of the following directories:
-
Linux: /etc/krb5.conf
-
Windows: c:\Windows\krb5.ini
-
Unix: /etc/krb5/krb5.conf
-
-
Define the Web Container settings (JBoss):
-
Copy the keytab from Active Directory.
Copy myRBPM.keytab from myadserver.cam.novell.com to myRBPM.
-
Edit login-config.xml.
Open and add the following fragment to jboss/server/context/conf/login-config.xml:
<application-policy name = "com.sun.security.jgss.krb5.accept">
      <authentication>
          <login-module code = "com.novell.common.auth.sso.KerberosCredentialLoginModule" flag = "required" />
          <login-module code = "com.sun.security.auth.module.Krb5LoginModule" flag = "required">
              <module-option name = "debug">false</module-option>
              <module-option name = "kdc">fully-qualified-name-AD-Server</module-option>
              <module-option name = "realm">WINDOWS-DOMAIN</module-option>
              <module-option name = "useKeyTab">true</module-option>
              <module-option name = "keyTab">path-to-keytab</module-option>
              <module-option name = "storeKey">true</module-option>
              <module-option name = "useFirstPass">true</module-option>
              <module-option name = "principal">HTTP/dns-name-for-UA</module-option>
              <module-option name = "noPrompt">true</module-option>
          </login-module>
      </authentication>
  </application-policy>
For example:
<application-policy name = "com.sun.security.jgss.krb5.accept">
      <authentication>
          <login-module code = "com.novell.common.auth.sso.KerberosCredentialLoginModule" flag = "required" />
          <login-module code = "com.sun.security.auth.module.Krb5LoginModule" flag = "required">
              <module-option name = "debug">false</module-option>
              <module-option name = "kdc">myadserver.cam.novell.com</module-option>
              <module-option name = "realm">MYDOMAIN.NOVELL.COM</module-option>
              <module-option name = "useKeyTab">true</module-option>
              <module-option name = "keyTab">/home/userapp/IDM370/rbpm.keytab</module-option>
              <module-option name = "storeKey">true</module-option>
              <module-option name = "useFirstPass">true</module-option>
              <module-option name = "principal">HTTP/rbpm.novell.com</module-option>
              <module-option name = "noPrompt">true</module-option>
          </login-module>
      </authentication>
  </application-policy>
For WebSphere and WebLogic, a configuration file must be created and a property needs to be set to make the Application Server aware that Kerberos authentication will be used.
Sample Kerberos_login.config for WebSphere Create a Kerberos_login.config file on the WebSphere Application server with the following content:
IBMJGSSRBPM {com.ibm.security.auth.module.Krb5LoginModule required debug=true
credsType=acceptor useKeytab=file:///c:/rbpm.keytab
tryFirstPass=true principal="HTTP/rbpm.novell.com@MYDOMAIN.NOVELL.COM";};
On Windows, use the file as is (remember to provide the exact location of the keytab file).
On Linux, provide the absolute path of the keytab file. For example: /home/user/rbpm.keytab
An entry needs to be added similar to the following in the Generic JVM arguments for Websphere.
-Djava.security.auth.login.config=C:/kerberos_login.config
Sample Kerberos_login.conf for WebLogic Create a Kerberos_login.conf file on the WebLogic Application server with the following content:
com.sun.security.jgss.krb5.accept {
     com.sun.security.auth.module.Krb5LoginModule required
     principal="HTTP/rbpm.novell.com@MYDOMAIN.NOVELL.COM" useKeyTab=true
     keyTab="C:/rbpm.keytab" realm=MYDOMAIN.NOVELL.COM debug=true
kdc=myadserver.cam.novell.com
     storeKey=true;};
On Windows, use this file as is (remember to provide the exact location of the keytab file).
On Linux, provide the absolute path of the keytab file. For example: /home/user/rbpm.keytab
An entry needs to be added similar to the following in the JAVA_OPTS section of setDomainEnv.sh (on Linux) and setDomainEnv.cmd (on Windows):
-Djava.security.auth.login.config=C:/kerberos_login.conf
-
-
Enable the Kerberos SSO Provider, as described in Using the Administration Tab to Configure the Kerberos Provider.
To prepare the end user browser (Internet Explorer 7):
-
Open > > , make sure is enabled.
-
Open > > > , add the dns-name-for-UA (for example, rbpm.novell.com) to the trusted intranet sites list.
To prepare the end user browser (Firefox 3):
-
Type about:config in the address bar.
-
Type network.n in the Filter.
-
Modify to include your domain (for example, .novell.com).
-
Close and restart Firefox.
Preparing to Use MIT Kerberos
To prepare the Key Distribution Center (KDC):
-
Install and configure the MIT KDC software.
Install MIT Kerberos 5 server on a machine that will be used as the KDC, assuming the Kerberos domain is MYDOMAIN.NOVELL.COM and the KDC is myadserver.cam.novell.com.
NOTE:SLES 11 comes with a pre-installed version of MIT Kerberos V5. You can configure it through yast2. Default Domain, Default Realm, and KDC Server Address for basic setup. You'll need to configure the Kerberos Server for the KDC, and the Kerberos client for the client side. After you've enabled these, you still need to follow the steps below. However, this will save you time by removing the need to download and install Kerberos in your environment.
-
In /etc/krb5.conf, make sure you define the domain and mapping correctly:
[libdefaults] default_realm = MYDOMAIN.NOVELL.COM [realms] MYDOMAIN.NOVELL.COM = { kdc = myadserver.cam.novell.com admin_server = myadserver.cam.novell.com } [domain_realm] .novell.com = MYDOMAIN.NOVELL.COM novell.com = MYDOMAIN.NOVELL.COM -
In /usr/local/var/krb5kdc/kdc.conf (or /var/lib/kerberos/krb5kdc/kdc.conf, depending on your OS), make sure you specified the following entries with reasonable values:
max_life = 8h 0m 0s
max_renewable_life = 1d 0h 0m 0s
-
Initialize the database:
kdb5_util create -s
-
Start KDC and Kadmin:
/etc/init.d/krb5kdc start
/etc/init.d/kadmind start
-
-
Prepare the RBPM Service Principal Name and Keytab.
-
Create a principal for RBPM on MIT KDC.
Suppose the User Application will be running on rbpm.novell.com. On the MIT KDC machine, execute the following command to create the service principal and assign it a random key.
kadmin.local
>ank -randkey HTTP/rbpm.novell.com
-
Export the key into a keytab.
ktadd -k /tmp/userapp.keytab HTTP/rbpm.novell.com
-
-
Prepare end user accounts for SSO.
The end user name should be able to map to an eDirectory user (for example, cnano):
kadmin.local
>ank cnano
To prepare the Application Server environment:
-
Define the OS settings for the Kerberos configuration.
Open and edit /etc/krb5.conf to make sure it has the same content as the one on the KDC (see above).
-
Define the Web Container settings (JBoss):
-
Copy the keytab from KDC.
Copy rbpm.keytab from the KDC (for example, myadserver.cam.novell.com) /tmp to the User Application server, securely.
-
Edit login-config.xml.
Open and add the following fragment to JBoss/server/context/conf/login-config.xml:
<application-policy name = "com.sun.security.jgss.krb5.accept">
      <authentication>
          <login-module code = "com.novell.common.auth.sso.KerberosCredentialLoginModule" flag = "required" />
          <login-module code = "com.sun.security.auth.module.Krb5LoginModule" flag = "required">
              <module-option name = "debug">false</module-option>
              <module-option name = "kdc">fully-qualified-name-AD-Server</module-option>
              <module-option name = "realm">WINDOWS-DOMAIN</module-option>
              <module-option name = "useKeyTab">true</module-option>
              <module-option name = "keyTab">path-to-keytab</module-option>
              <module-option name = "storeKey">true</module-option>
              <module-option name = "useFirstPass">true</module-option>
              <module-option name = "principal">HTTP/dns-name-for-UA</module-option>
              <module-option name = "noPrompt">true</module-option>
          </login-module>
      </authentication>
  </application-policy>
For example:
<application-policy name = "com.sun.security.jgss.krb5.accept"> <authentication> <login-module code = "com.novell.common.auth.sso.KerberosCredentialLoginModule" flag = "required" /> <login-module code = "com.sun.security.auth.module.Krb5LoginModule" flag = "required"> <module-option name = "debug">false</module-option> <module-option name = "kdc">myadserver.cam.novell.com</module-option> <module-option name = "realm">MYDOMAIN.NOVELL.COM</module-option> <module-option name = "useKeyTab">true</module-option> <module-option name = "keyTab">/home/userapp/IDM370/rbpm.keytab</module-option> <module-option name = "storeKey">true</module-option> <module-option name = "useFirstPass">true</module-option> <module-option name = "principal">HTTP/rbpm.novell.com</module-option> <module-option name = "noPrompt">true</module-option> </login-module> </authentication> </application-policy>NOTE:For WebSphere and WebLogic, a configuration file must be created and a property needs to be set to make the Application Server aware that Kerberos authentication will be used.
-
-
Enable the Kerberos SSO Provider, as described in Using the Administration Tab to Configure the Kerberos Provider.
To prepare the end user browser (Internet Explorer 7):
-
Initialize the ticket.
Make sure you have same content in /etc/krb5.conf as in the KDC (see above). If your local login is "cnano", do kinit.
Otherwise, do kinit cnano.
-
Prepare Firefox (Firefox 3):
-
Type about:config in the address bar.
-
Type network.n in Filter.
-
Modify to include .novell.com.
-
Close and restart Firefox.
-
Using the Administration Tab to Configure the Kerberos Provider
To configure the Kerberos provider in the Administration tab of the User Application:
-
Select the provider name and click .
The dialog displays.
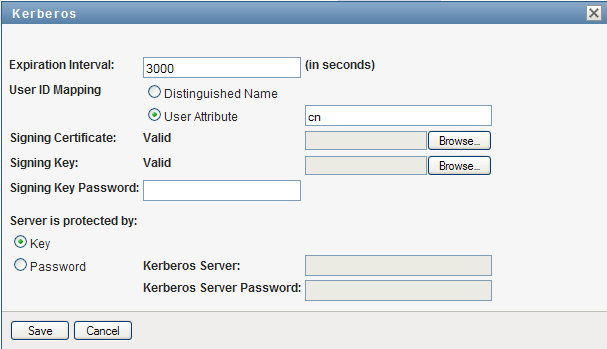
-
In the field, specify the number of seconds that the SSO Header will be kept alive before expiring. This value defines the lifecycle of the SSO Header from the time it is issued. The expiration interval is needed to prevent replay attacks. You need to consider the network latency between your SSO Provider and the SSO Controller, as well as clock synchronization between the two components, if they are deployed on different machines.
-
In the field, indicate whether the user ID will be associated with a user DN or with a user attribute, such as a CN. The maps the user ID in the original realm to the eDirectory realm. If is selected, the SSO UserID that appears in the SSO header has to be the full DN recognized by eDirectory. The SSO Controller will not try to do any user mapping. If is selected, the SSO Controller will try to map the user from UserID to a full user DN. For a particular mapping, if the result is not unique (in other words, a single UserID maps to multiple users in eDirectory), or the result is none, the SSO Controller will refuse the SSO header, and the single sign-on operation will fail.
-
Browse to the file you created earlier (for example, rbpm.cert) and upload it to the User Application.
This file can be the same one used for the SSO Controller, or it can be generated separately for the Kerberos provider. To make your environment more secure, you should use a different certificate than the one used for the SSO Controller.
-
Browse to the file you created earlier (for example, rbpm.pkcs8) and upload it to the User Application.
This file can be the same one used for the SSO Controller, or it can be generated separately for the Kerberos provider. To make your environment more secure, you should use a different key than the one used for the SSO Controller.
-
In the field, specify how the server will be protected by selecting or .
The recommended approach is .
-
Click .
-
Select the checkbox next to Kerberos, and select .
-
Restart the Application Server.
To confirm that the SSO Controller and SSO Provider are enabled, you can look for the following two lines in the server log file:
INFO [com.novell.common.auth.saml.AuthTokenGenerator] (main) SSO Framework is enabled
INFO [com.novell.common.auth.sso.SSOFilter] (main) SSO Filter kerberos is enabled.
On the page, you should also see that the checkbox is selected. In addition, you should see that the SSO Provider has a green check mark in the column.
Testing Single Sign-On with Kerberos
To test the single sign-on feature with Kerberos:
-
Login to the Windows Client Machine (on XP or Vista).
-
Open a browser and access the User Application by using a URL of this format:
http://dns-name-for-UA:port/context/Kerberos
For example:
http://rbpm.novell.com:8080/IDMProv/Kerberos
-
If all of the components have been configured properly, you should see your default page in the User Application.
Configuring an SAP Provider
This section provides instructions on preparing and configuring the SAP provider.
Preparing to Use an SAP Logon Ticket
To configure the domains:
-
Make sure the User Application is in the same domain as the SAP portal. Single sign-on with the SAP logon ticket only works when both are in the same domain.
To configure the SAP logon ticket properties:
-
Follow the instructions on configuring SAP logon provided at Configuring Authentication and Single Sign-On.
The steps below provide a simple example for the NW7 environment:
-
Login to the SAP portal NWA (management) as administrator/passw0rd:
http://w2k3entnw7.novell.com:50000/webdynpro/dispatcher/sap.com/tc~lm~webadmin~mainframe~wd/WebAdminApp
-
Switch from the to the tab. Choose . Expand in right hand pane and choose . Switch from to in section.
-
Page down to row 31 and choose . The section shows up at the bottom.
-
Enable and type . You should understand most of the settings and be able to verify that they are appropriate. Note that the login.ticket_lifetime is using minute as the time unit. This number must be very large.
-
Now change the filter to . Note the item called . It defines the domain level in which the ticket will take effect. For example, if the portal server is A.B.C.com and you set the domain level to 1, then any website under B.C.com will be able to single sign-on. If you set the domain level to 2, then any website under C.com will be able to single sign-on. This is achieved by the attribute.
-
To create a user in the SAP portal:
-
Login to the SAP portal as an administrator.
To be able to single sign-on to the User Application, you must create a portal user who also has an account in eDirectory.
To configure SSO on the User Application:
-
Create the private keys and certificates, if you have not already done so. For details, see Creating the Certificates.
-
Enable the SSO Controller, if you have not already done so. For details, see Configuring the SSO Controller.
-
Enable the SAP SSO Provider, as described in Using the Administration Tab to Configure the SAP Provider.
When you enable the SAP provider, you need to provide the SAP native library path and SAP ticket signing certificate path. You can download the native libraries through your SAP support channel. On the page, select , and then choose . The name of the package is SAPSSOEXT. You will need to unzip the .SAR file by using SAPCAR utility.
You can download the certificate from:
http://w2k3entnw7.novell.com:50000/irj/portal --> system admin --> system configuration --> keystore administration --> download verify.pse
Using the Administration Tab to Configure the SAP Provider
To configure the SAP provider in the tab of the User Application:
-
Select the provider name and click .
The dialog displays.
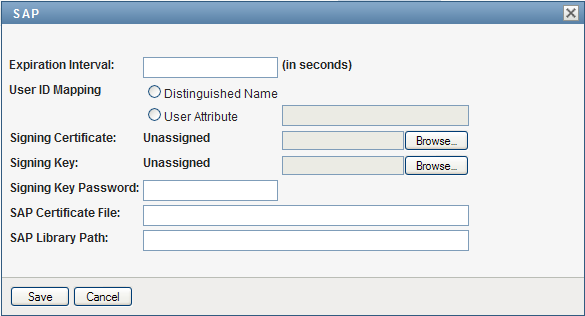
-
In the field, specify the number of seconds that the SSO Header will be kept alive before expiring. This value defines the lifecycle of the SSO Header from the time it is issued. The expiration interval is needed to prevent replay attacks. You need to consider the network latency between your SSO Provider and the SSO Controller, as well as clock synchronization between the two components, if they are deployed on different machines.
-
In the field, indicate whether the user ID will be associated with a user DN or with a user attribute, such as a CN. The maps the user ID in the original realm to the eDirectory realm. If is selected, the SSO UserID that appears in the SSO header has to be the full DN recognized by eDirectory. The SSO Controller will not try to do any user mapping. If is selected, the SSO Controller will try to map the user from UserID to a full user DN. For a particular mapping, if the result is not unique (in other words, a single UserID maps to multiple users in eDirectory), or the result is none, the SSO Controller will refuse the SSO header, and the single sign-on operation will fail.
-
Browse to the file you created earlier and upload it to the User Application.
This file can be the same one used for the SSO controller, or it can be generated separately for the SAP provider. To make your environment more secure, you should use a different certificate than the one used for the SSO controller.
-
Browse to the file you created earlier and upload it to the User Application.
This file can be the same one used for the SSO controller, or it can be generated separately for the SAP provider. To make your environment more secure, you should use a different key than the one used for the SSO controller.
-
Specify the path to the .
-
Specify the .
-
Click .
-
Select the checkbox next to SAP, and select .
-
Restart the Application Server.
Testing Single Sign-On with SAP
To perform single sign-on with SAP:
-
Login to the SAP portal as an SAP user.
NOTE:After logging in, you may see a message indicating that no portal roles have been assigned. This is because no portal permissions have been set up for this user. This is not a problem for single sign-on. As long as you see link under the warning, you are logged in.
-
Access your User Application.
To logout:
-
Logoff from the SAP portal.
-
Logoff from the User Application.
NOTE: If you don't logoff from the SAP portal, you won't be able to logout of the User Application. There is no mechanism to notify SAP that a user wants to logoff globally. Therefore, the ticket will keep you logged in.
Adding a Custom SSO Provider
This section provides instructions for creating a custom SSO Provider and configuring this provider to work with the Roles Based Provisioning Module. Topics include:
Implementing and Deploying a Custom SSO Provider
A custom SSO Provider can be implemented in various ways, but it must support the basic protocol outlined below.
Once the custom SSO Provider recognizes the login user identity, it must insert the following HTTP header into the HTTP request that is sent to the RBPM User Application:
<SSO Header Name>: BASE64<SSO UserID>:<TimeStamp>:BASE64(<Signature>)
The SSO Header Name must be named carefully to avoid conflicts with regular HTTP headers and other SSO providers.
The SSO UserID represents the login user’s identity. The SSO Controller will later map this identity to the user’s DN name. For details on user mapping, see Configuring the Custom SSO Provider in the SSO Configuration Page.
The Signature is a digital signature (SHA1WithRSA) of SSO UserID and TimeStamp in UTF-8 String representation.
Here is a code fragment that shows how you might generate the signature:
            // Signing
            Signature sig = Signature.getInstance("SHA1withRSA");
            sig.initSign(privatekey, SecureRandom.getInstance("SHA1PRNG"));
            sig.update(userId.getBytes("UTF-8"));
            String timestamp = Long.valueOf(System.currentTimeMillis()).toString();
            sig.update(timestamp.getBytes("UTF-8"));
            byte[] signature = sig.sign();
            // Build the content
            return new String(Base64.encodeBase64(userId.getBytes("UTF-8")), "UTF-8") +
                ":" + timestamp +
                ":" + new String(Base64.encodeBase64(signature), "UTF-8");
Configuring the Custom SSO Provider in the SSO Configuration Page
To configure a custom provider in the Single Sign On page within the User Application:
-
Select the button in the menu on the Single Sign On (SSO) page.
The dialog displays.
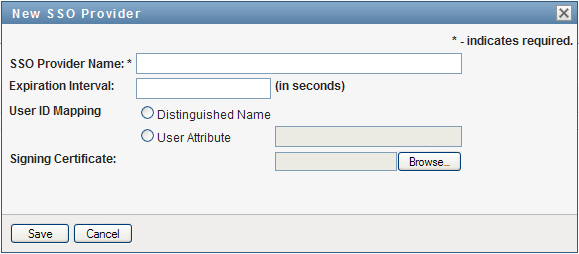
-
In the field, specify a name for the provider. This name must match the SSO Header Name, as described in Implementing and Deploying a Custom SSO Provider.
-
In the field, specify the number of seconds that the SSO Header will be kept alive before expiring. This value defines the lifecycle of the SSO Header from the time it is issued. The expiration interval is needed to prevent replay attacks. You need to consider the network latency between your SSO Provider and the SSO Controller, as well as clock synchronization between the two components, if they are deployed on different machines.
-
In the field, indicate whether the user ID will be associated with a user DN or with a user attribute, such as a CN. The maps the user ID in the original realm to the eDirectory realm. If is selected, the SSO UserID that appears in the SSO header has to be the full DN recognized by eDirectory. The SSO Controller will not try to do any user mapping. If is selected, the SSO Controller will try to map the user from UserID to a full user DN. For a particular mapping, if the result is not unique (in other words, a single UserID maps to multiple users in eDirectory), or the result is none, the SSO Controller will refuse the SSO header, and the single sign-on operation will fail.
-
Browse to the file you created earlier and upload it to the User Application.
The file you use must be match the certificate of the private key used for the Signature, as described in Implementing and Deploying a Custom SSO Provider.
-
Click .
-
Select the checkbox next to the new custom provider, and select .
-
Restart the Application Server.
5.1.7 Theme Administration
You can use the Themes page to control the look and feel of the Identity Manager user interface.
A theme is a set of visual characteristics that apply to the entire user interface (including the guest and login pages, the tab, the tab, and the tab). There’s always just one theme in effect for the user interface. The Themes page offers a choice of several themes, in case you want to switch to a different one.
The Themes page also enables you to:
-
Preview each theme choice to see how it looks
-
Customize any theme choice to reflect your own branding (such as a logo)
Previewing a Theme
Before choosing a theme, you can preview how it will change the look of the Identity Manager user interface.
-
Go to the Themes page:
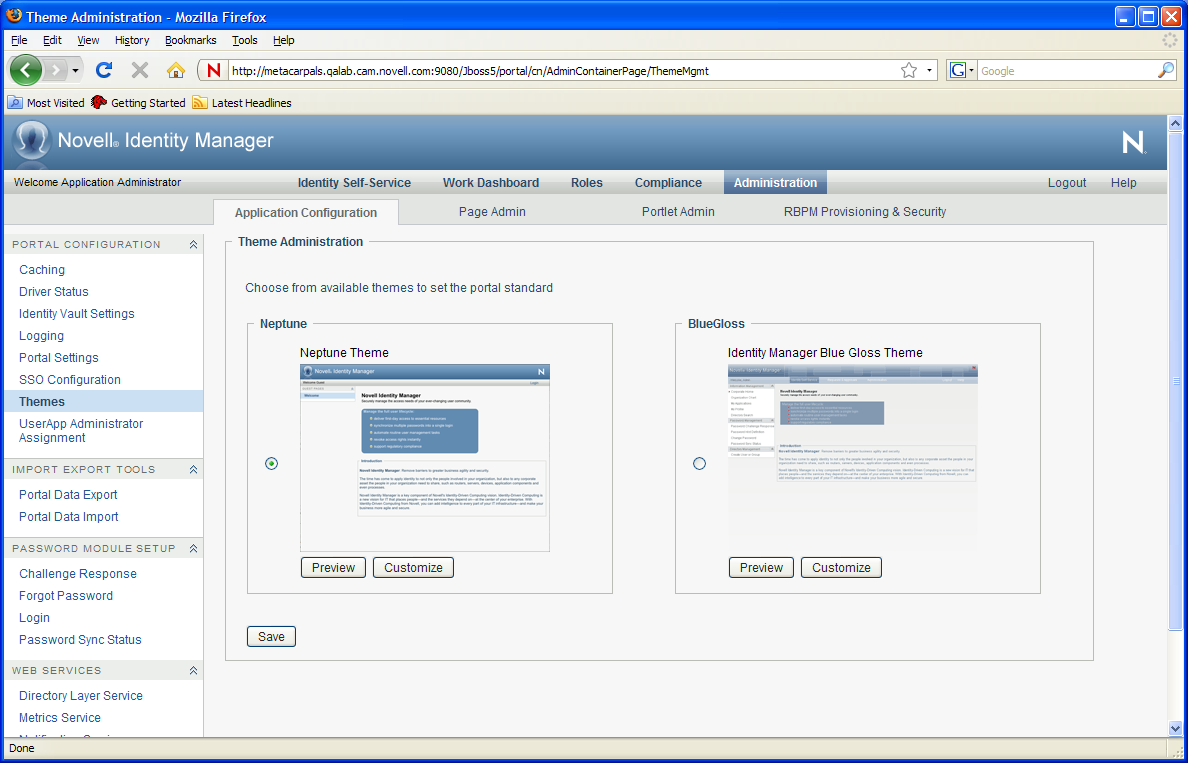
The following themes are supported in this release:
-
BlueGloss
-
Neptune (new theme introduced in this release)
Several of the themes introduced in earlier versions of the User Application have been deprecated in this release. The following themes have been deprecated:
-
Manilla
-
Linen
-
Medico
-
IDMStandard
These themes are no longer supported with the current release. You cannot select any of these themes on the page on the tab.
The Manilla, Linen, Medico, and IDMStandard themes will most likely be removed in a future release. If you use any of these themes, you should migrate them to this release of the User Application. If you use a custom theme that is based on one of the deprecated themes, you need to follow these steps to migrate the theme:
-
Look inside the theme.css for your custom theme and copy any custom selectors (new or edited) from this theme into either the BlueGloss or Neptune theme.
-
Save a new custom theme, which now includes your customizations as well as selectors from the BlueGloss or Neptune theme.
-
-
Find a theme that you are interested in, then click the corresponding button.
The preview for that theme displays in a new browser window:
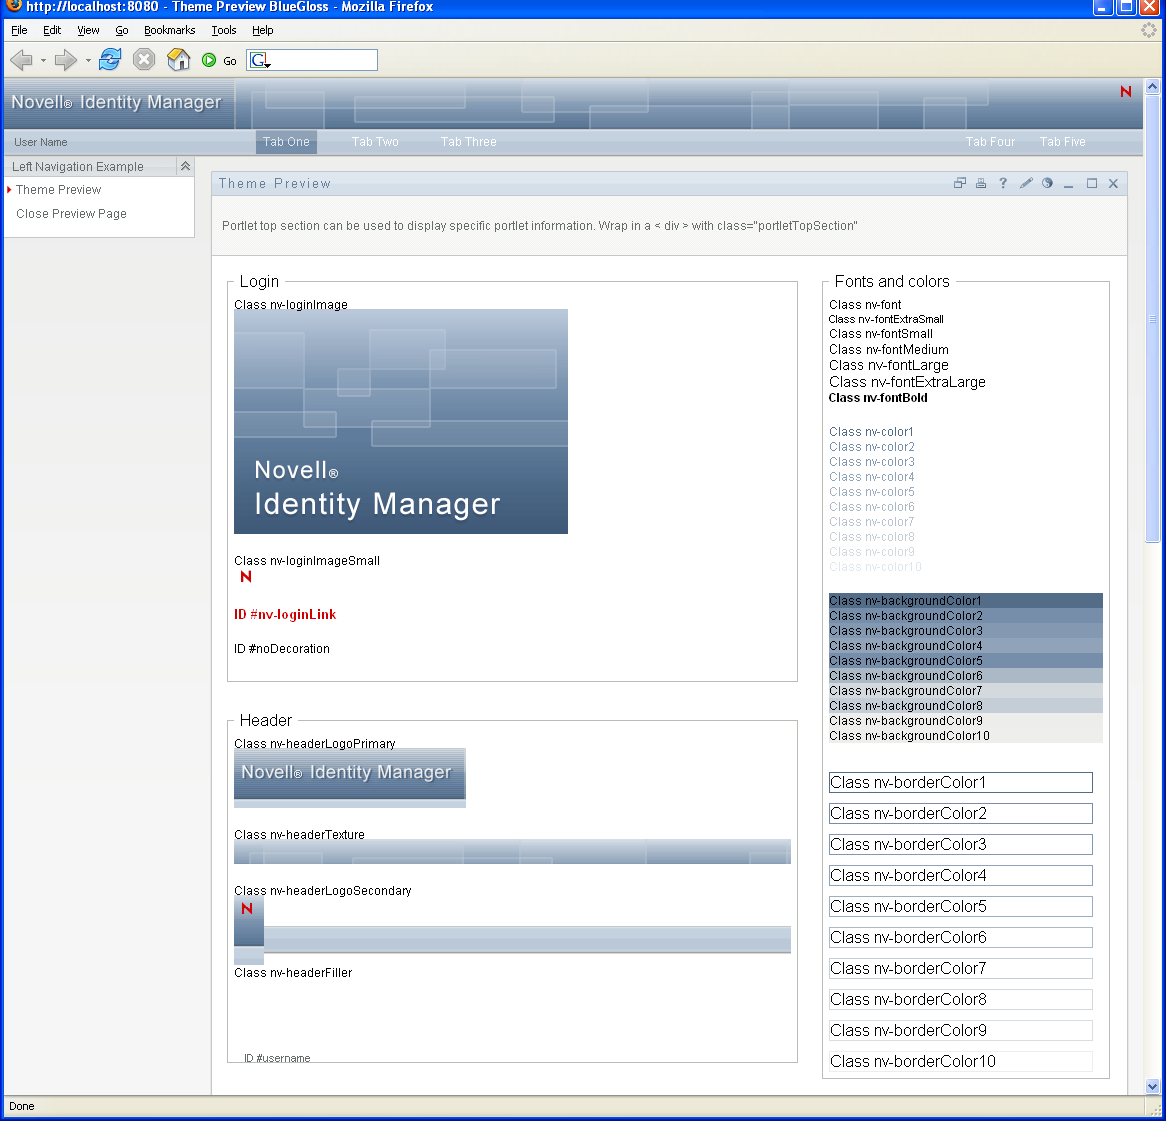
-
Scroll through the preview to see the characteristics of this theme.
-
When you’re done, click (in the top left corner) or close the preview window manually.
Choosing a Theme
When you find a theme that you like, you can choose to make it the current theme for the Identity Manager user interface.
-
Go to the Themes page.
-
Click the radio button for the theme you want.
-
Click the button.
The look of the user interface changes to reflect your chosen theme.
Customizing a Theme's Branding
You can tailor any theme by substituting your own images and changing some color settings. This enables you to give the Identity Manager user interface a custom look to meet the branding requirements of your company or organization.
-
Go to the Themes page.
-
Find a theme that you want to customize, then click the corresponding button.
The Themes page displays the Customize Branding settings for that theme:
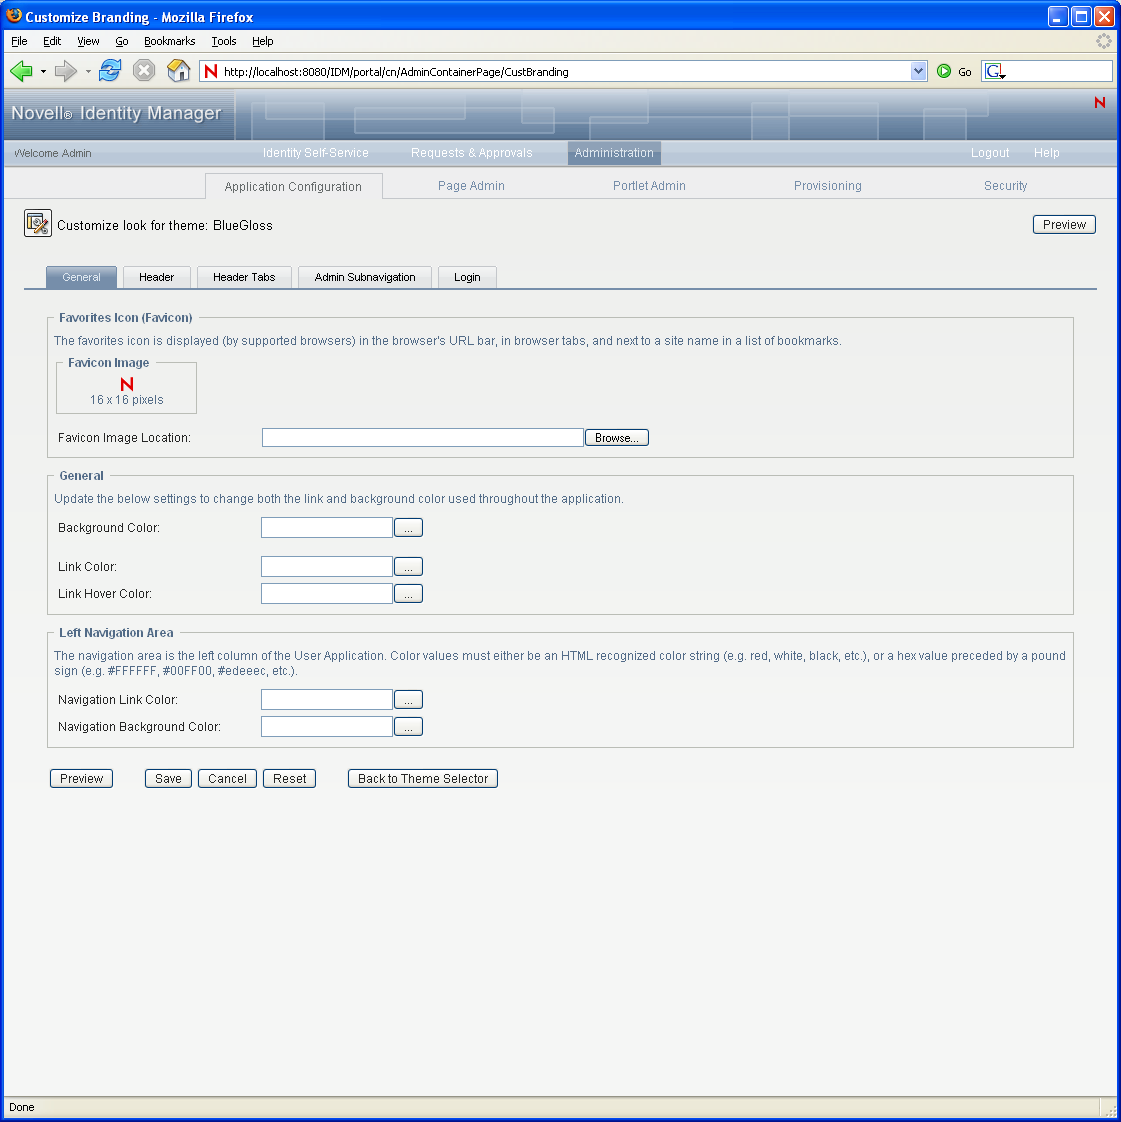
-
Specify your customizations by changing the settings in one or more tabs (as needed). Each contains the settings for different parts of the User Application interface. They include:
-
: Lets you specify general theming properties such as a favorites icon, background, link and hover color, and the left navigation area properties.
-
: Lets you specify the header color, texture, logo and username properties.
NOTE:The Left Background image needs to be the size indicated on the Header page (which defaults to 272 x 79 pixels) in order to display properly. The user interface does not attempt to resize the image automatically. For example, it will not stretch the image if it is too small.
-
: Lets you specify the properties for the header tabs.
-
: Lets you specify the properties for the tab.
-
: Lets you specify the properties for the login screen.
Follow the on-screen instructions for specifying each setting. The changes are not reflected in the User Application until you save them. If you have made unsaved changes, the button displays an asterisk * to indicate that the changes are pending a save.
-
-
Click .
If you’re editing the current theme, the look of the user interface changes to reflect your customizations. If you want to undo all of your customizations to the theme, click the Reset button.
-
When you’re done working on this theme, click .
Defining a Custom Theme
You can also create and deploy your own custom themes and deploy them in their own WAR file. When they are deployed, the custom themes are available through the Themes management page of the tab. Before attempting to create your own custom theme, make sure you have a working knowledge of the following technologies:
-
The structure of J2EE WAR files, how to modify the contents of a WAR file, and how to deploy one to your application server.
-
How to modify CSS and XML files
-
How to create the graphic elements for your theme
Creating a Custom Theme
To create a custom theme, begin with a copy of an existing theme (such as from the User Application WAR:
-
Back up the deployed User Application WAR file (IDMProv.WAR) to the directory in which you install, for example the /opt/novell/idm subdirectory.
-
In a test environment, extract the contents of the User Application WAR file.
The files that comprise the User Application’s themes are located in the resource\themes subdirectory. Each theme resides in its own directory with an appropriate name.
-
In the test environment, create a directory for the custom theme.
The directory name can be any valid directory name, but it should reflect the name of the theme, and it should not contain spaces.
-
Copy the contents of the BlueGloss theme from the extracted WAR file to the new subdirectory. You will be working with the following files:
File Name
Description
theme.xml
The theme descriptor file. It includes entries for display name and description. They are used in the page of the tab. The remaining entries correspond to the brandable selectors. The width and height attributes on these entries are used in the branding page to reference the exact dimensions needed when a user uploads a customized version of these images. These entries must match their respective images, width and height as found in the themes.css.
theme.css
Contains the CSS selectors used to style the look and feel of the user interface.
print.css
Contains the CSS selectors used to style a print friendly version of the user interface.
dojo.css
Contains a pointer to additional CSS files used by RBPM.
An images subdirectory
Contains the images used by the theme.
Rules for working with these files:
-
Do not change the names of the theme.xml, theme.css, print.css and dojo.css files.
-
The CSS Selector names must remain the same, but you can change the properties of the selectors to establish the look and feel.
-
The images subdirectory can have any name, but you must reference it correctly in the CSS and XML files.
-
-
Make your changes to the images, CSS style sheets and other theme elements as needed. The following changes are recommended:
-
In the theme.xml file:
-
display-name: Change this to a value that represents your theme. It displays as the Theme-name in the Themes page of the User Application’s tab.
-
description: Change this to a value that describes your theme. It displays as the Description in the Themes page of the User Application’s tab.
-
Consider whether to localize the and fields.
-
Remove the following:
<resource-bundle>com.novell.afw.portal.artifacts.theme.BlueGloss</resource-bundle>
<resource-group>admin-resgrp</resource-group>
-
In the dojo.css file, change the @import line to the following value:
@import url("../../../../IDMProv/javascript/dijit/themes/idmua/idmua.css");where IDMProv is the name of your WAR context.
-
If you wish to change the appearance of some Dojo elements, such as the menu buttons within the profile section on the Work Dashboard, you should take the following steps, instead of performing the steps above:
-
Copy the following from your extracted WAR in this location: /javascript/dijit/themes:
dijit.css
dijit_rtl.css
idmua (folder)
Paste these items into your new theme folder.
-
Change the @import line in the dojo.css file, as follows:
@import url("idmua/idmua.css");
-
-
-
In the graphics directory:
-
thumbnails.gif: Replace the copy with your own image. This image displays along with the Theme-name and Description of the theme (described above) that is shown in the Themes page of the tab. It typically illustrates what the User Application landing page looks like when the associated theme is applied
-
Renaming graphics files: If you change the names of graphics files (rather than just substituting a different image of the same name), make sure to change the reference to the image in both the theme.xml and the theme.css file. If the image is not used in the branding interface (for example, if it is not listed as one of the subset of brandable images in the theme.xml file), then you will only need to change the reference to the image in the theme.css file. Suppose you want to rename images/header_left.gif to images/my_company_name.gif. Edit the theme.css file to reflect the new image name.
-
-
-
After you make all of the desired changes to the theme files, add your customized theme directory to a new WAR file that contains one or more custom themes. Deploy the new WAR to your test application server. Testing tip: Open the Themes page (available under the tab). Your theme should display along with the prepackaged themes. Use the Theme Preview action to see how the customized changes to your new theme will render. This is a useful way to preview many of your intended changes to your theme. Running through commonly used features of the application is also a recommended testing step.
-
After your changes are fully tested, you can deploy the WAR containing the custom theme to your production application server.
Any number of custom themes can reside in a single WAR. Any number of custom WARs containing custom themes can be deployed.
To undeploy the theme, remove the WAR that contains the theme from the application server’s deploy directory. Before undeploying, make sure that any themes it contains are not defined as the User Application’s default theme. If you remove the WAR and it does contain the default theme, the Theme Administration screen displays an error message and reverts the User Application theme to the original default theme defined at installation time.
Customizing the Theme for External Password WAR
If you configured Password Management to use an , the theme for the Forgot Password page is defined in that external password WAR. The default name for the external password WAR is IDMPwdMgt.WAR. The IDMPwdMgt.WAR contains one theme; by default, it is . It does not include a user interface for modifying or branding this theme.
You can define a custom theme for the external Forgot Password page. The procedure for defining a custom theme is described in Defining a Custom Theme; however, the deployment procedure for the external Forgot Password page is different and the rules about the custom theme WAR are more restrictive. After you define the custom theme:
-
Package the theme in a WAR named IDMPwdMgtTheme.WAR.
-
The IDMPwdMgtTheme.WAR can contain a single theme, and the theme must be located in the resource/themes/Theme directory within the WAR.
-
Deploy the IDMPwdMgtTheme.WAR on the application server where the external WAR is located. Only one custom theme can be deployed at a time.
5.1.8 Assigning the User Application Administrator
The User Application Administrator performs administrative tasks for the Identity Manager User Application, using the panel of the Identity Manager User Application. The User Application Administrator does not have provisioning administration rights, and is considered an ordinary user while using the panel. There can be more than one User Application Administrator.
One user must be assigned to the User Application Administrator role at installation. The User Application Administrator created during installation can administer everything in the User Application including the Provisioning system and can designate other users as User Application Administrators.
You can assign the User Application Administrator at installation and on the Application Configuration page on the Administration tab of the Identity Manager User Application. When you assign the administrator at installation, IDM writes the assignment to the User Application configuration file, which is editable with the configupdate utility. But, at deployment of the WAR, the assignment is written to the User Application database. Thus, after you start the JBoss Application Server the first time after installation, you cannot change the assignment with the configupdate utility--it must be changed from the Application Configuration page.
A user who is to be a User Application Administrator should typically be located under the user root container specified in the User Application’s LDAP configuration. This enables the user to log in simply by username (instead of requiring the fully distinguished name each time).
The user who is a User Application Administrator does not need special directory rights because this role controls application-level access.
When assigning User Application Administrators, you can specify users, groups, or containers.
-
Go to the page:
-
Under , select .
-
Specify values for the following search settings:
Setting
What to Do
Search for
Select one of the following from the drop-down menu:
-
Users
-
Groups
-
Containers
Starts with
If you want to:
-
Find all available objects of your specified type (user), then make this setting blank.
-
Find a subset of those objects, then enter the starting characters of the CN values you want. (Case is not considered. Wildcards are not supported.)
-
-
Click .
The results of your search appear in the Results list.
-
Select the users, group, or container you want to assign as User Application Administrators, then click (>).
Hold down the Ctrl key to make multiple selections.
-
Click .
To unassign User Application Administrators:
-
In the Current Assignments list, select the users, group, or container you want to unassign as User Application Administrators, then click (<).
Hold down the Control key to make multiple selections.
-
Click .
You cannot delete yourself as User Application Administrator. This is a safeguard to ensure that the User Application always has at least one User Application Administrator.