3.2 Creating the Driver in iManager (old method)

Since the Blackboard driver supports Identity Manager versions earlier than 4.0, you may need to create your driver using the XML import file rather than the driver packages. You accomplish this by importing the driver’s basic configuration file and then modifying the configuration to suit your environment. After you’ve created and configured the driver, you need to start it.

3.2.1 Importing the Driver Configuration File

  1. In iManager, click to display the Identity Manager Administration page.

  2. In the Administration list, click Import Configuration to launch the Import Configuration wizard.

  3. Follow the wizard prompts, filling in the requested information (described below) until you reach the Summary page.

    Prompt

    Description

    Where do you want to place the new driver?

    You can add the driver to an existing driver set, or you can create a new driver set and add the driver to the new set. If you choose to create a new driver set, you are prompted to specify the name, context, and server for the driver set.

    Import a configuration into this driver set

    Use the default option, Import a configuration from the server (.XML file).

    In the Show field, select Identity Manager 4.0.1 configurations.

    In the Configurations field, select the Blackboard file.

    Driver name

    Specify a name that is unique within the driver set.

    Path to config file

    Specify the path to the bb-config.properties file on the Blackboard server where you installed the remote loader. You MUST include a trailing slash.

    Virtual Installation Host Name

    Enter the host name of the virtual installation you want the driver to update. If you are using the default installation then leave this field blank.

    Remote Host Name and Port

    Specify the host name or IP address of the server where the driver’s Remote Loader service is running.

    Driver Object Password

    Specify the driver object password that is defined in the Remote Loader service. The Remote Loader requires this password to authenticate to the Metadirectory server.

    Remote Object Password

    Specify the Remote Loader’s password (as defined on the Remote Loader service). The Metadirectory engine (or Remote Loader shim) requires this password to authenticate to the Remote Loader.

    Enable Entitlements

    Do you want the driver to use Approval Flow or Role-Based Entitlements with the Entitlements Service driver?

    Use scope filtering

    Do you want to choose a base container in the Identity Vault for synchronization? If you choose Yes you will be prompted on the next screen for the base container.

     • Base Container in eDirectory

    Specify the base container in the Identity Vault for User synchronization. This container is used in the Subscriber channel Event Transformation policies to limit the Identity Vault objects being synchronized. Example: users.myorg

     • Base Container in eDirectory

    Specify the base container in the Identity Vault for Group synchronization. This container is used in the Subscriber channel Event Transformation policies to limit the Identity Vault objects being synchronized. Example: groups.myorg

    Automatically set ID attribute

    Do you want the driver to automatically set the required ID attribute for new Person, Course, and Organization objects to the source name of the object if the ID attribute is not already set? The attributes are DirXML-BB-p-id for Person, DirXML-BB-c-id for Course, and DirXML-BB-o-id for Organization.

    Automatically set title attribute

    Do you want the driver to automatically set the required title attribute for new Course and Organization objects to the source name of the object if the title attribute is not already set? The attributes are DirXML-BB-c-course-title for Course and DirXML-BB-o-title for Organization.

    Automatically set role attribute

    Do you want the driver to automatically set the required user roles attributes for Person objects if it is not already set? If you choose Yes you will be prompted on the next screen for the default roles.

    Automatically set email address

    Do you want the driver to automatically set required attribute DirXML-BB-p-email if it is not set? If you choose Yes you will be prompted for the default email address on the next screen.

    Base Container in eDirectory

    Enter the subtree where group objects will be treated as Courses in Blackboard.

    Base Container in eDirectory

    Enter the subtree where group objects will be treated as Organizations in Blackboard.

    If you selected Yes for the Enable Entitlements option, this field option displays:

    The enrollment should be

    Choose the action the driver should take on the user’s enrollment (Disabled or Deleted) if a user loses the bbAccount Entitlement.

    If you selected Yes for the Use Scope Filtering option, these field options display:

    Base Container in eDirectory

    Specify the base container in the Identity Vault for User synchronization. This container is used in the Subscriber channel Event Transformation policies to limit the Identity Vault objects being synchronized. Example: users.myorg

    Base Container in eDirectory

    Specify the base container in the Identity Vault for Group synchronization. This container is used in the Subscriber channel Event Transformation policies to limit the Identity Vault objects being synchronized. Example: groups.myorg

    If you selected Yes for the Automatically set roles attributes option, these field options display:

    Default System Role for users

    What should be the default System Role for new users?

    Default Institution Role

    What should be the default Institutional Role for new users? Examples: STUDENT, STAFF, ALUMNI, GUEST, FACULTY, OBSERVER, or any custom defined roles

    When you finish providing the information required by the wizard, a Summary page similar to the following is displayed.
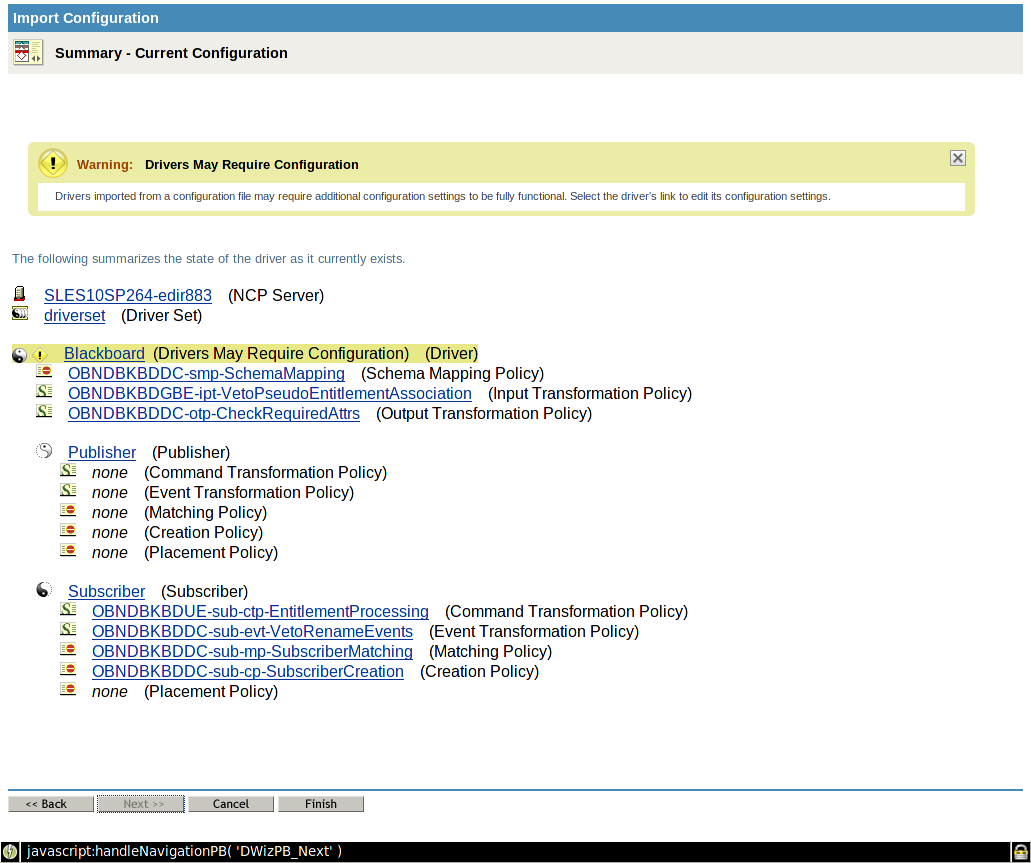
    At this point, the driver is created from the basic configuration file. To ensure that the driver works the way you want it to for your environment, you must review and modify the driver’s default configuration settings

  4. To modify the default configuration settings, click the linked driver name, then continue with the next section, Configuring the Driver.

    or

    To skip the configuration settings at this time, click Finish. When you are ready to configure the settings, continue with Configuring the Driver.

3.2.2 Configuring the Driver

After importing the driver configuration file, you need to configure the driver before it can run. You should complete the following tasks to configure the driver:

  • Configure the driver parameters: There are many settings that can help you customize and optimize the driver. The settings are divided into categories such as Driver Configuration, Engine Control Values, and Global Configuration Values (GCVs). Although it is important for you to understand all of the settings, your first priority should be to configure the driver parameters located on the Global Configuration Values page.

  • Configure the driver filter: Modify the driver filter to include the object classes and attributes you want synchronized between the Identity Vault and Blackboard.

  • Configure Policies: Modify the policies as needed. For information about the default configuration policies, see Section A.0, Policies.

  • Configure password synchronization: The basic driver configuration is set up to support password synchronization through Universal Password. If you don’t want this setup, see “Configuring Password Flow ” in the Identity Manager 4.0.1 Password Management Guide.

After completing the configuration tasks, continue with the next section, Starting the Driver.

3.2.3 Starting the Driver

When a driver is created, it is stopped by default. To make the driver work, you must start the driver and cause events to occur. Identity Manager is an event-driven system, so after the driver is started, it won’t do anything until an event occurs.

To start the driver:

  1. If you are using the Remote Loader with the driver, make sure the Remote Loader driver instance is running:

    • Windows: Open the Remote Loader console on the driver’s server, select the driver in thelist, then click Start.

    • Linux, AIX or Solaris: Ensure the configuration file was copied to /etc/opt/novell/dirxml/rdxml, then enter the following at the server command line:

        /etc/init.d/rdxml start
       
      
  2. In iManager, click to display the Identity Manager Administration page.

  3. Click Identity Manager Overview.

  4. Browse to and select the driver set object that contains the driver you want to start.

  5. Click the driver set name to access the Driver Set Overview page.

  6. Click the upper-right corner of the driver, then click Start driver.