2.4 Installation Tasks
2.4.1 Installing the Driver Files
-
If you have not already done so, install a Metadirectory server. For instructions, see the Identity Manager Installation Guide at Identity Manager 4.0.1 Documentation Page.
-
Install the Remote Loader on the Blackboard Application server. For instructions, the Identity Manager Installation Guide at Identity Manager 4.0.1 Documentation Page.
The Remote Loader installation includes jar files for the Blackboard driver.
-
Continue to the next section to complete installation of the files.
2.4.2 Installing the Java Class File on the Blackboard Server
The file Blackboard.jar contains Java classes used by the Publisher and Subscriber channels to convert XDS command documents into Blackboard API calls. RPM and PKG archives are provided for the appropriate operating systems to install Blackboard.jar into the correct location.
If you are running Linux,you can find the RPM and PKG archives in the Additional_Drivers/Blackboard directory in the Identity_Manager_4.0.1_Linux_Advanced.iso image. If you are running Windows, you can find the Blackboard.jar file in the Additional_Drivers/Blackboard directory in the Identity_Manager_4.0.1_Windows_Advanced.iso image.
Install the driver’s Java class file on the Blackboard server as follows, depending on your operating system:
-
If you are running Linux, enter: rpm -ivh novell-DXMLbb.rpm
-
If you are running Solaris, enter: pkgadd -n -d DXMLbb.pkg
-
If you are running Windows, copy Blackboard.jar to \novell\RemoteLoader\lib
2.4.3 Copying Blackboard Files to Remote Loader classpath
These files are needed to connect to the Blackboard Event API.
Linux
Copy: /usr/local/blackboard/apps/tomcat/lib/*
to: /opt/novell/eDirectory/lib/dirxml/classes
Solaris
-
Copy: /usr/local/blackboard/apps/tomcat/lib/*
to: /opt/novell/eDirectory/lib/dirxml/classes
-
Copy: /usr/local/blackboard/apps/tomcat/common/lib/xercesImpl.jar
to: /opt/novell/eDirectory/lib/sparcv9/nds-modules/jre/lib
(replace sparcv9 with correct version of sparc)
Windows
-
Copy: \blackboard\apps\tomcat\lib\*.*
to: \Novell\RemoteLoader\lib\
-
Copy: \blackboard\apps\tomcat\lib\xercesImpl.jar
to: \Novell\RemoteLoader\jre\lib\
2.4.4 Extending the Schema for Identity Manager
If you plan on using the Identity Vault to manage connected system attributes that are not already mapped to standard eDirectory™ attributes, you will need to extend the schema. Otherwise, it is not necessary.
Extending the schema adds auxiliary classes to eDirectory User and Group objects for Blackboard user and group attributes. It also extends the schema for an effective class called DirXML-BB-Enrollment that can be used to represent an enrollment in a Blackboard Course or Organization.
To extend the schema:
-
Obtain the blackboard.sch file for browser access, depending on the operating system you are running:
-
Linux or Solaris: Copy the blackboard.sch file from /opt/novell/eDirectory/lib/lib/nds-schema/ on the Blackboard application server where you installed the RPM or PKG archive (see ) to a location accessible to your web browser.
Windows: Copy the blackboard.sch file from from the Additional_Drivers/Blackboard directory in the Identity_Manager_4.0.1_Windows_Advanced.iso image to a location accessible to your web browser.
-
-
In iManager, select the task under .
-
Select , then click .
-
Select a file type of .
-
Type or browse for blackboard.sch as the file to import, then click .
-
Specify the host name or IP address and the LDAP port number of your Metadirectory server.
-
To connect to the non-secure LDAP port (389), you must have the option disabled on your LDAP Group. If necessary, you can edit this option using the task under in iManager. For details, see the Novell eDirectory Administration Guide.
-
Select and log in as Admin or another user with rights to extend the schema.
-
Click to go to the summary.
-
Click to extend the schema.
2.4.5 Configuring the Remote Loader
Linux and UNIX
For detailed instructions on configuring the Remote Loader for Linux and UNIX, see the relevant instructions in the Identity Manager 4.0.1 Remote Loader Guide at the Identity Manager 4.0.1 Documentation site.
Be sure to place the configuration file in /etc/opt/novell/dirxml/rdxml so the driver will start when the system is started. The following is an example configuration file that does not include settings for a secure connection:
-commandport 8000
-connection "port=8090 fromaddress=xxx.xxx.xxx.xxx"
-class com.Omnibond.nds.dirxml.driver.Blackboard.BlackboardDriverShim
-trace 0
-tracefile /tmp/bbtrace.log
If you are using SSL for a secure connection, see the relevant instructions in the Identity Manager 4.0.1 Remote Loader Guide at the Identity Manager 4.0.1 Documentation site.
The configuration file will need to include the keystore and storepass settings for SSL. Following is an example configuration that includes settings for a secure connection:
-commandport 8000
-connection "port=8090 fromaddress=xxx.xxx.xxx.xxx keystore='mystore'
    storepass='dirxml'"
-class com.Omnibond.nds.dirxml.driver.Blackboard.BlackboardDriverShim
-trace 0
-tracefile /tmp/bbtrace.log
Windows
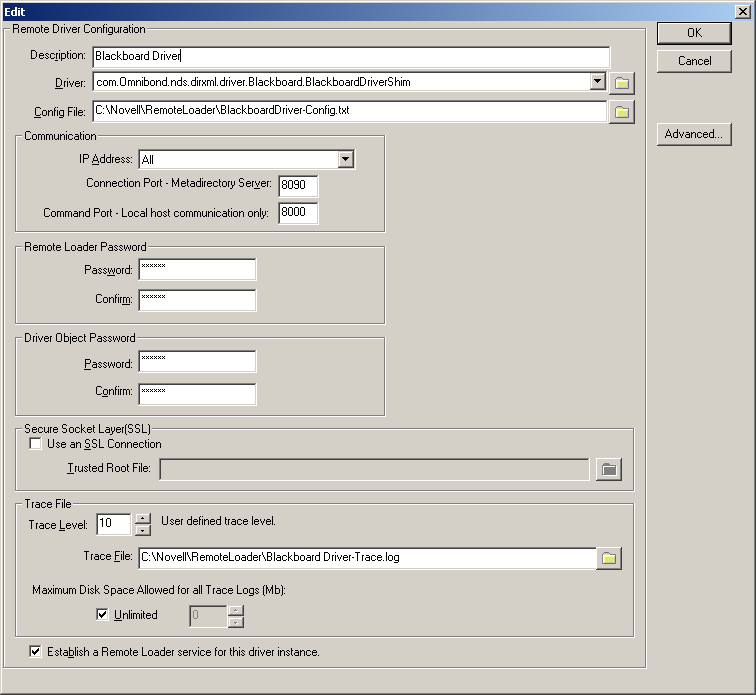
For detailed instructions on configuring the Remote Loader for Windows, see the relevant instructions in the Identity Manager 4.0.1 Remote Loader Guide at the Identity Manager 4.0.1 Documentation site
For the field, enter:
com.Omnibond.nds.dirxml.driver.Blackboard.BlackboardDriverShim
Figure 2-1 provides an example of the Remote Loader configuration dialog with this entry.
Figure 2-1 Remote Driver Configuration dialog for Windows.
2.4.6 Testing Connectivity to Blackboard
To test connectivity to Blackboard, run the appropriate test script for your platform located in Section C.0, Test Scripts.
2.4.7 Starting the Remote Loader Service
Start the Remote Loader Service as follows, depending on your operating system.
Linux and Solaris
-
Ensure the configuration file was copied to /etc/opt/novell/dirxml/rdxml/
-
Run the following command:
/etc/init.d/rdxml start
Windows
Use the Remote Loader Console application to start the driver.