3.5 Creating a Secure Connection
If you plan to use the Remote Loader, the first step is to provide secure data transfer between the Remote Loader and the Metadirectory engine. This requires you to use the Secure Socket Layer (SSL) to setup a connection between the Remote Loader and the Metadirectory engine.
To accomplish this, complete the following tasks:
3.5.1 Creating a Server Certificate
If you are unfamiliar with certificates, it is easy to create a new one.
-
In Novell iManager, click .
-
Select the server to own the certificate, and give the certificate a nickname (for example, remotecert).
IMPORTANT:We recommend that you don’t use spaces in the certificate nickname. For example, use remotecert instead of remote cert.
Also, make a note of the certificate nickname. This nickname is used for the KMO name in the driver’s remote connection parameters.

-
Leave the Creation method set to , then click .
-
Review the Summary, click , then click .
You have created a server certificate. Continue with Section 3.5.2, Exporting a Self-Signed Certificate.
3.5.2 Exporting a Self-Signed Certificate
You can export a newly created certificate. Or, if an SSL server certificate already exists and you have experience with SSL certificates, you can use the existing certificate instead of creating and using a new one.
When a server joins a tree, eDirectory creates the following default certificates:
-
SSL CertificateIP
-
SSL CertificateDNS
-
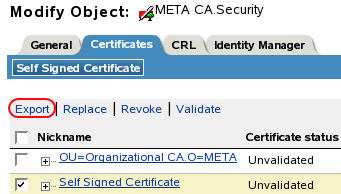
In iManager, click .
-
Browse to and select the Certificate Authority in the Security container, then click .
The Certificate Authority (CA) is named after the tree name (Treename-CA.Security).
-
Click the tab, select the , then click .

-
In the Export Certificate Wizard, deselect .

You don’t want to export the private key with the certificate.
-
Set the export format to , then click .

IMPORTANT:When the Remote Loader is running on a Windows 2003 R2 SP1 32-bit server, the certificate must be in Base64 format. If you use the DER format, the Remote Loader fails to connect to the Identity Manager engine.
-
Click the link to , specify a location in the local file system, then click .
-
Click .
3.5.3 Creating a Keystore
A keystore is a Java file that contains encryption keys and, optionally, certificates. If you want to use SSL between the Remote Loader and the Metadirectory engine, and you are using a Java shim, you need to create a keystore file.
Keystore on Windows
On Windows, run the Keytool utility, typically found in the c:\novell\remoteloader\jre\bin directory.
Keystore on Solaris, Linux, or AIX
On Solaris, Linux, or AIX environments, use the create_keystore file. Create_keystore is installed with rdxml. It is located in the install_directory/dirxml/bin directory. The create_keystore file is also included in the dirxml_jremote.tar.gz file, found in the \dirxml\java_remoteloader directory. The create_keystore file is a shell script that calls the Keytool utility.
On UNIX, when the self-signed certificate is used to create the keystore, the certificate can be exported in Base64 or binary DER format.
Enter the following at the command line:
create_keystore self-signed_certificate_name keystorename
For example, type one of the following
create_keystore tree-root.b64 mystore
create_keystore tree-root.der mystore
The create_keystore script specifies a hard-coded password of “dirxml” for the keystore password. This is not a security risk because only a public certificate and public key are stored in the keystore.
Keystore on All Platforms
To create a keystore on any platform, you can enter the following at the command line:
keytool -import -alias trustedroot -file self-signed_certificate_name -keystore filename -storepass keystorepass
The filename can be any name (for example, rdev_keystore).