6.7 Configuring the Runtime Environment for Data Collection

This section provides information about additional configuration steps you should perform to ensure that the runtime environment is operating correctly. It also provides troubleshooting techniques, as well as some information about database tables that are of particular interest.

This process includes the following activities:

If you have problems with one or more of the drivers that are difficult to understand, see “Troubleshooting the Drivers” in the NetIQ Identity Reporting Module Guide.

6.7.1 Configuring the Data Collection Services Driver to Collect Data from the Identity Applications

For the identity applications to function properly with Identity Reporting, you must configure the DCS driver to support the OAuth protocol.

NOTE:

  • You only need to install and configure the DCS driver if you use Identity Reporting in your environment.

  • If you have multiple DCS drivers configured in your environment, you must complete the following steps for each driver.

  1. Log in to Designer.

  2. Open your project in Designer.

  3. (Conditional) If you have not already upgraded your DCS driver to the supported patch version, complete the following steps:

    1. Download the latest DCS driver patch file.

    2. Extract the patch file to a location on your server.

    3. In a terminal, navigate to the location of the extracted patch RPM for your environment and run the following command:

      rpm -Uvh novell-DXMLdcs.rpm
    4. Restart the Identity Vault.

    5. In Designer, ensure that you have installed a supported version of the Data Collection Service Base package. If necessary, install the latest version before continuing. For more information about software requirements, see the Considerations for Installing Identity Reporting Components.

    6. Redeploy and restart the DCS driver in Designer.

  4. In the Outline view, right-click the DCS driver, then select Properties.

  5. Click Driver Configuration.

  6. Click the Driver Parameters tab.

  7. Click Show connection parameters, then select show.

  8. Click SSO Service Support, then select Yes.

  9. Specify the IP address and port for Identity Reporting.

  10. Specify a password for the SSO Service Client. The default password is driver.

  11. Click Apply, then click OK.

  12. In the Modeler view, right-click the DCS driver, then select Driver > Deploy.

  13. Click Deploy.

  14. If prompted to restart the DCS driver, click Yes.

  15. Click OK.

6.7.2 Migrating the Data Collection Service Driver

For the objects to synchronize into the Identity Information Warehouse, you must migrate the Data Collection Service driver.

  1. Log in to iManager.

  2. In the Overview panel for the Data Collection Service Driver, select Migrate From Identity Vault.

  3. Select the organizations that contain relevant data, and click Start.

    NOTE:Depending on the amount of data that you have, the migration process could take several minutes. Be sure to wait until the migration process is complete before you proceed.

  4. Wait for the migration process to complete.
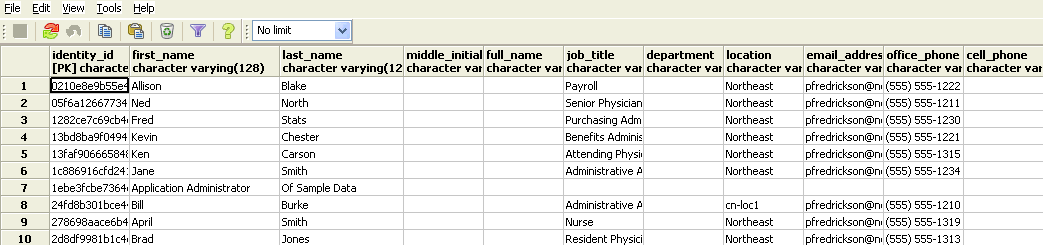
  5. In the idmrpt_identity and idmrpt_acct tables, which provide information about the identities and accounts in the Identity Vault, ensure they contain the following type of information:

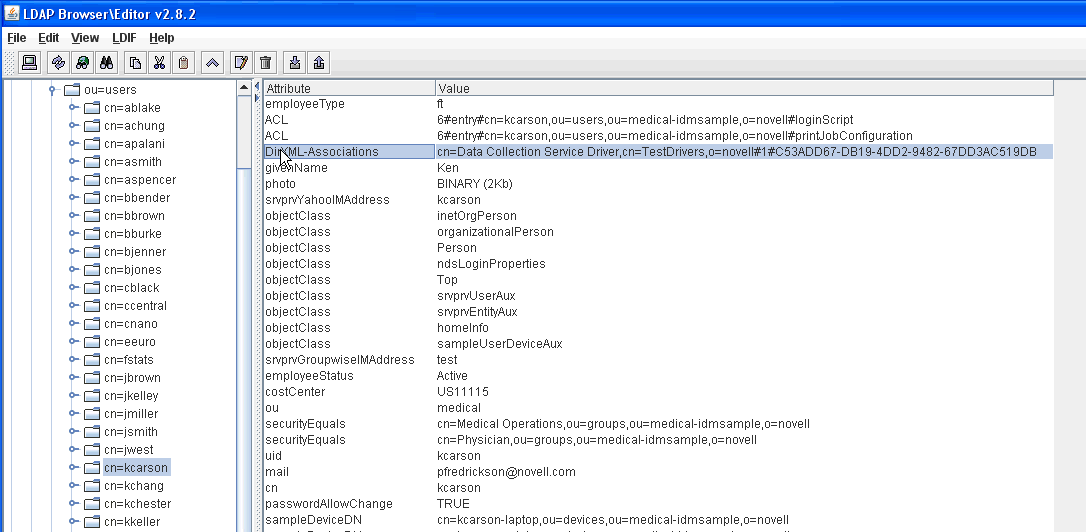
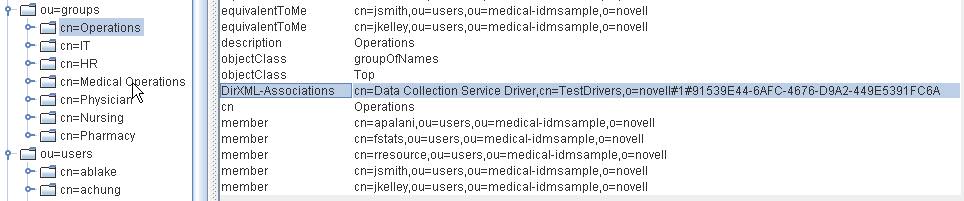
  6. In the LDAP browser, verify that the migration process adds the following references for DirXML-Associations:

    • For each user, verify the following type of information:

    • For each group, verify the following type of information:

  7. Ensure that the data in the idmrpt_group table appears similar to the following information:

    This table shows the name for each group, as well as flags indicating whether the group is dynamic or nested. It also shows whether the group has been migrated. The synchronization status (idmrpt_syn_state) could possibly be set to 0 if an object had been modified in the User Application but not yet migrated. For example, if a user were added to a group, and the driver had not been migrated yet, this value might be set to 0.

  8. (Optional) Verify the data in the following tables:

    • idmrpt_approver

    • idmrpt_association

    • idmrpt_category

    • idmrpt_container

    • idmrpt_idv_drivers

    • idmrpt_idv_prd

    • idmrpt_role

    • idmrpt_resource

    • idmrpt_sod

  9. (Optional) Verify that the idmrpt_ms_collect_state table, which shows information about the data collection state for the Managed System Gateway Driver, contains now rows.

    This table includes data about which REST endpoints for managed systems have been executed. At this point, the table has no rows because you have not started the collection process for this driver.

6.7.3 Adding Support for Custom Attributes and Objects

You can configure the Data Collection Service driver to gather and persist data for custom attributes and objects that are not part of the default data collection scheme. To do this, you need to modify the Data Collection Service driver filter. Modifying the filter does not trigger object synchronization immediately. Instead, the newly added attributes and objects are sent to the data collection services when add, modify, or delete events occur in the Identity Vault.

When you add support for custom attributes and objects, you need to modify the reports in order to include the extended attribute and object information. The following views provide current and historic data on the extended objects and attributes:

  • idm_rpt_cfg.idmrpt_ext_idv_item_v

  • idm_rpt_cfg.idmrpt_ext_item_attr_v

This process includes the following activities:

Configuring the Driver to Use Extended Objects

You can add any object or attribute to the Data Collection Service filter policy. When you add a new object or attribute, you need to make sure you map the GUID (with subscriber sync) and the Object Class (with subscriber notify), as shown in the following example:

<filter-class class-name="Device" publisher="ignore" publisher-create-homedir="true" publisher-track-template-member="false" subscriber="sync"> 
<filter-attr attr-name="CN" merge-authority="default" publisher="ignore" publisher-optimize-modify="true" subscriber="sync"/> 
<filter-attr attr-name="Description" merge-authority="default" publisher="ignore" publisher-optimize-modify="true" subscriber="sync"/> 
<filter-attr attr-name="GUID" merge-authority="default" publisher="ignore" publisher-optimize-modify="true" subscriber="sync"/> 
<filter-attr attr-name="Object Class" merge-authority="default" publisher="ignore" publisher-optimize-modify="true" subscriber="notify"/> 
<filter-attr attr-name="Owner" merge-authority="default" publisher="ignore" publisher-optimize-modify="true" subscriber="sync"/> 
<filter-attr attr-name="Serial Number" merge-authority="default" publisher="ignore" publisher-optimize-modify="true" subscriber="sync"/> 
<filter-attr attr-name="sampleDeviceModel" from-all-classes="true" merge-authority="default" publisher="ignore" publisher-optimize-modify="true" subscriber="sync"/> 
<filter-attr attr-name="sampleDeviceType" from-all-classes="true" merge-authority="default" publisher="ignore" publisher-optimize-modify="true" subscriber="sync"/> 
</filter-class> 

Including a Name and Description in the Database

If you want the object to have a name and description in the database, you need to add a schema mapping policy for _dcsName and _dcsDescription. The schema mapping policy maps the attribute values on the object instance to the columns idmrpt_ext_idv_item.item_name and idmrpt_ext_idv_item.item_desc, respectively. If you do not add a schema mapping policy, the attributes will be populated in the child table idmrpt_ext_item_attr.

For example:

<attr-name class-name="Device"> 
<nds-name>CN</nds-name> 
<app-name>_dcsName</app-name> 
</attr-name> 
<attr-name class-name="Device"> 
<nds-name>Description</nds-name> 
<app-name>_dcsDescription</app-name> 
</attr-name>

The following example of SQL allows you to show these object and attribute values in the database:

SELECT        
    item.item_dn, 
    item.item_name, 
    item.item_desc, 
    attr.attribute_name, 
    itemAttr.attribute_value, 
    item.idmrpt_deleted as item_deleted, 
    itemAttr.idmrpt_deleted as attr_deleted, 
    item.item_desc, 
    obj.object_class 
FROM 
    idm_rpt_data.idmrpt_ext_idv_item as item, idm_rpt_data.idmrpt_ext_item_attr itemAttr, idm_rpt_data.idmrpt_ext_attr as attr, idm_rpt_data.idmrpt_ext_obj as obj 
WHERE 
    item.object_id = obj.object_id and itemAttr.attribute_id = attr.attribute_id and itemAttr.cat_item_id = item.item_id 
ORDER BY 
    item.item_dn, item.item_name 

Adding Extended Attributes to Known Object Types

If an attribute is added to the filter policy on the Data Collection Service driver and not explicitly mapped to the reporting database in the XML reference file (IdmrptIdentity.xml), the value is populated and maintained in the idmrpt_ext_item_attr table, with an attribute reference in the idmrpt_ext_attr table.

The following example of SQL shows these extended attributes:

SELECT 
    acct.idv_acct_dn, 
    attrDef.attribute_name,   
    attribute_value, 
    attrVal.idmrpt_valid_from, 
    cat_item_attr_id, 
    attrVal.idmrpt_deleted, 
    attrVal.idmrpt_syn_state 
FROM 
    idm_rpt_data.idmrpt_ext_item_attr as attrVal, idm_rpt_data.idmrpt_ext_attr as attrDef, idm_rpt_data.idmrpt_identity as idd, idm_rpt_data.idmrpt_idv_acct as acct 
WHERE attrVal.attribute_id = attrDef.attribute_id and idd.identity_id = acct.identity_id and attrVal.cat_item_id = acct.identity_id and cat_item_type_id = 'IDENTITY' 

In addition to the User object, you can add extended attributes to the filter policy on the following objects and populate the database with these attributes:

  • nrfRole

  • nrfResource

  • Containers

    NOTE:The installed product provides support for organizationUnit, Organization, and Domain. The container types are maintained in the idmrpt_container_types table.

  • Group

  • nrfSod

You can see the association of the extended attributes to the parent table or object by looking at the idmrpt_cat_item_types.idmrpt_table_name column. This column describes how to join the idm_rpt_data.idmrpt_ext_item_attr.cat_item_id column to the primary key of the parent table.

6.7.4 Adding Support for Multiple Driver Sets

The Data Collection Service Scoping package (NOVLDCSSCPNG) provides static and dynamic scoping capabilities for enterprise environments with multiple driversets and multiple pairs of Data Collection Service Drivers and Managed System Gateway Drivers.

During or after installation, you need to determine the role for the Data Collection Service Driver that the package is being installed on. You need to select one of the following roles:

  • Primary The driver synchronizes everything except subtrees of other driver sets. A primary Data Collection Service Driver may well service a whole Identity Vault or it may work in conjunction with one or multiple secondary drivers.

  • Secondary The driver synchronizes only its own driver set, but nothing else. A secondary Data Collection Service Driver usually requires a primary driver to run in a different driverset or no data outside the local driver set is sent to the Data Collection Service.

  • Custom Allows the administrator to define custom scoping rules. The only implicit scope is the local driver set, everything else is considered out-of-scope, unless it is explicitly added to the list of custom scopes. A custom scope is the distinguished name in slash format of a container in the Identity Vault whose subordinates or subtree should be synchronized.

The scoping package is only required in some configuration scenarios, as described below:

  • Single server with a single driver set Identity Vault: For this scenario, you do not need scoping, and, therefore, you do not need to install the scoping package.

  • Multiple servers with a single driver set Identity Vault: For this scenario, you need to follow these guidelines:

    • Make sure the Identity Manager server holds replicas of all partitions from which data should be collected.

    • For this scenario, no scoping is required, so do not install the scoping package

  • Multiple servers with a multiple driver set Identity Vault: In this scenario, there are two basic configurations:

    • All servers hold a replica of all partitions from which data should be collected.

      For this configuration, you need to follow these guidelines:

      • Scoping is required to avoid the same change being processed by multiple DCS drivers.

      • You need to install the scoping package on all DCS drivers.

      • You need to select one DCS driver to be the Primary driver.

      • You need to configure all other DCS drivers to be Secondary drivers.

    • All servers do not hold a replica of all partitions from which data should be collected.

      Within this configuration, there are two possible situations:

      • All partitions from which data should be collected are being held by only one Identity Manager server

        In this case, you need to follow these guidelines:

        • Scoping is required to avoid the same change being processed by multiple DCS drivers.

        • You need to install the scoping package on all DCS drivers.

        • You need to configure all DCS drivers to be Primary drivers.

      • All partitions from which data should be collected are not being held by only one Identity Manager server (some partitions are held by more than one Identity Manager server).

        In this case, you need to follow these guidelines:

        • Scoping is required to avoid the same change being processed by multiple DCS drivers.

        • You need to install the scoping package on all DCS drivers.

        • You need to configure all DCS drivers to be Custom drivers.

          You need to define custom scoping rules for each driver and be sure not to create any overlapping scopes.

6.7.5 Configuring the Drivers to Run in Remote Mode with SSL

When running in remote mode, you can configure the Data Collection Service and Managed System Gateway drivers to use SSL. This section provides steps for configuring the drivers to run in remote mode with SSL.

To configure SSL using a Keystore for the Managed System Gateway Driver:

  1. Create a server certificate in iManager.

    1. In the Roles and Tasks view, click NetIQ Certificate Server > Create Server Certificate.

    2. Browse to and select the server object where the Managed System Gateway Driver is installed.

    3. Specify a certificate nickname.

    4. Select Standard as the creation method, then click Next.

    5. Click Finish, then click Close.

  2. Export the server certificate using iManager.

    1. In the Roles and Tasks view, click NetIQ Certificate Access > Server Certificates.

    2. Select the certificate created in Step 1 and click Export.

    3. In the Certificates menu, select the name of your certificate.

    4. Ensure that Export private key is checked.

    5. Enter a password and click Next.

    6. Click Save the exported certificate, and save the exported pfx certificate.

  3. Import the pfx certificate exported in Step 2 into the java key-store.

    1. Use the keytool available with Java. You must use JDK 6 or later.

    2. Enter the following command at a command prompt:

      keytool -importkeystore -srckeystore pfx certificate -srcstoretype
      PKCS12 -destkeystore Keystore Name

      For example:

      keytool -importkeystore -srckeystore cert.pfx -srcstoretype PKCS12
      -destkeystore msgw.jks
    3. Enter the password when prompted to do so.

  4. Modify the Managed System Gateway Driver configuration to use the keystore using iManager.

    1. From Identity Manager Overview, click the driverset containing the Managed System Gateway Driver.

    2. Click on the driver state icon and select Edit properties > Driver configuration.

    3. Set Show Connection Parameters to true and set the Driver configuration mode to remote.

    4. Enter the complete path of the keystore file and the password.

    5. Save and restart the driver.

  5. Modify the Data Collection Service Driver configuration to use the keystore using iManager.

    1. From Identity Manager Overview, click the driverset containing the Managed System Gateway Driver.

    2. Click on the driver state icon and select Edit properties > Driver configuration.

    3. Under the Managed System Gateway Registration header, set Managed System Gateway Driver Configuration Mode to remote.

    4. Enter the complete path of the keystore, password and the alias enter in Step 1.c.

    5. Save and restart the driver.